Заглавная страница Избранные статьи Случайная статья Познавательные статьи Новые добавления Обратная связь FAQ Написать работу КАТЕГОРИИ: ТОП 10 на сайте Приготовление дезинфицирующих растворов различной концентрацииТехника нижней прямой подачи мяча. Франко-прусская война (причины и последствия) Организация работы процедурного кабинета Смысловое и механическое запоминание, их место и роль в усвоении знаний Коммуникативные барьеры и пути их преодоления Обработка изделий медицинского назначения многократного применения Образцы текста публицистического стиля Четыре типа изменения баланса Задачи с ответами для Всероссийской олимпиады по праву 
Мы поможем в написании ваших работ! ЗНАЕТЕ ЛИ ВЫ?
Влияние общества на человека
Приготовление дезинфицирующих растворов различной концентрации Практические работы по географии для 6 класса Организация работы процедурного кабинета Изменения в неживой природе осенью Уборка процедурного кабинета Сольфеджио. Все правила по сольфеджио Балочные системы. Определение реакций опор и моментов защемления |
Rear Wheel / Rear SuspensionСодержание книги
Поиск на нашем сайте
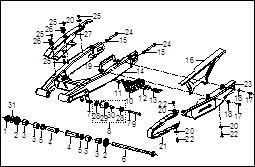
Real Shock Absorber / Real Rocker Arm
1. Self-locking nutM14*1.5 2. Dust ring units 3. Multi-roll bearing HK2020 4. Real rocking arm axle sleeve 5. Oil seal 6. Real rocking arm installment axle 7. Chain tension axle sleeve 8. Chain tension wheel units 9. Bolt M6*50 10. Chain guide plate 11. Self-locking nut M6 12. Guide plate lining 13. Bolt M6*45 14. Rear rocking arm weld assembly 15. NutM8 16. Chain upper shield 17. Inner hexagon screw M5*15 18. Gasket 5 19. Bracing sheet weld assembly 20. Spacer bush 2 21. Chain fence 22. Group bolt M6*12 23. Rear rocking arm left decorative plate 24. Bolt M8*60 25 Bolt M6*1*14 26. Liquid brake cable clamp 27. Rear rocking arm right decorative plate 28. Chain tensioner axle 29. Chain tension wheel 30. Chain tension wheel lining 31.Gasket ¦Х16*¦Х32*2
1. Rear axle 2. Rear wheel plate pinch 3. front wheel oil seal assembly 4. Rolling bearing 6003-2RS 5. Chain erection bolt M8*22 6. Rear wheel central axle sleeve units 7. Self-locking nutM16*1.5 8. Chain wheel 9. Chain 428HG-1*132 10. Rear brake disc 11. Vacuum tyre 130/80-17 12. Cycle valve 13. Rear wheel left axle sleeve 14. Rear wheel ring 15. Liquid brake plate erection bolt IV Rear Wheel/Rear Suspension Preparatory data----------------------------------- 4.1 Fault diagnosis-------------------------------------4.2 Rear wheel------------------------------------------4.3 Rear shock absorber/rear swing arm----------- 4.4 Chain drive assembly-----------------------------4.5
4.1 Preparatory Data Precautions on operation Do not contaminate braking shoe ad brake disc with oil. Basic preparatory data
Tightening torque Rear shat locknut 100 - 113 NЎ¤m Rear shock absorber top nut 37 - 44 NЎ¤m Rear shock absorber bottom nut 37 - 44 NЎ¤m 4.2 Fault Diagnosis 4.2.1 Shimmy Rear Wheel l Distorted wheel rim l Worn rear bearing l Troubled tyre l Worn or injured swing arm pivot bush l Improper adjustment of drive chain adjuster l Unbalance of tyre and wheel l Tyre pressure is too low l Bent frame or swing arm 4.2.2 Inflexible Wheel Rotation l Flexible rear liquid brake plate l Worn rear bearing l Too tight drive chain 4.2.3 Soft suspension l Insecure damping spring with shock l Incorrect front suspending regulator l Oil leakage of shock absorber l Tyre pressure is too low 4.2.4 Hard suspension l Damage of assembly axle on shock absorber l Bending shock absorber pipe l Damage of rear rocking arm pivot bearing l Bending rear rocking arm pivot bearing l Incorrect suspending regulator l Tyre pressure is too high 4.2.5 Operation with one side only or not taking straight line l Bending rear axle l Arrangement of axle of both sides/incompetent chain regulator Rear wheel
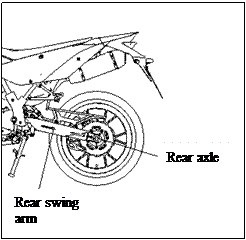
Loosen rear axle nut Disassemble rear axle nut and take down chain from chain wheel seat Disassemble rear axle Disassemble rear wheel
4.3.2 Inspection
Put axle on V-style seat and measure its eccentricity ratio with dial indicator Use limits: change over 0.2mm
Rotate the wheel by hands and measure its eccentricity with a dial gauge. Service limit: Longitudinal: Replace it when the measured value exceeds 2.0mm. Transversal: Replace it when the measured value exceeds 2.0mm. When rear wheel shimmy exceeds service limit, rear wheel bearing is loosened, which results in wobbly rear wheel. Check and replace rear wheel bearing.
4.3.3 Installation Install the rear wheel in the reverse order of removal and tighten the nut. Rear wheel shaft locknut Tightening torque: 100-113NЎ¤m
4.4.1 Disassemble rear shock absorber Disassemble body guard board Disassemble rear splash guard Disassemble tool box Disassemble air filter Disassemble rear wheel shock absorber fixed bolt Take down rear shock absorber
4.4.2 Rear Shock Absorber Inspection Visual inspection of shock absorber to check whether there is damage
Check the following items: ЎЄbending or damage of shock absorber pipe ЎЄout of shape or oil leakage of shock absorber ЎЄabrasive wear or damage of block rubber ЎЄdamage of spring
Check damage or abrasive wear of other parts Replace shock absorber if necessary
4.4.3 Install Rear Shock Absorber Install the rear shock absorber in the reverse order of removal. Install upper locknut and lower mounting bolt on the rear shock absorber Tighten them to specified torque.
Torsion force: Upper hold-down nut: 37-44NЎ¤m Bottom hold-down nut: 37-44NЎ¤m
4.5.1 Remove Rear Swing Arm Disassemble chain guard board Disassemble chain tension wheel and rear axle Disassemble rear wheel and rear shock absorber Disassemble rear swing arm installment axle Take down rear swing arm weld assembly
Check rear swing arm installation shaft. Rotate the shaft on a flat surface or measure it with a dial gauge. If it is bent, replace it. * Attention
Wash in solvent the components for rear swing arm installation shaft. Check sleeve assembly and intermediate sleeve of rear swing arm. If they are damaged, replace them.
4.6 Drive Chain 4.6.1Ј® Disassembly Lay motorcycle on the flat ground and fasten Disassemble shift lever swing arm, left rear cover and drive chain Disassemble rear wheelЎўchain shield and drive chain
Wash drive chain and put it into kerosene. Brush dust and then take it out from kerosene and dry it out.
Check drive chain. Wash, lubricate and replace it if it is hard.
Check drive chain and driven chain wheel. Replace chain wheel when 1/4 gear teeth are worn. Replace it when gear teeth is bending.
Check wheel axle. Replace when there is bearing gap in hub or unbalance of rotation. Check oil seal and replace when there is abrasive wear or damage.
|
||||||||||||||||||||||||
|
Последнее изменение этой страницы: 2016-04-08; просмотров: 459; Нарушение авторского права страницы; Мы поможем в написании вашей работы! infopedia.su Все материалы представленные на сайте исключительно с целью ознакомления читателями и не преследуют коммерческих целей или нарушение авторских прав. Обратная связь - 3.133.141.201 (0.006 с.) |


 4.3.1 Disassembly
 4.3.2.1 Check the bending of axle
 4.3.2.2 Wheel Shimmy Inspection
 4.4 Rear Shock Absorber
 4.5 Rear Swing Arm
 4.5.2 Rear Swing Arm Inspection
 4.5.2Ј® Inspection
 Check rattleer1and side panel2. replace drive chain when damaged or abrased.
 Lubricate drive chain. Buy it from store


