Заглавная страница Избранные статьи Случайная статья Познавательные статьи Новые добавления Обратная связь КАТЕГОРИИ: ТОП 10 на сайте Приготовление дезинфицирующих растворов различной концентрацииТехника нижней прямой подачи мяча. Франко-прусская война (причины и последствия) Организация работы процедурного кабинета Смысловое и механическое запоминание, их место и роль в усвоении знаний Коммуникативные барьеры и пути их преодоления Обработка изделий медицинского назначения многократного применения Образцы текста публицистического стиля Четыре типа изменения баланса Задачи с ответами для Всероссийской олимпиады по праву 
Мы поможем в написании ваших работ! ЗНАЕТЕ ЛИ ВЫ?
Влияние общества на человека
Приготовление дезинфицирующих растворов различной концентрации Практические работы по географии для 6 класса Организация работы процедурного кабинета Изменения в неживой природе осенью Уборка процедурного кабинета Сольфеджио. Все правила по сольфеджио Балочные системы. Определение реакций опор и моментов защемления |
Periodic Maintenance Schedule
Expected Inspection
Please go to your local Qianjiang Motorcycle dealer periodically for inspection and adjustment to keep your vehicle in best conditions. In above table, monthly 1000km travel is employed as reference. IЎЄ Inspect AЎЄAdjust RЎЄReplace CЎЄClean LЎЄLubricate
Note: 1. Ў°*Ў± for items involved in exhaust gas, which meets regulations of national environmental protection. Normal maintenance shall be performed according to specifications on the userЎЇs manual; unauthorized repair and adjustment are forbidden. We will not be responsible for the results. 2. You shall clean more frequently the air cleaner to extend its service life when your motorcycle is used on sand-gravel roads or in severely polluted environment.
Engine Oil/Filter Engine oil level *Attention
Check engine oil level When the engine oil level sensor alarms, refill engine oil to its upper limit. Engine oil replacement * Attention
Shut down engine.
Screw off the drain plug at the bottom of crankcase to drain engine oil. When the engine oil is completely drained, put back cleaned drain plug and sealing ring. Refill engine oil to specified level. Engine oil volume: 1.0-1.2L Check if there is engine oil leakage. Start the engine and run the engine on idle for a few minutes.
Gasoline filter Check of degradation and damage of fuel pipe. If there is any degradation, damage or fuel leakage, new products should replace the old ones.
Check/Adjustment of accelerator stay wire Check the smoothness of accelerator stay wire. Check the play of accelerator stay wire. Free stroke: 2-6mm Side of the restrictor is the main parts which should be adjusted. Loosen the hold-down nut and rotate to adjust nuts.
Air filter Change of air filter Disassemble seat cushion
Disassemble backplate of the right fuel tank Disassemble right knee board. Disassemble backplate of the left fuel tank
Disassemble gusset plate of right and left fuel tank backplate
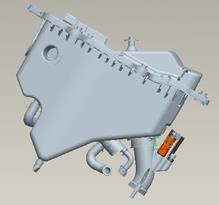
Disassemble bolts; take down air filter. Disassemble filter sponge from air filter.
Check whether the filter sponge is polluted or damaged. If there is pollution or damage, please replace a new one. If there is pollution, please replace and wash.
a) Wash it in the clean washing oil. b) Make it fully dry. c) Soak it in the clean gear oil until soaking well. d) Squeeze out the extra oil in sponge.
If driving under dusty condition or in rainy days frequently, replace the air cleaner earlier. *Attention
Pull out head of spark plug.
Check the burning, pollution and carbon deposit of spark plug.
Clearance inspection of spark plug Gap: 0.7-0.8mm Spark plug type: CR8E (NGK) *Attention
Storage battery
Open seat cushion Disassemble gusset plate of right and left fuel tank backplate. Disassemble air filter cover Disassemble negative wire first and then the positive one. Take out storage battery. Warning!
Install the battery in reverse order of removal. Warning!
Open seat cushion Open roof cover of air filter; disassemble joint wire of storage battery. Measure the battery voltage using a voltmeter. Fully charged: 13.1V Undercharge: 12.3V * Attention
Charging Connection method: Positive pole of battery charger is connected to battery positive lead wire; Warning!
* Attention
|
||||||||||||||||||||||||||||||||||||||||||||||||||||||||||||||||||||||||||||||||||||||||||||||||||||||||||||||||||||||||||||||||||||||||||||||||||||||||||||||||||||||||||||||||||||||||||||||||||||||||||||||||||||||||||||||||||||||||||||||||||||
|
|
Последнее изменение этой страницы: 2016-04-08; просмотров: 330; Нарушение авторского права страницы; Мы поможем в написании вашей работы! infopedia.su Все материалы представленные на сайте исключительно с целью ознакомления читателями и не преследуют коммерческих целей или нарушение авторских прав. Обратная связь - 18.226.251.68 (0.025 с.) |
 3. More frequent servicing may be required when the motorcycle is often driven at high speed or travels a long distance.
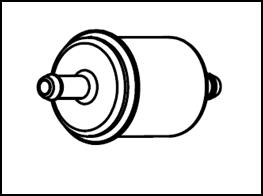 Check engine oil level again.
 Warning!
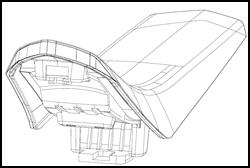

 Disassemble left knee board.
 Disassemble air filter cover; fix bolts; take down the cover.
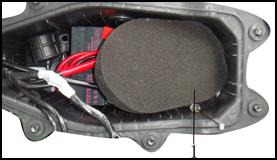
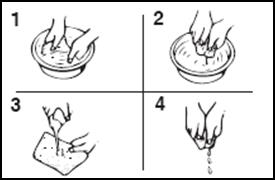 How to wash the filter sponge:
 Replacing Time
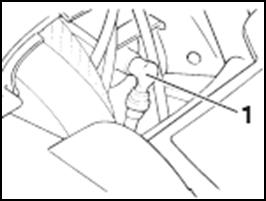 Spark plug
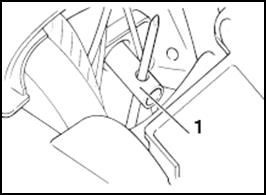 Disassemble spark plug with spark plug sleeve.
 If the conditions above happen, please clear with spark plug scavenger or steel brush.
 Disassembly of storage battery
 Check of the charging state (closed circuit voltage)