Заглавная страница Избранные статьи Случайная статья Познавательные статьи Новые добавления Обратная связь FAQ Написать работу КАТЕГОРИИ: ТОП 10 на сайте Приготовление дезинфицирующих растворов различной концентрацииТехника нижней прямой подачи мяча. Франко-прусская война (причины и последствия) Организация работы процедурного кабинета Смысловое и механическое запоминание, их место и роль в усвоении знаний Коммуникативные барьеры и пути их преодоления Обработка изделий медицинского назначения многократного применения Образцы текста публицистического стиля Четыре типа изменения баланса Задачи с ответами для Всероссийской олимпиады по праву 
Мы поможем в написании ваших работ! ЗНАЕТЕ ЛИ ВЫ?
Влияние общества на человека
Приготовление дезинфицирующих растворов различной концентрации Практические работы по географии для 6 класса Организация работы процедурного кабинета Изменения в неживой природе осенью Уборка процедурного кабинета Сольфеджио. Все правила по сольфеджио Балочные системы. Определение реакций опор и моментов защемления |
Drive Chain Slackness AdjustmentСодержание книги
Поиск на нашем сайте
Adjustment with Not fulfill quality requirements Screw off rear axle nut1 Adjust the slackness of drive chain. The adjustment steps are as follows: Screw off erection nut2; screw in or back adjusting device3 until fulfilling quality requirements Screw in; slackness increases Screw back; slackness reduces Attention
At last, screw down locking nut
Do the verse steps as disassembly Install drive, hull, rear shock absorber(left), rear wheel and drive chain sleeve Adjust slackness of drive chain and free travel of brake footstep. If the slackness is too small, engine and other important parts will overload. Make sure the slackness in the scope of limit value. Charging system
V Storage Battery/Charging System Preparatory data---------------5.1 Fault diagnoses-----------------5.2 Battery-------------------------5.3 Charging system---------------5.4 Voltage/current adjuster-----5.5 Alternator charge coil---------5.6 Alternator light coil----------5.7 Disassembly of alternator----5.8 5.1 Preparatory Data Precautions on operation * Attentions 1. The battery can be charged and discharged, and used repeatedly. If a battery is laid aside after discharging, its service life will be shortened and its performance is degraded. Performance of a battery is usually reduced after about 2-3 yearsЎЇ run. Voltage of the performance-reduced (capacity drops) battery can be resumed, but the voltage will run down quickly while loading. 2. Overcharging of battery: Usually overcharging is demonstrated by the battery itself. If short circuit occurs inside the battery, there will be no voltage or very low voltage on the terminals of the battery. Adjuster fails: it indicates too high voltage on the battery, the life-span of the battery will be shortened. 3. When the battery is not be used for a long period, it will self-discharge and its capacitance will drop. The battery should be recharged every three months. 4. Charging system inspection: please perform inspection in the sequence listed in the fault diagnosis table. 5. If there is current going through the electric part, please do not remove the connector, or the voltage will be very high and electronic components inside the voltage adjuster will be damaged. Set ignition switch at Ў°OffЎ± position and then begin your operation. 6. It is not necessary to inspect maintenance-free (dry-charged type) battery. You donЎЇt need to add electrolyte and distilled water for it. 7. Inspect the entire electric load. 8. Quick charging is forbidden except in emergency. 9. During quick recharging, the battery must be removed from the motorcycle and recharged. 10. While battery is exchanged, please do not use liquid-feeding battery. 11. A voltmeter shall be employed to check recharged battery. Preparatory Standard
Tightening torque Tools Rectifier bolt 5.0 NЎ¤mUniversal non-adjustable spanner High-voltage coil pinch bolt 9.0 NЎ¤m Flywheel remover Testing device Multimeter 5.2 Fault Diagnosis No power unstable power Battery over discharged Lead wire of battery is poorly contacted.
Lead wire of battery is not connected. Discharging system is of poor contact. Fuse is broken. Lighting system is of poor contact or short circuit. Power switch is poorly contacted. Low voltage Poor charging system Battery is poorly recharged. Wire connector is of poor contact, short circuit or short line. Poor contact. Defective voltage and current adjuster Poor charging system Magneto does not work well. Bad voltage and current adjuster
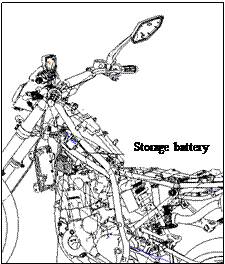
Storage Battery
Open seat cushion Disassemble left guard board Disassemble negative guide line first and then the positive guide line Take out storage battery
Warning!
Install the battery in the reverse order of removal.
*Attention
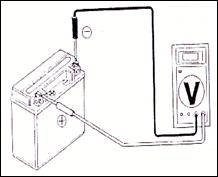
Check of charging situation (open-circuit voltage) Open sear cushion Open air filterЎЇs cover and disassemble storage battery joint guide line
Measure voltage between terminals of the battery Fully charged: 13.1V
|
|||||||||||||||||||||||||||||||||
|
|
Последнее изменение этой страницы: 2016-04-08; просмотров: 411; Нарушение авторского права страницы; Мы поможем в написании вашей работы! infopedia.su Все материалы представленные на сайте исключительно с целью ознакомления читателями и не преследуют коммерческих целей или нарушение авторских прав. Обратная связь - 18.226.187.232 (0.008 с.) |

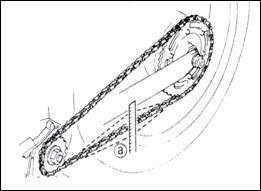 Stand vertically the motorcycle on the flat ground and check drive chain slackness a. Drive chain slackness: 10-20mm
 4.5.4 Installment

 5.3.1 Battery Removal