Заглавная страница Избранные статьи Случайная статья Познавательные статьи Новые добавления Обратная связь КАТЕГОРИИ: ТОП 10 на сайте Приготовление дезинфицирующих растворов различной концентрацииТехника нижней прямой подачи мяча. Франко-прусская война (причины и последствия) Организация работы процедурного кабинета Смысловое и механическое запоминание, их место и роль в усвоении знаний Коммуникативные барьеры и пути их преодоления Обработка изделий медицинского назначения многократного применения Образцы текста публицистического стиля Четыре типа изменения баланса Задачи с ответами для Всероссийской олимпиады по праву 
Мы поможем в написании ваших работ! ЗНАЕТЕ ЛИ ВЫ?
Влияние общества на человека
Приготовление дезинфицирующих растворов различной концентрации Практические работы по географии для 6 класса Организация работы процедурного кабинета Изменения в неживой природе осенью Уборка процедурного кабинета Сольфеджио. Все правила по сольфеджио Балочные системы. Определение реакций опор и моментов защемления |
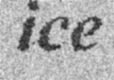
Exercise 2. Preparation of the ice text. The 2nd method.
1. 1. Launch the Adobe Photoshop app. 2. 2. Create a new picture using the New command (<Ctrl>+ < N>) file►. Set the following parameters:
3. 3.Layer ► New Layer... Use the command (<Shift>+ < Ctrl>+<N>) and create a new layer. Its Fill 4. text
5. 5. Moving
6. 6.merge layers using the following commands: ► Merge layer with the lower One (<Ctrl>+<E>).
9. 9. Filter ► Blur ► Gaussian Blur...
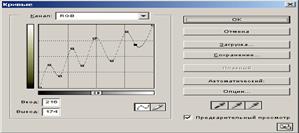
10. Image ► Adjustments ► Curves... (<Ctrl>+<M>)
11. Connect the layers: ► layer to the bottom One (<Ctrl>+<E>). 12. Image ► Adjustments ► Invert (<Ctrl>+ < I>) 13. 13. Image ► Rotate the Canvas ► 90° counterclockwise flip the image. 14. 14. Filter ► Stylize ► Wind... use the command.
15. 15. Image ► Rotate Canvas ► 90° counterclockwise
17. Program_files/ Photoshop/ Goodies/ Brushes / Assorted Brushes.install the handle by running the abr command.
Working of t ext effects Goal: to learn how to write text in different styles of Adobe Photoshop. Necessary tools and materials: PC, Adobe Photoshop. Content and order of work I. repetition of theoretical data; II. independent performance of exercises and analysis of results; III. delivery of laboratory work.
3. Тext
4. Use the move device to drag the record up.
| ||||||||||||||||||||||||||||||||||||||||||||||||||||||||||||||||||||||||||||||||||||||||||||||
5. Connect the layers: ► layer to the bottom One (<Ctrl>+<E>). 5. Image ► Rotate Canvas ► 90° counterclockwise
5. 5.Wind: Filter ► Stylize ► Wind... run the command 5 times.
6. Image ► Rotate Canvas ► 90o clockwise
8. Image ► Adjustments ► Invert (<Ctrl>+<I>).
9. Selection ► All (<Ctrl>+<A>) select the image and copy it to the clipboard. 10. Editing ► Copy (<Ctrl>+<C>). 11. press the < Delete> key from the keyboard. 12. go to the channel palette and create a new channel
13. switching to a new channel set the text in the buffer. 14. Editing ► Paste (<Ctrl>+<V>). 15. go to the RGB channel and return to the floors (<Ctrl>+<V>). 16. press the key combination <Ctrl>+<Alt>+<4>.
17. apply the selected area in red.
Exercise 2. To write the text, "Marsh inscription."
|
|||||||||||||||||||||||||||||||||||||||||||||||||||||||||||||||||||||||||||||||||||||||||||||||
|
|
Последнее изменение этой страницы: 2021-04-12; просмотров: 52; Нарушение авторского права страницы; Мы поможем в написании вашей работы! infopedia.su Все материалы представленные на сайте исключительно с целью ознакомления читателями и не преследуют коммерческих целей или нарушение авторских прав. Обратная связь - 18.189.188.36 (0.014 с.) |
||||||||||||||||||||||||||||||||||||||||||||||||||||||||||||||||||||||||||||||||||||||||||||||

 with the tools.
 record an ice record using the tool and set the parameter as follows:

 use the device to drag the record up.


 .
.