Заглавная страница Избранные статьи Случайная статья Познавательные статьи Новые добавления Обратная связь КАТЕГОРИИ: ТОП 10 на сайте Приготовление дезинфицирующих растворов различной концентрацииТехника нижней прямой подачи мяча. Франко-прусская война (причины и последствия) Организация работы процедурного кабинета Смысловое и механическое запоминание, их место и роль в усвоении знаний Коммуникативные барьеры и пути их преодоления Обработка изделий медицинского назначения многократного применения Образцы текста публицистического стиля Четыре типа изменения баланса Задачи с ответами для Всероссийской олимпиады по праву 
Мы поможем в написании ваших работ! ЗНАЕТЕ ЛИ ВЫ?
Влияние общества на человека
Приготовление дезинфицирующих растворов различной концентрации Практические работы по географии для 6 класса Организация работы процедурного кабинета Изменения в неживой природе осенью Уборка процедурного кабинета Сольфеджио. Все правила по сольфеджио Балочные системы. Определение реакций опор и моментов защемления |
Exercise 2. Insert an edge (frame) on the image. Method 2.
Open the Adobe Photoshop app. 2. Globe.open the tif image.
3. create a new channel from the channel palette. 4. use the elliptical selection tool to create an ellipse or circle on the new channel. 5. Selection ► Invert selection follow the command. 6. Paint the resulting area white.
9. PGB- go to channel.
10. insert the selected channel to the image by pressing the <Ctrl>button.
11. color the selected area in the desired color.
12. to remove the selection. Exercise 3. Insert a frame on the image. Method 3. Open the Adobe Photoshop app. 2. cat. open the tif image.
3. Create a new channel from the channel palette. 4. use the rectangular selection tool to insert a rectangular shape into the new channel. 5. Selection ► Invert selection follow the command. 6. paint the resulting area white.
7. delete the selection. 8. Twirl: filter ► Distort ► run the Twirl command and use the filter per channel.
9. Color Halftone Pattern: Фильтр ► Pixelate ► Color Halftone
10. PGB- go to channel.
11. insert the selected channel to the image by pressing the <Ctrl>button.
12. color the selected area in any color.
13. to remove the selection.
Laboratory work № 10-12 D rawing the image colors on the water. W orking with the three-dimensional transformation method. V arious methods for creating textures. U sing various effects to the image.
Goal: to learn how to use filters in Adobe Photoshop. Necessary tools and materials: PC, Adobe Photoshop. Content and order of work I. repetition of theoretical data; II. independent performance of exercises and analysis of results; III. delivery of laboratory work. Exercise 1. | ||||||||||||||||||||
1. Adobe Photoshop run the program.
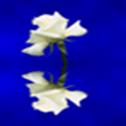
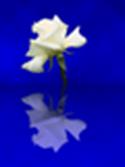
2. flower from the package of my documents.open the tif image.
4. put a flower from the clipboard.
5. align the bottom surface of the drawing. 6. front surface color light blue __ color, and the background color is dark blue __ to set the color.
7. go to the background surface. Use the following filter on the background: ► Render ► Clouds Filter.
1. copy each other's pages. 2. set the image size as follows:
Image ► canvas Size.
3. select the lower part of the image using the amazing wand (sensitivity = 0). 4. similar to the gradient type below 5. Now use the gradient.
6. The allocation ► run the command to Invert the selection. Copy the specified part. 8. Set the image vertically: image ► Rotate the canvas ► Flip vertically.
9. put a picture.
10. set the image up.
11. set the image vertically: image ► Rotate the canvas ► Flip vertically. Set the copied page down. 12. set the brightness of this page to 50%.
13. select the lower part of the image. 14. set the following filter ► Distort ► Ocean Ripple.
15. delete the selection. 16. merge pages.
|
|||||||||||||||||||||
|
|
Последнее изменение этой страницы: 2021-04-12; просмотров: 39; Нарушение авторского права страницы; Мы поможем в написании вашей работы! infopedia.su Все материалы представленные на сайте исключительно с целью ознакомления читателями и не преследуют коммерческих целей или нарушение авторских прав. Обратная связь - 3.21.43.192 (0.01 с.) |


 selected color.