Заглавная страница Избранные статьи Случайная статья Познавательные статьи Новые добавления Обратная связь FAQ Написать работу КАТЕГОРИИ: ТОП 10 на сайте Приготовление дезинфицирующих растворов различной концентрацииТехника нижней прямой подачи мяча. Франко-прусская война (причины и последствия) Организация работы процедурного кабинета Смысловое и механическое запоминание, их место и роль в усвоении знаний Коммуникативные барьеры и пути их преодоления Обработка изделий медицинского назначения многократного применения Образцы текста публицистического стиля Четыре типа изменения баланса Задачи с ответами для Всероссийской олимпиады по праву 
Мы поможем в написании ваших работ! ЗНАЕТЕ ЛИ ВЫ?
Влияние общества на человека
Приготовление дезинфицирующих растворов различной концентрации Практические работы по географии для 6 класса Организация работы процедурного кабинета Изменения в неживой природе осенью Уборка процедурного кабинета Сольфеджио. Все правила по сольфеджио Балочные системы. Определение реакций опор и моментов защемления |
U sing various effects to the imageСодержание книги
Поиск на нашем сайте
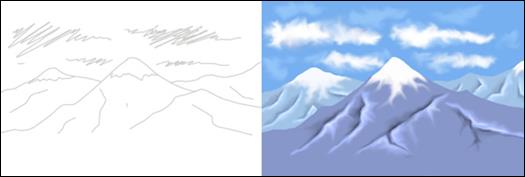
Goal: learn how to apply various effects to an image in Adobe Photoshop. Necessary tools and materials: PC, Adobe Photoshop. Content and order of work I. repetition of theoretical data; II. independent performance of exercises and analysis of results; III. delivery of laboratory work. Drawing with tools In this lesson, you will learn how to draw and color drawings using Adobe Photoshop. For example, a mountain drawing.
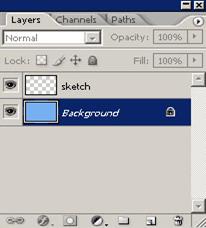
Create a new layer and call it "sketch". This is what we need to draw the outline of the drawing. Brush
Magnetic lasso look at the picture.
| |||||||||||||||||||
| Laboratory work № 13-15 G etting to know the Corel Draw editor. User interface. S implest approaches to objects. Working with text. Formatting plain text. W orking with multiple objects. C reating a layout. Working with layers. Goal: getting to know the interface of the Corel Draw program. Necessary tools and materials: PC, Corel Draw program. Content and order of work I. repetition of theoretical data; II. independent performance of exercises and analysis of results; III. delivery of laboratory work. The Corel Draw working window is not very different from other image editors. Launch the Corel Draw app. Vector graphics are familiar with the main elements of the working window of the Corel Draw editor. In accordance with the Windows standard, a menu bar is placed under the title bar. Below it is the standard toolbar, followed by the property bar. To the left of the window is the toolbar (tollbox), to the right-the color palette (Color palette), at the bottom-the status bar (can be located up). | ||||||||||||||||||||


Figure 1. CorelDraw working window It remains a good mood and adjustment of the way You can configure the status bar on the screen in one of the following ways: 1. with the mouse; 2. Click with the right mouse button on the status bar. Using the user command > Status Bar > Position > Top (Bottom). To change the width of the status bar, run the appropriate command Customize > Status Bar > Size > One line (Two lines). One line is one road wide, and two lines wide. 3.in the Options dialog box, on the Workspase > custom settings > Command Bar page, in the Status Bar Property Settings group, select the desired type. To delete the status bar, do one of the following (to display the status bar): 1.setting or removing the flag next to the Status Bar track in the work area context menu. 2.in the Options dialog box, remove the corresponding flag on the Workspase > custom settings > Command Bars page. To display/delete status bar items, select the Status Bar from the list at the top of the Workspase > custom settings > Commands page. To add a new field to the status bar, we will delete it from the interview window to the status bar. Field from the status bar Information specified in the status bar: 1. Mouse Position the current mouse coordinates. 2. Info line-a comment about transformations that can be performed by the User in accordance with the actions performed by the user. 3. Object Detales – full information about the selected object. 4. Object Information – General information about the selected object. 5. Time – current time. 6. Date – current date and date of the week. 7. Outline – the type, color, and thickness of the object's outline. 8. Fill – type of filling. 9. disabling or enabling the CAPS, NUM, and SCROOL indicators. 10. Memory Allocated – the amount of additional memory used. 11. Swap Remaining - CorelDraw – the amount of memory that remains necessary.
|
||||||||||||||||||||
|
|
Последнее изменение этой страницы: 2021-04-12; просмотров: 79; Нарушение авторского права страницы; Мы поможем в написании вашей работы! infopedia.su Все материалы представленные на сайте исключительно с целью ознакомления читателями и не преследуют коммерческих целей или нарушение авторских прав. Обратная связь - 216.73.216.38 (0.008 с.) |

 take the tool, 3 pixels and light gray color.


 we can use it to highlight the flag as shown in the image.