Заглавная страница Избранные статьи Случайная статья Познавательные статьи Новые добавления Обратная связь КАТЕГОРИИ: ТОП 10 на сайте Приготовление дезинфицирующих растворов различной концентрацииТехника нижней прямой подачи мяча. Франко-прусская война (причины и последствия) Организация работы процедурного кабинета Смысловое и механическое запоминание, их место и роль в усвоении знаний Коммуникативные барьеры и пути их преодоления Обработка изделий медицинского назначения многократного применения Образцы текста публицистического стиля Четыре типа изменения баланса Задачи с ответами для Всероссийской олимпиады по праву 
Мы поможем в написании ваших работ! ЗНАЕТЕ ЛИ ВЫ?
Влияние общества на человека
Приготовление дезинфицирующих растворов различной концентрации Практические работы по географии для 6 класса Организация работы процедурного кабинета Изменения в неживой природе осенью Уборка процедурного кабинета Сольфеджио. Все правила по сольфеджио Балочные системы. Определение реакций опор и моментов защемления |
SnapStatus – the name of the current form of communication.
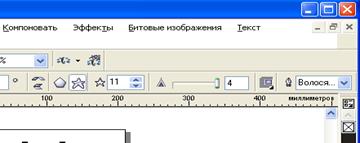
Rulers Measuring range-precisely position the elements of the picture and measure their size. To display and delete a ruler, run the View > Rules command or the View > Rules command from the work area context menu.According to the agreed agreement, the origin is located in the lower-left corner of the CorelDraw window. To change the position of the coordinate head, click on the button located at the intersection of the lines and move it to the desired location without releasing the left mouse button. To change the position of the lines, you must insert the rulers in a new location, including the Shift key. The tacit measurement is made in inches. To change the unit of measurement, press the Esc key and select the desired unit of measurement in the Drawing Units list on the properties panel. CorelDraw – menu setting of the rear sight The menu is configured in the Options dialog box. Options to display the interview window, do one of the following::: * Tools > Options; * Ctrl + I click a key combination; * Click the Options button on the Property Bar. Docker Windows. Docker Windows are designed to dynamically change object parameters when working. Unlike dialog boxes, Docker Windows are not modeled, i.e. they allow the user to perform any actions while in the open position. To display the Docker window on the screen, you must do one of the following:. 1. Window > Docker; 2. using the assigned corresponding key;a frequently used Docker window is released with a menu command. Docker Windows are located in the last place on the screen. Frequently used Windows: Transformation, Scrapbook Control question: Types of loading the CorelDraw graphics editor. CorelDraw window. 3. configuring the CorelDraw menu. Task: 1. draw shapes in the drawing. 2. Change the internal color and contour thickness of each shape, color. 3.
| |||||
Very complex drawings in CORELDRAW are formed from a few simple objects. Therefore, in order to edit the image in the future, you need to create various vector objects.
Draw a simple shape
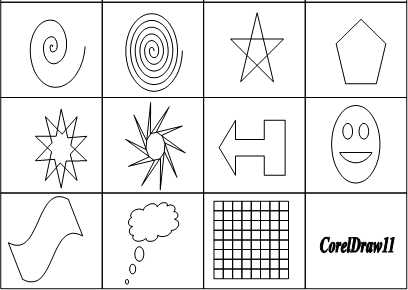
Simple geometric objects created in CORELDRAW include rectangular and elliptical lines, polygonal and spiral lines, and straight and curved lines. Some complex objects consist of many simple objects. Therefore, you need to be able to build it. Let's start drawing your experience with a rectangle. From the Toolbox toolbar (Graphics) located on the left side of the program window  Select the "Rectangle Tool". In this case, the button type changes and switches to the specified position, which means that you are in the rectangle construction mode. As long as you select a different tool, it will be in the same position as the button. Place the mouse pointer anywhere in the work area. This switches the arrow to the cross type. Click the left mouse button and drag it without releasing it. A rectangle will appear on the screen, and its size changes with the mouse movement. After getting the desired size, click the mouse button and you will see an image of a right triangle on the screen. (3.1.-figure). Select the "Rectangle Tool". In this case, the button type changes and switches to the specified position, which means that you are in the rectangle construction mode. As long as you select a different tool, it will be in the same position as the button. Place the mouse pointer anywhere in the work area. This switches the arrow to the cross type. Click the left mouse button and drag it without releasing it. A rectangle will appear on the screen, and its size changes with the mouse movement. After getting the desired size, click the mouse button and you will see an image of a right triangle on the screen. (3.1.-figure).
 Next to the built object, we see black rectangles and the x sign in the center, and contour rectangles on the vertices. All these are management elements designed for editing an object. We discuss their application in the following sections. This is how the ellipse is constructed.
Task:
1.1. from the Toolbox toolbar (Graphics)
Next to the built object, we see black rectangles and the x sign in the center, and contour rectangles on the vertices. All these are management elements designed for editing an object. We discuss their application in the following sections. This is how the ellipse is constructed.
Task:
1.1. from the Toolbox toolbar (Graphics)  «Select the Ellipse Tool and insert the ellipse.
1.2. press and hold the Ctrl key, select the rectangle and ellipse command, and insert the square and circle.
1.3. draw a rectangle associated with the center point. To do this, drag the mouse pointer to the center of the object under construction. Press the Shift button and insert the rectangle without releasing it. Make sure that the center of the object matches the original position of the pointer.
1.4. This is how you can draw all simple shapes using the Ctrl and Shift keys.
Draw polygons
To draw polygons with different numbers of walls, follow these steps:
1.select the polygon Tool. Pointer near besbris
crestco will be there.
2.Select the starting point and drag it to the right and down. The number of polygon walls according to the agreed number is 5. there is a similarity in the construction of ellipses and polygons. You can also draw a polygon from a corner or center (press and hold the Shift key). If you hold CTRL during construction, the correct polygon will be placed. The Pentagon that we will build is surrounded by a manipulator, like any object, and there are 10 nodes in each of the corners at once and in the center of each of the walls. The vertex of a Pentagon (vertex) (like any polygon with odd numeral walls) goes up when it is placed from top to bottom.
3.you can change the number of polygon walls. The corresponding input line in the properties panel is marked with an asterisk. The number of walls of a polygon
The number of walls of a polygon
The number of walls can vary from 3 to 500. This feature can be transfer at an agreed consent for all new facilities, as well as other properties of the polygon.
A polygon can be convex (the outer corners are convex) (each of the corners is less than 180) or a star. The length of star-shaped polygons (beams) is not passed to the properties panel. It can only be changed in interactive mode. Click on any of the nodes and send it to the center or center depending on the required number of stars. If you rotate a polygon node, it turns into a complex shape whose eyes intersect repeatedly. For example, insert a 12-wall polygon, drag a node on its wall inside the object, about a third of the way to the center, and then drag this node along the circle. When the node rotates, it changes the appearance of the star, and its rays form colorful joints.
Using the polygon Tool, you can draw not only a star-shaped polygon, but also the star itself. Its rays are connected between segments that pass through the inner zone of the object. Select a five-pointed star, then click on the star button (a small blue star is built in it).The object turned into an icon. Now note that the button contains a polygon. The rebellion dates back to the original restoration of the figure.
Note: if the radiation of a star is greater than seven, you can change the length of the star by using the slider in the properties panel (a triangle is built next to it). The more right the slider is, the sharper the star's rays will be.
Task:
1. from the Toolbox panel (Graphics) «Select the Ellipse Tool and insert the ellipse.
1.2. press and hold the Ctrl key, select the rectangle and ellipse command, and insert the square and circle.
1.3. draw a rectangle associated with the center point. To do this, drag the mouse pointer to the center of the object under construction. Press the Shift button and insert the rectangle without releasing it. Make sure that the center of the object matches the original position of the pointer.
1.4. This is how you can draw all simple shapes using the Ctrl and Shift keys.
Draw polygons
To draw polygons with different numbers of walls, follow these steps:
1.select the polygon Tool. Pointer near besbris
crestco will be there.
2.Select the starting point and drag it to the right and down. The number of polygon walls according to the agreed number is 5. there is a similarity in the construction of ellipses and polygons. You can also draw a polygon from a corner or center (press and hold the Shift key). If you hold CTRL during construction, the correct polygon will be placed. The Pentagon that we will build is surrounded by a manipulator, like any object, and there are 10 nodes in each of the corners at once and in the center of each of the walls. The vertex of a Pentagon (vertex) (like any polygon with odd numeral walls) goes up when it is placed from top to bottom.
3.you can change the number of polygon walls. The corresponding input line in the properties panel is marked with an asterisk. The number of walls of a polygon
The number of walls of a polygon
The number of walls can vary from 3 to 500. This feature can be transfer at an agreed consent for all new facilities, as well as other properties of the polygon.
A polygon can be convex (the outer corners are convex) (each of the corners is less than 180) or a star. The length of star-shaped polygons (beams) is not passed to the properties panel. It can only be changed in interactive mode. Click on any of the nodes and send it to the center or center depending on the required number of stars. If you rotate a polygon node, it turns into a complex shape whose eyes intersect repeatedly. For example, insert a 12-wall polygon, drag a node on its wall inside the object, about a third of the way to the center, and then drag this node along the circle. When the node rotates, it changes the appearance of the star, and its rays form colorful joints.
Using the polygon Tool, you can draw not only a star-shaped polygon, but also the star itself. Its rays are connected between segments that pass through the inner zone of the object. Select a five-pointed star, then click on the star button (a small blue star is built in it).The object turned into an icon. Now note that the button contains a polygon. The rebellion dates back to the original restoration of the figure.
Note: if the radiation of a star is greater than seven, you can change the length of the star by using the slider in the properties panel (a triangle is built next to it). The more right the slider is, the sharper the star's rays will be.
Task:
1. from the Toolbox panel (Graphics)  select the tool and insert the polygon.In the properties panel, select the number of polygon ceilings. Try putting on the first 5, and then on 11.
2. put two of the Pentagon. To do this, move the mouse below the starting point, and then up. Compare the shapes from the five superimposed corners. Conclude.
3. If you press the Delete key, the last built shape will be deleted.
4. from the properties panel select the tool and insert the polygon.In the properties panel, select the number of polygon ceilings. Try putting on the first 5, and then on 11.
2. put two of the Pentagon. To do this, move the mouse below the starting point, and then up. Compare the shapes from the five superimposed corners. Conclude.
3. If you press the Delete key, the last built shape will be deleted.
4. from the properties panel  Press the Star key. Note the change to the previously constructed object.
5. draw a polygon with the ceiling number equal to 11. Press the Star key in the properties panel and change the field value to 4 using the slider, as shown in figure. 3.2.. Press the Star key. Note the change to the previously constructed object.
5. draw a polygon with the ceiling number equal to 11. Press the Star key in the properties panel and change the field value to 4 using the slider, as shown in figure. 3.2..
6. Press and hold the Ctrl key. Put the polygon in the above way and release the Ctrl key. As a result, every fifth ceiling is connected to each other, eleven correct corners are laid at a high angle. Set the value 2 in the field using the slider. The star changes its type. Now the connection is not from four, but from two ceilings.
7. Toolbox (Graphics) panels Control question: Name simple shapes.
|
||||||
|
|
Последнее изменение этой страницы: 2021-04-12; просмотров: 33; Нарушение авторского права страницы; Мы поможем в написании вашей работы! infopedia.su Все материалы представленные на сайте исключительно с целью ознакомления читателями и не преследуют коммерческих целей или нарушение авторских прав. Обратная связь - 3.147.80.94 (0.005 с.) |
 Өзіңіздің папкаңызда “фигуры” деп сақтаңыз.
 hold a small black triangle that is located in the lower right corner. There are several buttons, and an additional panel will appear.