Заглавная страница Избранные статьи Случайная статья Познавательные статьи Новые добавления Обратная связь КАТЕГОРИИ: ТОП 10 на сайте Приготовление дезинфицирующих растворов различной концентрацииТехника нижней прямой подачи мяча. Франко-прусская война (причины и последствия) Организация работы процедурного кабинета Смысловое и механическое запоминание, их место и роль в усвоении знаний Коммуникативные барьеры и пути их преодоления Обработка изделий медицинского назначения многократного применения Образцы текста публицистического стиля Четыре типа изменения баланса Задачи с ответами для Всероссийской олимпиады по праву 
Мы поможем в написании ваших работ! ЗНАЕТЕ ЛИ ВЫ?
Влияние общества на человека
Приготовление дезинфицирующих растворов различной концентрации Практические работы по географии для 6 класса Организация работы процедурного кабинета Изменения в неживой природе осенью Уборка процедурного кабинета Сольфеджио. Все правила по сольфеджио Балочные системы. Определение реакций опор и моментов защемления |
C reating a collage for an image
| ||||||||
Goal: to learn how to create a collage for an image in Adobe Photoshop.
Necessary tools and materials: PC, Adobe Photoshop.
Content and order of work
I. repetition of theoretical data;
II. independent performance of exercises and analysis of results;
III. delivery of laboratory work.
In this work, Adode Photoshop provides a method for creating collages using multiple images. Below is a method for setting a collage on an image individually-in separate steps.
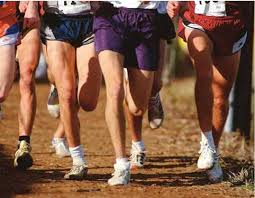
Step 1. Name of the person.
From the my photos Image1 folder. open an image called jpeg in Photoshop. Change the image size by running the Image > Image Size command.
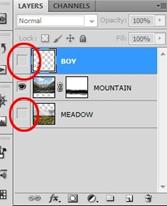
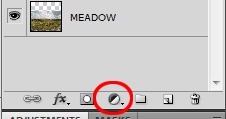
 Window > Layers or F7 open the page window to the screen. We change the page name to MEADOW by double-clicking the Background button in this window.
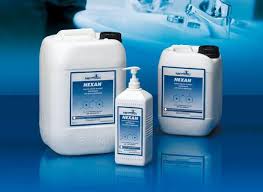
 Step 2. Combine two photos with each other.
In this step, Image1. an image called jpeg Image2. jpeg must be set inside the image. For this, Image1. jpeg click and hold the mouse over the Image2 image. jpeg we move to the image.
Image2. open an image called jpeg and rename it to MOUNTAIN. Open pages should look like this:
Step 3. Reduce the appearance of the mountain.
Image2. the size of the image called jpeg Image1. jpeg seems larger than the picture. To reduce the size, we will reduce the size by pressing the key combination Image > Free Transform or Ctrl + T. Performing the above command, rectangular dots appear in the image. By clicking these square points, we change the image as follows:
Step 2. Combine two photos with each other.
In this step, Image1. an image called jpeg Image2. jpeg must be set inside the image. For this, Image1. jpeg click and hold the mouse over the Image2 image. jpeg we move to the image.
Image2. open an image called jpeg and rename it to MOUNTAIN. Open pages should look like this:
Step 3. Reduce the appearance of the mountain.
Image2. the size of the image called jpeg Image1. jpeg seems larger than the picture. To reduce the size, we will reduce the size by pressing the key combination Image > Free Transform or Ctrl + T. Performing the above command, rectangular dots appear in the image. By clicking these square points, we change the image as follows:
 In order for the image to change in the same proportion, you must press the Shift key.
Step 4. Changing the size of the canvas.
To change the size of the canvas, run the Image > Canvas Size command and change the parameters of the window that appears as follows:
In order for the image to change in the same proportion, you must press the Shift key.
Step 4. Changing the size of the canvas.
To change the size of the canvas, run the Image > Canvas Size command and change the parameters of the window that appears as follows:
 Step 5. Movement of the image.
The size of the modified image increases after the upper hols step is completed. Now set the image as follows using the Move (V) device):
Step 5. Movement of the image.
The size of the modified image increases after the upper hols step is completed. Now set the image as follows using the Move (V) device):
 Step 6. Add a mask to your face.
To add a mask to a page, click the Add layer mask button for the page palette.
The face mask appears next to the surface of the SKIN.
Select a Brush from the toolbar. Set its diameter to 80 pixels. Now select the black color and color the unnecessary part of the drawing.
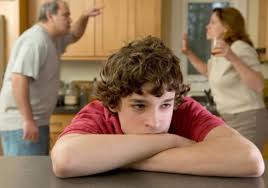
Step 7. Background clipping.
In Photoshop Image3. open an image called jpeg. On the toolbar, select the Lasso tool and select the child completely. The selected image should look like this:
Step 6. Add a mask to your face.
To add a mask to a page, click the Add layer mask button for the page palette.
The face mask appears next to the surface of the SKIN.
Select a Brush from the toolbar. Set its diameter to 80 pixels. Now select the black color and color the unnecessary part of the drawing.
Step 7. Background clipping.
In Photoshop Image3. open an image called jpeg. On the toolbar, select the Lasso tool and select the child completely. The selected image should look like this:  Step 8. Changing the image size.
Image of the distinguished to copy Ctrl + C and press the key combination. Go to the main photo and insert the child's image by pressing Ctrl + V.
Step 8. Changing the image size.
Image of the distinguished to copy Ctrl + C and press the key combination. Go to the main photo and insert the child's image by pressing Ctrl + V.
 The image of the child, as seen in the picture, looks large. To reduce its size, press Ctrl + T and change the image of the child as follows through the square dots that appear:
 Step 9. Channel selection.
To work with the channel, we set it so that all pages except MOUNTAIN are not visible.
Step 9. Channel selection.
To work with the channel, we set it so that all pages except MOUNTAIN are not visible.
 Select the channel palette and its vision will look like this:
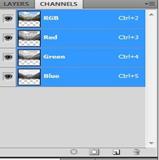 Here we copy the blue channel. Set all channels except the copied blue channel so that they are not visible.
 Step 10. Setting the channel by level.
To create a mask, set the sky to white and the image of the mountain to black. To do this, use the Image > Adjustments > Levels window. Set the window parameters as follows:
Step 10. Setting the channel by level.
To create a mask, set the sky to white and the image of the mountain to black. To do this, use the Image > Adjustments > Levels window. Set the window parameters as follows:
 The display of the image after entering parameters should be as follows:
Step 11. Starting the mask.
To create a mask based on the Blue copy > Load Selection channel... select the command and select Blue copy in the Channel item and click OK.
The image of a drawing using a mask looks like this:
The display of the image after entering parameters should be as follows:
Step 11. Starting the mask.
To create a mask based on the Blue copy > Load Selection channel... select the command and select Blue copy in the Channel item and click OK.
The image of a drawing using a mask looks like this:
 Step 12. Hide the sky.
To hide the sky, repeat step 9. Click the MOUNTAIN mask page. Select the black color and go out to color the sky. After the sky is completely filled in, press Ctrl + D.
Step 12. Hide the sky.
To hide the sky, repeat step 9. Click the MOUNTAIN mask page. Select the black color and go out to color the sky. After the sky is completely filled in, press Ctrl + D.  Step 13. Insert a new sky into the image.
Image4. open an image called jpeg in Photoshop and get collage photos.
Step 13. Insert a new sky into the image.
Image4. open an image called jpeg in Photoshop and get collage photos.
 Step 14. The movement of the child.
Edit > Transform > go to the child by executing the Flip Horizontal command.
Step 14. The movement of the child.
Edit > Transform > go to the child by executing the Flip Horizontal command.
 Step 15. Adding a book to an image.
Image5. open the jpeg image and cut out the book using the magnetic lasso tool. Replies: Kulik Maria Viktorovna there is no Sots.the tax is not deducted, since the employee is on vacation without the content of charges, he does not have, respectively, and deductions, too. We change its size using the transform command. That is, the changed picture looks like this:
Step 15. Adding a book to an image.
Image5. open the jpeg image and cut out the book using the magnetic lasso tool. Replies: Kulik Maria Viktorovna there is no Sots.the tax is not deducted, since the employee is on vacation without the content of charges, he does not have, respectively, and deductions, too. We change its size using the transform command. That is, the changed picture looks like this:
 Step 16. Insert the image of the dragon on the image.
Image6. open the jpeg image and cut out the dragon image using the magnetic lasso tool. Replies: Kulik Maria Viktorovna there is no Sots.the tax is not deducted, since the employee is on vacation without the content of charges, he does not have, respectively, and deductions, too. We change its size using the transform command. That is, the changed picture looks like this:
Step 16. Insert the image of the dragon on the image.
Image6. open the jpeg image and cut out the dragon image using the magnetic lasso tool. Replies: Kulik Maria Viktorovna there is no Sots.the tax is not deducted, since the employee is on vacation without the content of charges, he does not have, respectively, and deductions, too. We change its size using the transform command. That is, the changed picture looks like this:
 Creating edges of different types for a drawing
Purpose: to study the method of creating a contour in Adobe Photoshop.
Necessary tools and materials: PC, Adobe Photoshop.
Content and order of work
I. repetition of theoretical data;
II. independent performance of exercises and analysis of results;
III.delivery of laboratory work.
Exercise 1. Creating a gradient field for an image.
Creating edges of different types for a drawing
Purpose: to study the method of creating a contour in Adobe Photoshop.
Necessary tools and materials: PC, Adobe Photoshop.
Content and order of work
I. repetition of theoretical data;
II. independent performance of exercises and analysis of results;
III.delivery of laboratory work.
Exercise 1. Creating a gradient field for an image.
| |||||||||
1. Open the Adobe Photoshop app.
2. Avto.open the tif image.
 3. Create a new channel from the channel palette.
4. Select the gradient tool.
5. change the previous page in white.
3. Create a new channel from the channel palette.
4. Select the gradient tool.
5. change the previous page in white.
 6. from the gradient window Foreground To Transparent selected type.
 7. select a linear gradient and draw the new channel as shown in the image below:
 8. Filter ► Blur ► Gaussian Blur... used method. Radius: 2.6 pixels.
 9. Filter ► Noise ► use the method of adding noise.
10. PGB- go to channel.
11. insert the selected channel to the image by pressing the <Ctrl>button.
12. set the front page color to black and the background color to white.
13. Filter ► Render ► use the Clouds command.
14. Image ► use the Adjust command to change the color of the drawing (Tone / Saturation, Brightness / Contrast, Curves).
15. deselect. 16. combine the layers.
|
|||||||||
|
|
Последнее изменение этой страницы: 2021-04-12; просмотров: 31; Нарушение авторского права страницы; Мы поможем в написании вашей работы! infopedia.su Все материалы представленные на сайте исключительно с целью ознакомления читателями и не преследуют коммерческих целей или нарушение авторских прав. Обратная связь - 18.219.126.197 (0.009 с.) |