Заглавная страница Избранные статьи Случайная статья Познавательные статьи Новые добавления Обратная связь КАТЕГОРИИ: ТОП 10 на сайте Приготовление дезинфицирующих растворов различной концентрацииТехника нижней прямой подачи мяча. Франко-прусская война (причины и последствия) Организация работы процедурного кабинета Смысловое и механическое запоминание, их место и роль в усвоении знаний Коммуникативные барьеры и пути их преодоления Обработка изделий медицинского назначения многократного применения Образцы текста публицистического стиля Четыре типа изменения баланса Задачи с ответами для Всероссийской олимпиады по праву 
Мы поможем в написании ваших работ! ЗНАЕТЕ ЛИ ВЫ?
Влияние общества на человека
Приготовление дезинфицирующих растворов различной концентрации Практические работы по географии для 6 класса Организация работы процедурного кабинета Изменения в неживой природе осенью Уборка процедурного кабинета Сольфеджио. Все правила по сольфеджио Балочные системы. Определение реакций опор и моментов защемления |
API SH, SJ or SL with JASO MA
Viscosity: SAE 10W-40 Capacity: 1.7 L (1.8 US qt) (when filter is not removed) 1.9 L (2.0 US qt) (when filter is removed) L (2.5 US qt) (when engine is completely dry) NOTE ○Although 10W-40 engine oil is the recommended oil for most conditions, the oil viscosity may need to be changed to accommodate atmospheric conditions in your riding area. • Check the oil level (see Oil Level Inspection in the Engine Lubrication System chapter).
• Drain the engine oil (see Engine Oil Change). • Remove the oil filter [A] with the oil filter wrench [B]. Special Tool - Oil Filter Wrench: 57001-1249
• Apply engine oil to the gasket [A] before installation. • Tighten the filter with the oil filter wrench. Torque - Oil Filter: 17.2 N·m (1.75 kgf·m, 13 ft·lb) NOTE ○Hand tightening of the oil filter can not be allowed since it does not reach to this tightening torque. • Pour in the specified type and amount of oil (see Engine Oil Change).
 Brake Hose and Pipe Replacement Brake Hose and Pipe Replacement
• Remove the banjo bolts [A]. • When removing the brake hose, take care not to spill the brake fluid on the painted or plastic parts.
loss to a minimum. • Immediately wash away any brake fluid that spills.
Rear Fender Front (see Rear Fender Front Removal in the Frame chapter) (EX650B Models) Right Center Fairing (see Center Fairing Removal in the Frame chapter) (EX650B Models) Air Cleaner Housing (see Air Cleaner Housing Removal in the Fuel System (DFI) chapter) (EX650B Models) • Remove the brake pipe joint nuts [C] (EX650B Models). • Remove the bracket bolt [D] and bracket [E] (EX650B Models).
• Tighten: Torque - Brake Hose Banjo Bolts: 25 N·m (2.5 kgf·m, 18 ft·lb) Brake Pipe Joint Nuts: 18 N·m (1.8 kgf·m, 13 ft·lb) (EX650B Models) • When installing the hoses, avoid sharp bending, kink- ing, flatting or twisting, and route the hoses according to
• Fill the brake line after installing the brake hose (see Brake Fluid Change).
Brake Fluid Change NOTE ○The procedure to change the front brake fluid is as fol- lows. Changing the rear brake fluid is the same as for the front brake.
• Remove the reservoir cap and diaphragm. • Remove the rubber cap from the bleed valve [A] on the caliper. • Attach a clear plastic hose [B] to the bleed valve, and run the other end of the hose into a container. • Fill the reservoir with fresh specified brake fluid.
○Repeat this operation until fresh brake fluid comes out from the plastic hose or the color of the fluid changes. 1. Open the bleed valve [A]. 2. Apply the brake and hold it [B]. 3. Close the bleed valve [C]. 4. Release the brake [D]. NOTE ○The fluid level must be checked often during the chang- ing operation and replenished with fresh brake fluid. If the fluid in the reservoir runs out any time during the changing operation, the brakes will need to be bled since air will have entered the brake line. ○Front Brake: Repeat the above steps for the other caliper. • Remove the clear plastic hose. • Install the diaphragm and reservoir cap. • Tighten: Torque - Front Brake Reservoir Cap Screws: 1.0 N·m (0.10 kgf·m, 9 in·lb)
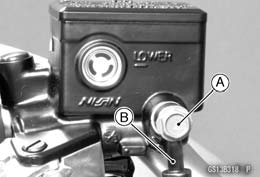
○First, tighten the rear brake fluid reservoir cap [B] clock- wise [C] by hand until slight resistance is felt indicating that the cap is seated on the reservoir body, then tighten the cap an additional 1/6 turn [D] while holding the brake fluid reservoir body [A].
• Tighten the bleed valve, and install the rubber cap. Torque - Bleed Valve: 7.8 N·m (0.80 kgf·m, 69 in·lb) • After changing the fluid, check the brake for good braking power, no brake drag, and no fluid leakage.
Front Master Cylinder Disassembly • Remove the front master cylinder (see Front Master Cylin- der Removal in the Brakes chapter). • Remove the reservoir cap and diaphragm, and pour the brake fluid into a container. • Unscrew the locknut and pivot bolt, and remove the brake lever. • Pull the dust cover [A] out of place, and remove the circlip [B].
|
|||||||
|
|
Последнее изменение этой страницы: 2016-08-10; просмотров: 363; Нарушение авторского права страницы; Мы поможем в написании вашей работы! infopedia.su Все материалы представленные на сайте исключительно с целью ознакомления читателями и не преследуют коммерческих целей или нарушение авторских прав. Обратная связь - 18.118.148.178 (0.005 с.) |
 Oil Filter Replacement
 • Replace the filter with a new one.
 • When removing the brake hoses [B], temporarily secure the end of the brake hose to some high place to keep fluid
 • Remove:
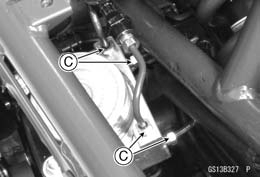 • There are washers on each side of the brake hose fitting. Replace them with new ones when installing.
 Cable, Wire, and Hose Routing section in the Appendix chapter.
 • Level the brake fluid reservoir.
 • Change the brake fluid.
 • Follow the procedure below to install the rear brake fluid reservoir cap correctly.
 If necessary, bleed the air from the lines.
 Master Cylinder Rubber Parts Replacement