Заглавная страница Избранные статьи Случайная статья Познавательные статьи Новые добавления Обратная связь FAQ Написать работу КАТЕГОРИИ: ТОП 10 на сайте Приготовление дезинфицирующих растворов различной концентрацииТехника нижней прямой подачи мяча. Франко-прусская война (причины и последствия) Организация работы процедурного кабинета Смысловое и механическое запоминание, их место и роль в усвоении знаний Коммуникативные барьеры и пути их преодоления Обработка изделий медицинского назначения многократного применения Образцы текста публицистического стиля Четыре типа изменения баланса Задачи с ответами для Всероссийской олимпиады по праву 
Мы поможем в написании ваших работ! ЗНАЕТЕ ЛИ ВЫ?
Влияние общества на человека
Приготовление дезинфицирующих растворов различной концентрации Практические работы по географии для 6 класса Организация работы процедурного кабинета Изменения в неживой природе осенью Уборка процедурного кабинета Сольфеджио. Все правила по сольфеджио Балочные системы. Определение реакций опор и моментов защемления |
Do not grind the shim. This may cause it to fracture, causing extensive engine damage.Содержание книги
Поиск на нашем сайте
PERIODIC MAINTENANCE
Periodic Maintenance Procedures
VALVE CLEARANCE ADJUSTMENT CHART INLET VALVE
1. Measure the clearance (when engine is cold).
2. Check present shim size.
3. Match clearance in vertical column with present shim size in horizontal column.
4. Install the shim specified where the lines intersect. This shim will give the proper clearance.
Example: Present shim is 2.95 mm. Measured clearance is 0.45 mm.
Replace 2.95 mm shim with 3.20 mm shim. 5. Remeasure the valve clearance and readjust if necessary.
PERIODIC MAINTENANCE 2-25
Periodic Maintenance Procedures
VALVE CLEARANCE ADJUSTMENT CHART EXHAUST VALVE
1. Measure the clearance (when engine is cold).
2. Check present shim size.
3. Match clearance in vertical column with present shim size in horizontal column.
4. Install the shim specified where the lines intersect. This shim will give the proper clearance.
Example: Present shim is 2.95 mm.
Measured clearance is 0.47 mm.
Replace 2.95 mm shim with 3.15 mm shim. 5. Remeasure the valve clearance and readjust if necessary.
PERIODIC MAINTENANCE
Periodic Maintenance Procedures
Clutch
Clutch Operation Inspection •Pull[A]. the clutch lever just enough to take up the free play
•Measure the gap between the lever and the lever holder.
Clutch Lever Free Play
Standard: 2 ∼ 3 mm (0.08 ∼ 0.12 in.)
To avoid a serious burn, never touch the engine or exhaust pipe during clutch adjustment.
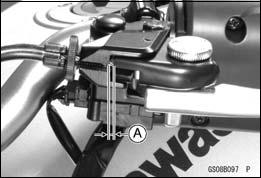
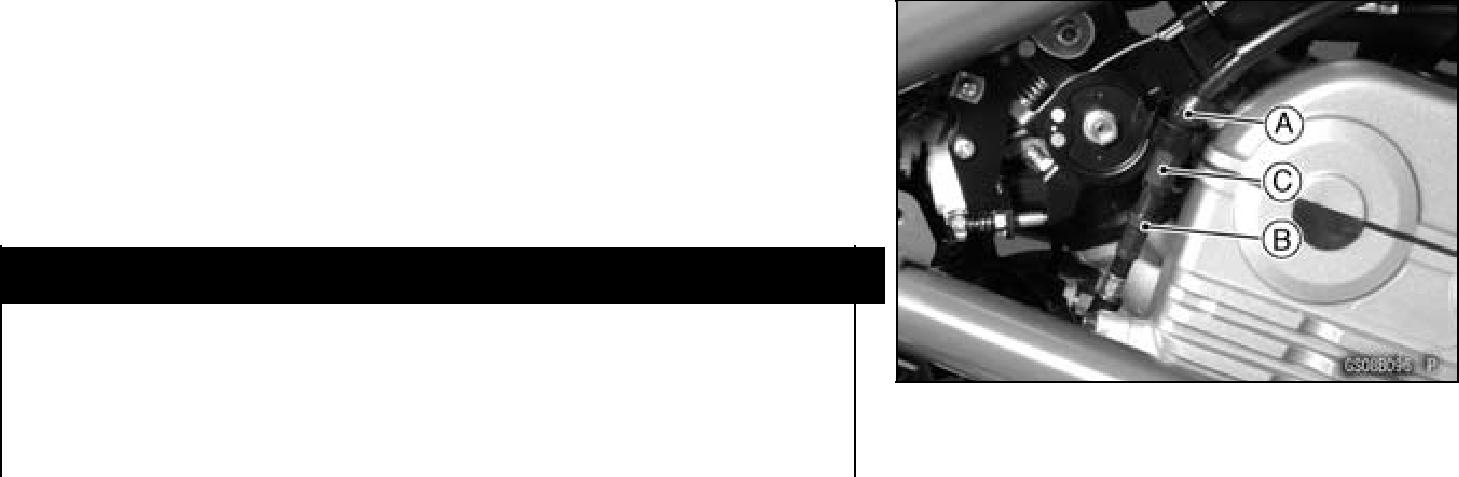
• Turn the adjuster [A] so that 5 ∼ 6 mm (0.20 ∼ 0.24 in.) [B] of threads are visible.
• Remove the right center fairing (see Center Fairing Re-moval in the Frame chapter). • Slide the dust cover [A] at the middle of the clutch cable out of place.
• Loosen the locknut [B] at the middle of clutch cable. • Turn the adjusting nut [C] until the free play is correct.
Be sure that the outer cable end at the clutch lever is fully seated in the adjuster at the clutch lever, or it could slip into place later, creating enough cable play to prevent clutch disengagement.
• After the adjustment, tighten the locknut and start the en-gine and check that the clutch does not slip and that it releases properly.
Wheels/Tires
Air Pressure Inspection •Remove the air valve cap. •Measure the tire air pressure with an air pressure gauge [A] when the tires are cold (that is, when the motorcycle
PERIODIC MAINTENANCE 2-27
Periodic Maintenance Procedures
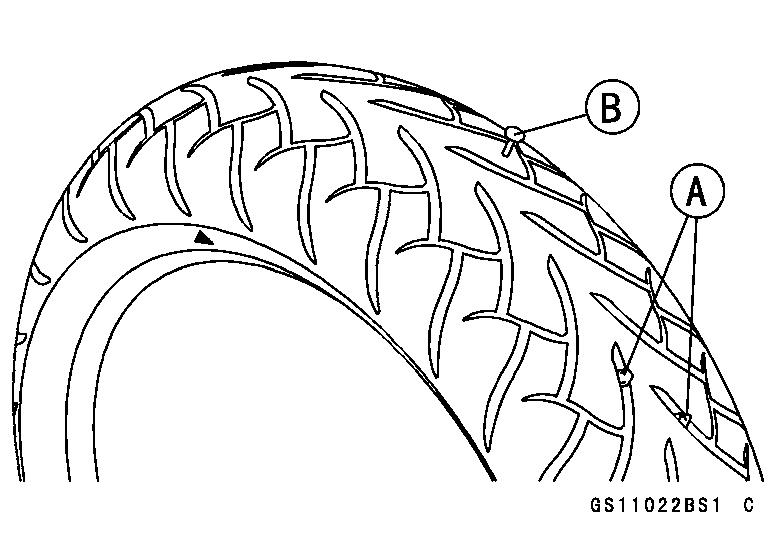
Wheel/Tire Damage Inspection
• Remove any imbedded stones [A] or other foreign parti-cles [B] from tread. • Visually inspect the tire for cracks and cuts, and replace the tire if necessary. Swelling or high spots indicate inter-nal damage, requiring tire replacement.
• Visuallyage. inspect the wheel for cracks, cuts and dents dam-
Tire Tread Wear, Abnormal Wear Inspection
As the tire tread wears down, the tire becomes more sus-ceptible to puncture and failure. An accepted estimate is that 90% of all tire failures occur during the last 10% of tread life (90% worn). So it is false economy and unsafe to use the tires until they are bald.
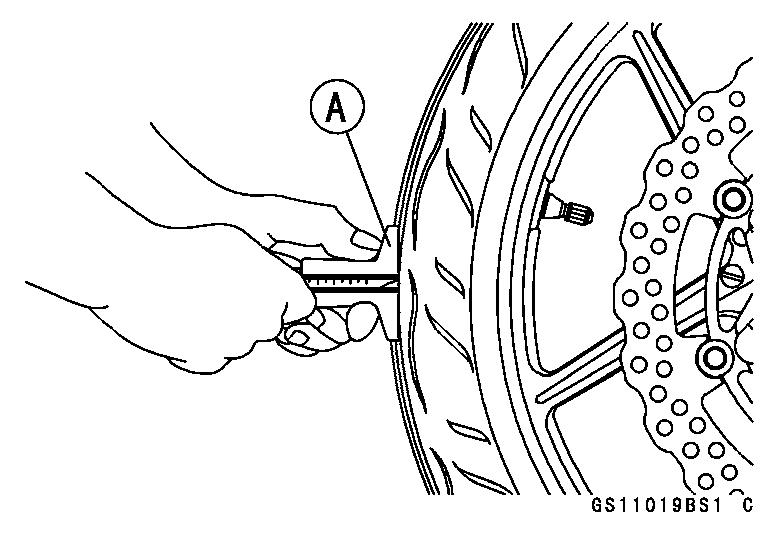
• Measure the tread depth at the center of the tread with a depth gauge [A]. Since the tire may wear unevenly, take measurement at several places.
Tread Depth
Standard:
Front 4.3 mm (0.17 in.)
Rear 7.0 mm (0.28 in.)
Service Limit:
Front 1 mm (0.04 in.)
(AT, CH, DE) 1.6 mm (0.06 in.)
Rear 2 mm (0.08 in.)
(Up to 130 km/h (80 mph))
Mm (0.12 in.)
(Over 130 km/h (80 mph))
To ensure safe handling and stability, use only the recommended standard tires for replacement, in-flated to the standard pressure.
NOTE ○Most countries may have their own regulations a mini-mum tire tread depth: be sure to follow them.
○Check and balance the wheel when a tire is replaced with a new one.
PERIODIC MAINTENANCE
|
|||||||||||||||||||||||||||||||||||||||||||||||||
|
|
Последнее изменение этой страницы: 2016-08-10; просмотров: 281; Нарушение авторского права страницы; Мы поможем в написании вашей работы! infopedia.su Все материалы представленные на сайте исключительно с целью ознакомления читателями и не преследуют коммерческих целей или нарушение авторских прав. Обратная связь - 3.147.48.226 (0.006 с.) |


 If the gap is too wide, the clutch may not release fully. If the gap is too narrow, the clutch may not engage fully. In either case, adjust it.
 WARNING
 WARNING
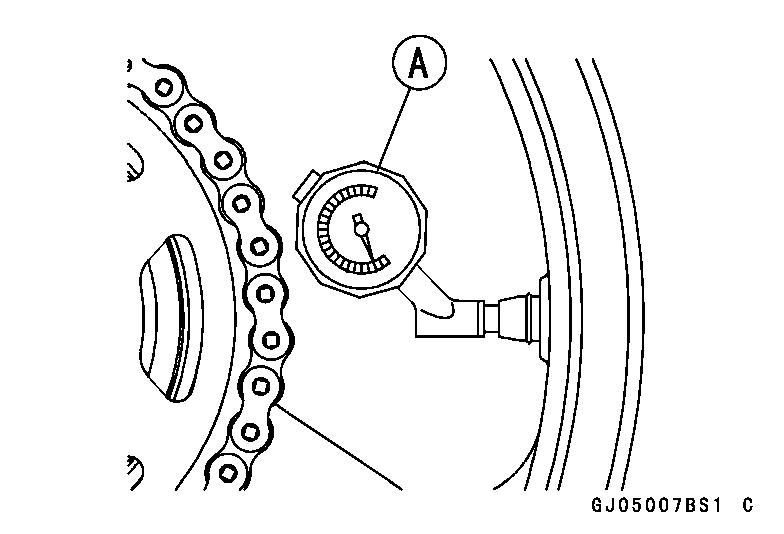
 WARNING