Заглавная страница Избранные статьи Случайная статья Познавательные статьи Новые добавления Обратная связь FAQ Написать работу КАТЕГОРИИ: ТОП 10 на сайте Приготовление дезинфицирующих растворов различной концентрацииТехника нижней прямой подачи мяча. Франко-прусская война (причины и последствия) Организация работы процедурного кабинета Смысловое и механическое запоминание, их место и роль в усвоении знаний Коммуникативные барьеры и пути их преодоления Обработка изделий медицинского назначения многократного применения Образцы текста публицистического стиля Четыре типа изменения баланса Задачи с ответами для Всероссийской олимпиады по праву 
Мы поможем в написании ваших работ! ЗНАЕТЕ ЛИ ВЫ?
Влияние общества на человека
Приготовление дезинфицирующих растворов различной концентрации Практические работы по географии для 6 класса Организация работы процедурного кабинета Изменения в неживой природе осенью Уборка процедурного кабинета Сольфеджио. Все правила по сольфеджио Балочные системы. Определение реакций опор и моментов защемления |
Font Designer: Letter SelectionСодержание книги Поиск на нашем сайте
The W column indicates the width of each letter. Clicking on a letter automatically activates the letter designer.
Font Designer: Letter Properties
Font Designer: Letter Design
The Letter Design is almost the same as for a standard double-face pattern, the sole difference being that no colours can be selected. See the Double-Face Pattern Designer for details.
Lettered Bands
Lettered Bands: Font and Letter Selection
To add a letter to the band, simply double-click on it.
Lettered Bands: Band Generator
To select a particular letter, simply click on it - it will be outlined in red. To deselect the letter, click on it again.
Lettered Bands: Design Area
The design area is the same as for a normal double-face pattern, except that no colours or threading can be selected.
The Weaving Image
This display will appear on several of the design forms, notably the threaded-in pattern designer and the double-faced pattern designer. It shows an approximation of what the actual band will look like once it has been woven. The tool buttons can be used to change the display to show specific features like direction reversal points, twist directions etc.
Tool Buttons
Setting the Size Ratios
Note that the End Height is counted twice. The numbers represent the ratios between these factors; they can be fractions but should be 1 or greater. Number less than one will give some very strange results!
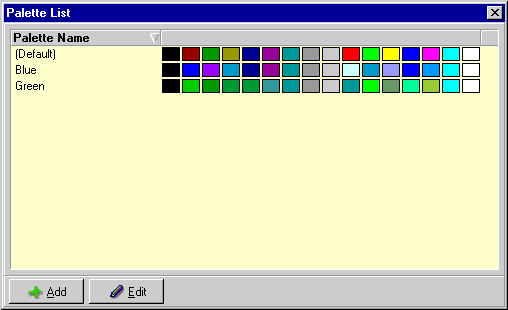
Palettes
For the sake of convenience only 16 colours are available when designing a pattern; it seems unlikely that a single band will use more colours than that! These colours are arranged in a palette from which the current colour can be selected. GTT automatically creates a default palette with some standard colours, but any number of additional palettes with difference colours can be created.
Creating Palettes
Palettes can be edited or created via the Edit | Palettes menu option.
Double-clicking on the palette name, or clicking once on a palette and clicking on Edit will show the palette details (see below). To change a particular palette colour, simply double-click on the colour box in the list and choose the new colour.
Double-click on a colour box to change the colour.
Using Palettes
Both the threaded-in pattern designer and the double-face pattern designer allow you to select colours from a palette associated with the design. A new pattern automatically uses the Default palette, but a different palette can be selected using the palette tool buttons.
Printing a Pattern
This display is used for printing the turning sequence for both threaded-in and double-face patterns.
V1.09 New Functionality
Appendix A: Basic Tutorials
|
|||||||||||||||||||||||||||||||||||||||||||||||||||||||||||||||||||||||||||||||||||||||
|
|
Последнее изменение этой страницы: 2016-04-08; просмотров: 315; Нарушение авторского права страницы; Мы поможем в написании вашей работы! infopedia.su Все материалы представленные на сайте исключительно с целью ознакомления читателями и не преследуют коммерческих целей или нарушение авторских прав. Обратная связь - 216.73.216.102 (0.005 с.) |


 button is pressed.


 This panel shows the font used for the band as well as all the letters in the font.


 In GTT, each cord is shown as a series of parallelograms since this is the closest simple representation of the structure of a band. However, the actual appearance of the band will differ depending on the yarn used and on the thickness of the weft. This can be simulated in GTT by setting the size ratios of the display. There are three factors that can be set, as shown in the diagram on the right.
 By default, the Centre Height is set to zero, so that each cell will look something like this: