Заглавная страница Избранные статьи Случайная статья Познавательные статьи Новые добавления Обратная связь FAQ Написать работу КАТЕГОРИИ: ТОП 10 на сайте Приготовление дезинфицирующих растворов различной концентрацииТехника нижней прямой подачи мяча. Франко-прусская война (причины и последствия) Организация работы процедурного кабинета Смысловое и механическое запоминание, их место и роль в усвоении знаний Коммуникативные барьеры и пути их преодоления Обработка изделий медицинского назначения многократного применения Образцы текста публицистического стиля Четыре типа изменения баланса Задачи с ответами для Всероссийской олимпиады по праву 
Мы поможем в написании ваших работ! ЗНАЕТЕ ЛИ ВЫ?
Влияние общества на человека
Приготовление дезинфицирующих растворов различной концентрации Практические работы по географии для 6 класса Организация работы процедурного кабинета Изменения в неживой природе осенью Уборка процедурного кабинета Сольфеджио. Все правила по сольфеджио Балочные системы. Определение реакций опор и моментов защемления |
How house construction worksСодержание книги Поиск на нашем сайте
In the United States, there are more than 100 million housing units, and the majority of them are "single family dwellings," or houses. In cities, in the suburbs and in rural communities, houses are a very common sight.
Have you ever wondered how a house is built? What holds up the ceilings and the walls? What keeps the rain out? What parts go into making a house? How many different people are involved when a house goes up? If you would like to know the answers to questions like these, or if you have simply been curious to know all the steps that go into making a new home, then read on. In this article, you'll learn exactly how houses are built. Steps to Building a House One of the amazing things about American homes is that the huge majority of them are built using completely standardized building practices. One reason for this consistency is a set of uniform building codes that apply across the country. Another reason is cost -- the techniques used to build homes produce reliable housing quickly at a low cost (relatively speaking). If you ever watch any house being built, you will find that it goes through the following steps: · Grading and site preparation · Foundation construction · Framing · Installation of windows and doors · Roofing · Siding · Rough electrical · Rough plumbing · Rough HVAC · Insulation · Drywall · Underlayment · Trim · Painting · Finish electrical · Bathroom and kitchen counters and cabinets · Finish plumbing · Carpet and flooring · Finish HVAC · Hookup to water main, or well drilling · Hookup to sewer or installation of a septic system · Punch list Many of these steps are performed by independent crews known as subcontractors. For example, the framing is generally done by one subcontractor specializing in framing, while the roofing is done by a completely different subcontractor specializing in roofing. Each subcontractor is an independent business. All of the subcontractors are coordinated by a contractor who oversees the job and is responsible for completing the house on time and on budget. We will walk through these different stages so that you can see what is involved, understand all the steps and learn about the different materials used in the construction process. We will use a typical three-bedroom home as our example. Site Preparation The first crew on the site handles site preparation. Often, this crew and the foundation crew are the same people, but sometimes not (especially if there are a lot of trees on the lot). Houses are generally built on a foundation that is either a basement, a crawl space or a slab. The site-preparation crew typically arrives on the site with a backhoe and/or bulldozer. The crew's job is to clear the site of any trees, rocks and debris, level the site if necessary and dig as necessary for the foundation being built.
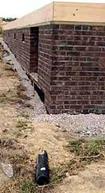
The example house shown here is built on a crawl space. For a crawl space, the site preparation crew digs a set of trenches and holes. Concrete is poured into these trenches and holes and will act as the interface between the foundation wall and the ground. Once the concrete is poured, the house looks like this:
(In these pictures, the bricks for the crawl space have already been moved into position while the concrete cures.) The concrete in the trench is generally about 18 to 24 inches wide (45.72 to 60.96 cm) and 18 to 24 inches deep. Once it hardens, it forms a massive concrete "beam" on which the house rests. The width of this concrete beam is controlled by the compressibility of the soil. In light soils, the beam will be wider to try to spread out the load, while in heavy clay soils it can be narrower. If the site slopes, the concrete beam is stepped, like this: Concrete takes approximately two weeks to cure to full strength (depending on the weather), so once the concrete is poured nothing will happen for some period of time while curing takes place. If this house had been built on a basement, the site-prep crew would have dug a square hole about 8 feet deep. If this house had been built on a slab, the site-prep crew would have trenched around the outside approximately 2 feet deep and then completely leveled the area for the pad. Vocabulary
· housing units – дом с участком и постройками · "single family dwellings " – дом на одну семью · cit y - город · suburbs - пригород · rural communities – сельская местность · ceiling - потолок · wall - стена · g rading – нивелирование, выравнивание, обработка грейдером · site – строительная площадка · foundation - фундамент · framing - опалубка · roof - крыша · siding –наружная облицовка · plumbing – слесарно-водопроводные работы · HVAC – установка кондиционной системы · insulation – проведение изоляционного материала · drywall – стена с сухой штукатуркой · underlayment – подстилающий слой · painting - окраска · flooring – настил полов · hookup – присоединение к общей цепи · water main – основой источник воды · well drilling – бурение колодца · sewer – канализационная труба, прокладывать канализацию · installation of a septic system – установка канализации · basement – подвал
Answer the questions: 1. How are most of the American houses are built? 2. What are the two reasons for it? 3. How many steps of building a house do you know? 4. Who usually performs these steps? 5. What is the first crew arriving on the site? 6. What is its job? What do they take with them? 7. What are the three types of a foundation? 8. What does the site preparation crew dig for a crawl space? 9. What material is used to fill the holes? 10. How long does concrete take to cure? Text 2 FOUNDATION
Slab The slab is probably the easiest foundation to build. It is a flat concrete pad poured directly on the ground. It takes very little site preparation, very little formwork for the concrete and very little labor to create. It works well on level sites in warmer climates -- it has problems up north because the ground freezes in the winter and this freezing can shift the slab at worst and at least lead to cold floors in the winter. A cross-section of a typical slab looks like this:
Around the edge of the slab, the concrete forms a beam that is perhaps 2 feet deep. The rest of the slab is 4 or 6 inches thick. A 4- or 6-inch layer of gravel lies beneath the slab. A 4-millimeter sheet of plastic lies between the concrete and the gravel to keep moisture out. Embedded in the concrete is 6-inch by 6-inch wire mesh (shown by the dotted line in the slab) and steel reinforcing bars (shown by the white circles at the bottom of the beams). You will often hear this sort of foundation referred to as a "floating slab" -- it "floats" on the soil, with the deeper concrete around the edge holding it in place. In northern climates, the concrete around the edge has to extend deep enough to remain below the frost line in winter. One thing about a slab is that the sewer pipe, and sometimes much of the electrical conduit, has to be put in place before the concrete is poured. The sewer pipes are actually embedded in the slab. Basement A house with a basement starts with a hole about 8 feet deep. At the bottom of the hole is a concrete slab, and then concrete or cinder-block walls form the outer walls of the basement. Actually, a basement is poured in three pieces in most cases: the "beams," then the walls, and then the slab inside the walls, like this:
This approach helps keep the basement waterproof. The L-shaped piece is a steel reinforcing bar to bind the beam and the wall together. Crawl Space A crawl space has several advantages over basements and slabs:
Most of the time, a crawl space is made of cinder block with a brick facing, as shown in the image on the right. This is exactly how our sample house is put together. Here is how the finished foundation looks:
You might have noticed in the previous pictures that the concrete work for the crawl space was not done with much precision at all. One of the neat things that the mason (bricklayer) does is carefully adjust the height of the cinder blocks and bricks with mortar thickness so that the crawl-space walls end up exactly level all the way around. One problem that arises in crawl spaces and basements is dampness. In order to keep water out, perforated pipe and gravel are used in a trench around the crawl space to route water away. The drainage system looks like this:
In a house with a basement, this same sort of drainage system is added along the bottom of the walls. The basement walls are then generally insulated with rigid foam board and then heavily waterproofed before dirt is backfilled against the walls. Vocabulary · crawl space – ленточный фундамент · slab – плита; плиточный фундамент. · backhoe - экскаватор · bulldozer - бульдозер · dig - копать · trench - траншея · concrete - бетон · inch - дюйм · concrete "beam "- бетонная балка · compressibility - жимаемость · soil - почва · stepped – ступенчатый, ярусный · gravel - гравий · steel reinforcing bars – стальные укрепляющие балки · " floating slab ”- «плавающая» (не закрепленная) плита · the sewer pipe – канализационная труба · electrical conduit - электропроводка · cinder-block - шлакоблок · duct - труба, трубопровод · brick facing – облицовка из кирпича · mason (bricklayer) - каменщик · mortar – известковый раствор · perforated pipe – перфорированная труба · drainage system – дренажная система
Answer the questions: 1. What are the three main foundation systems used on houses? 2. Which system is the easiest foundation to build? 3. How is it made? 4. What are its advantages? 5. Why does it have problems up north? 6. Why is this sort of foundation often called a "floating slab"? 7. When does the sewer pipe and much of the electrical conduit have to be put in place? 8. How does the basement look like? 9. In what pieces is a basement poured? 10. What is the reason of this approach? 11. What role does the L-shaped piece play? 12. What are the advantages of a crawl space over basements and slabs? 13. What is a crawl space made of? 14. What is the problem that arises in crawl spaces and basements? 15. What is usually used in order to keep water out? Text 3 FLOOR AND WALLS
The floor starts with a sill-plate made of pressure-treated lumber in direct contact with the bricks of the crawl space wall. One interesting thing to note is that this house literally "sits" on the foundation -- it is not held on or bolted on in any way. Then the floor is constructed on the sill with 2x10 lumber:
You may have noticed the brick posts when you saw the picture of the foundation. They hold a beam that runs down the center of the house. The beam is also built from 2x10 lumber (three pieces thick):
All of the "joists" (as the 2x10s in the floor are called) meet on this center beam:
(In many houses the meeting of the joists is somewhat better organized!) This funny little cantilevered section of the frame will eventually hold the fireplace:
Once the floor framing is complete, it is covered with 1/2-inch or 5/8-inch plywood or OSB (oriented strand board).
And the floor is finished. Walls The framing crew next starts on the walls. Walls are assembled on the floor...
...and then raised into place. Here's what the first wall looks like once it is up:
You can see that this wall is made of 2x4 lumber and covered on the outside with an OSB sheathing. Using plywood or OSB as the sheathing gives the wall rigidity -- you may have seen diagonal pieces used at the corners of older homes (homes built before plywood was widely available). The plywood does the same thing, but it provides much more strength.
The 2x4s are placed on "16-inch centers," meaning that the center of one 2x4 is 16 inches away from the center of the next. In this wall, two things interrupt the consistent 16-inch pattern:
Here's a shot that shows these two features in better detail:
The plywood will be cut out of the window openings as construction proceeds. Above the window is a 2x10 header, which is actually two 2x10s with a piece of 1/2-inch-thick plywood sandwiched in between and a 2x4 along the bottom:
A 2x10 header is a beam. You see these headers over all windows and doors -- they give the wall enough strength over the window or door to support the roof. When a header spans more than 5 feet, you find double full-length studs on either side of the header instead of the single studs seen here. All of the exterior walls go up following this same basic pattern. In the corners, the top plate on one wall overlaps the top plate of the next, and the walls are nailed together to bind the corner. Then the interior walls go up, fitting into the top plates of the exterior walls as shown above.
This house has a garage and a breezeway connecting the garage to the house.
The walls of the garage are built slightly differently (because the garage will have a slab floor). The walls are bolted directly to the brick foundation walls:
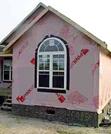
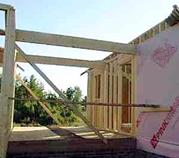
Here's how the house looks right before the roof framing starts.
You can see that the framers have covered the outside walls in pink house wrap.
Vocabulary
· pressure-treated lumber- ДСП · brick - кирпич · joist – балка, брус, доска · cantilever – кронштейн, консоль · fireplace - камин · inch - дюйм · plywood – фанера · OSB (oriented strand board) –ДВП · header -ригель · studs -штифт · top plate верхняя плита · garage- гараж · brick foundation – кирпичный фундамент · wall - стена
Answer the questions:
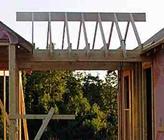
Text 4 ROOF. WINDOWS AND DOORS. This house uses trusses for the roof framing. Trusses are pre-fabricated, triangulated wooden structures used to support the roof. The alternative is to build up the roof's frame with 2x8s and 2x10s. Trusses are quite common these days because they have five big advantages from the builder's standpoint:
From the homeowner's standpoint, the one big disadvantage is that you don't have any attic space. C'est la vie... Trusses come in several standard configurations:
Gable trusses are used at the ends of the roof (the outermost trusses on either end). The vertical pieces are 16 inches on center so that siding can be nailed on. Our sample house uses a custom truss in the main part of the house that looks like this:
The left-hand side will provide a cathedral ceiling over the living room. Scissors trusses are used for the front room, and M trusses are used over the garage. Gable trusses are used at the ends of the three rooflines. The trusses are fist stacked on top of the walls, either by hand or with a crane.
These trusses went up in about four hours. They are on 24-inch centers.
The trusses are tied to the walls with small metal plates.
Once the trusses are up, the roof is covered in plywood or OSB, which gives the roof tremendous rigidity.
There are two small custom roofs in this house: the roof over the porch (see next section) and the roof over the breezeway.
Roof framing without trusses is actually fairly complicated. The angles found in anything but the simplest roof become intricate. Windows and Doors. Inside the house, things are now beginning to look enclosed:
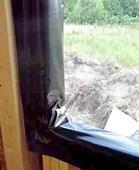
The next step in enclosure is windows and doors. The windows and doors arrive in one shipment and are unloaded from the truck into a stack:
Plastic stripping is stapled to the inside of all window and door openings, like this:
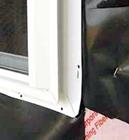
The windows used here are standard vinyl windows. They are placed in each rough opening and stapled in place on the outside.
The front-most window is the feature window of this house:
Vocabulary · truss - ферма · pre - fabricated – заранее изготовленные · triangulated -треугольной формы · cathedral ceilings -купол · load-bearing – несущий нагрузку · porch - крыльцо · strip – узкая полоска, планка. Answer the questions: 1. What are the trusses? 2. What are they used for? 3. How many advantages do the trusses have? 4. What are they?
Text 5 ROOFING. SIDING.
The shingles then go on very quickly (on this house, in less than a day):
In the following shot you can barely detect the ridge vent that runs along the peak of the breezeway roof. There is a vent like this along the peak of all the roofs.
This vent replaces the triangular "gable-end vents" found in older homes. Ridge vents give better circulation (especially when cathedral ceilings are used) and also prevent bats and squirrels from getting into the attic. In the following shot, you can see the aluminum flashing that keeps water away from the walls at the points where the shingles touch the walls.
At the edge of the roof, the shingles are cut off with about 2 inches of overhang:
Siding. This house uses standard vinyl siding. The siding is made from thin, flexible sheets of plastic about 2 millimeters thick, pre-colored and bent into shape during manufacturing. The sheets are 12 feet long and about a foot high. You start at the bottom and the sheets interlock into each other as you go up. Because vinyl expands and contracts due to temperature and sunlight, it fits into deep channels at the corners and around windows and doors. The channels are deep enough that as the siding contracts it remains within the channel. The following shot shows a channel nailed to a corner of the house and a piece of siding fitting into it. It is nailed in place and ready for the next sheet to be interlocked and installed above it:
This is the back wall of the house, showing the scaffolding used to install the siding:
This shot shows roofline detail. The area extending out from the house under the roof is known as the soffit (parallel to the roof). The fascia boards are perpendicular to the roof. The soffit is perforated so that air can flow into the attic and up through the ridge vents to ventilate the attic. In this shot, part of the soffit is in place, while part is awaiting installation. Note that all exposed fascia wood is capped with a sheet of painted aluminum that was bent into shape on the site:
At this point, the house is "dried in," meaning that it is completely protected from rain. Now interior work can begin.
Vocabulary · building paper (tar paper) – строительный картон · shingles – дранка, тонкие доски · ridge – конек, коньковый брус · attic -чердак · sheet - лист · interlock – взаимно соединяться, смыкаться · soffit - софит · fascia – поясок, валик, узкая полоска
Answer the questions:
Text 6 PLUMBING
Why can't you run the sewer line from a toilet or a sink out of the side of the house so it spills on the ground? That certainly would be easy and inexpensive, but people learned fairly quickly that human waste spilled on the ground smells bad and leads to incredible disease problems. Septic tanks and sewer systems take care of this. The uniform plumbing code lists hundreds of rules for septic-tank installation. These rules ensure that tanks work properly over many years. Once you have a septic tank in place, you can add sewer lines from the sink or toilet to the septic tank. Say you tried this approach:
The problem with this approach is that as the septic tank fills up with stuff, it produces a rather malodorous cloud of fumes. These fumes float from the septic tank up the sewer line to the sink and into the bathroom. Therefore, plumbing codes require a "P-trap" at every drain opening, as shown here:
You may have wondered why you find these funny loops of pipe under every sink in your house. The idea is that water gets trapped in the "P." This water blocks the fumes from the septic tank and keeps them from entering the bathroom. Unfortunately, a P-trap alone does not solve the problem because it turns out that the fumes in a septic tank are under pressure. The fumes simply bubble through the water in the trap and cause the same problem. Therefore, there is the concept of a vent pipe, which allows the pressure to escape, as shown here:
You may have wondered why houses have pipes sticking up out of the roof. They are vent pipes to relieve the pressure so that P-traps can do their jobs. It turns out that vents also break vacuums so water flows down the pipes faster. Besides covering P-traps and vent pipes, the uniform plumbing code specifies all sorts of other things:
When plumbers follow all the rules, they are able to create extremely reliable and safe plumbing systems. Over time, new rules get added as people realize funny little quirks and nuances. These new rules prevent problems in the future, and each one makes the code a little bigger and better. This is all a nice way to say that, even though plumbing looks simple in this section, there are many subtleties and nuances dictated by code that plumbers know and neophytes generally do not. (The same holds true for electrical systems, by the way.) Vocabulary · sewer systems – канализационная система · tank – резервуар, цистерна, бак · sewer line – канализационная труба · vent pipe – вентиляционная труба · angle – угол · plumber - слесарь Answer the questions:
Text 7 ROUGH PLUMBING
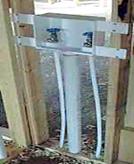
Typically, rough plumbing involves installing all sewer lines and vents as well as all water supply lines for each fixture. Here's a typical sink fixture:
Here's the fixture for a washer:
The tub is put in place and filled. Note the framing problem being corrected on the left side of the tub because the tub changed size:
Here are the lines for the tub:
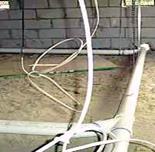
In the crawl space, the supply lines all branch off from common pipes running the length of the house:
The sewer lines all join together...
... and then exit out the back of the house, ready for connection to the septic tank:
Vocabulary · water line –водопроводная труба · sewer line -канализационная труба · bathtub - ванна · fixture – зажимное приспособление, обойма, хомут Answer the questions: 1. What does the rough plumbing involve? 2. Why are the tubs are installed early?
VOCABULARY Abundant — имеющийся в изобилии, обильный abutment – контрфорс, береговой устой моста access -доступ accommodation -размещение adaptability —приспособляемость. admit -допускать, приобретать advantage — преимущество aisle — боковой неф along the grain — по направлению волокна alternating — чередующийся ambulatory — крытая внутренняя галерея anchorage –опора, якорь angle -угол appropriate — подходящий aqueduct – акведук arch bridge -арочный мост architecture – архитектура arrangement — расположение, распределение artificial material -искусственный материал assemble -составлять attic -чердак Axis — ось Back hoe -экскаватор, канавокопатель с обратной лопатой basement – подвал, основание, фундамент bathtub - ванна beam bridge – балочный мост beam -балка, брус benefit — выгода, польза bind -завязывать, заедать, затвердевать bolt – болт bottom side –нижняя сторона braced — укрепленный brick – кирпич brick facing -кирпичная облицовка (накладка) brick foundation – кирпичный фундамент bridge – мост buckle – выпучиваться, изгибаться budget -бюджет building - здание building paper (tar paper) – строительный картон bulldozer – бульдозер Cable – трос, канат cable-stayed – поддерживаемый тросами, канатами cantilever – кронштейн, консоль cantilevered section -консольный отдел; заделанный одним концом carpenting - ковровая облицовка carve — резать, вырезать (по дереву или кости); высекать (камень) cast iron - чугун cathedral ceiling -купол cathedral -собор ceiling - потолок channel -канал, канава chapel — часовня cinder-block - шлакоблок city – город clay - глина commodity — предметы потребления, товары compressibility – сжимаемость compression – сжатие, давление concrete – бетон concrete "beam"- бетонная балка concrete pad – бетонная подушка conduit -трубопровод confine — ограничивать, заключать, обращать consist of-состоять из constrain — принуждать; вынуждать; сдерживать construction -строительство construction crew строительная бригада corner — угол counterpart — копия; дубликат counter -счётчик, счёты; гибкий раскос фермы crane -кран crawl space – ленточный фундамент; полупроходное техническое подполье (высотой до 1,5м), полупроходной канал crew -бригада crypt — склеп cure - выдерживать, пропаривать (бетонные блоки) curvature – кривизна, изгиб, искривление Damper - амортизатор dampness -сырость, влажность damp -влажность, сырость debris -строительный мусор, осколки, обломки deck - поверхность define — определять deliberately — умышленно, нарочно demise – смерть, кончина depart — отступать depend (on) — зависеть (от) derive - происходить design -проектировать device — средство diagonal beams – диагональная балка dig - копать dissipate – рассеивать, разгонять distinguish –различать drainage system – дренажная система drilling - сверление dry in -высушивать drywall – стена сухой кладки; стена с сухой поверхностью duct - труба, трубопровод duct work -трубопроводные работы durability — прочность, стойкость Earthquake — землетрясение eave - карниз, свис крыши elaborately — тщательно (разрабатывать) electrical conduit - электропроводка electrical outlet – штепсельная розетка electrician – электрик elevator - лифт elevator shaft – шахта лифта embed - покрывать. заделывать employ — применять erect -восстанавливать establishment - учреждение eventually — в конце концов evolve — происходить excavations - раскопки excavation - земляные работы, выемка грунта exceed — превышать, превосходить extend - наполнять extreme — крайняя степень Facility - приспособление fascia – поясок, валик, узкая полоска; сандрик faucet – кран, вентиль, патрубок finished material -обработанный материал fireplace - камин fire- resistant- огнеупорный fixture – зажимное приспособление, обойма, хомут flexible structure – гибкая структура floating slab- «плавающая» (не закрепленная) плита; затирка поверхности плиты flood — наводнение floor - пол flooring – настил полов foam - пена force. – сила force of gravity – сила гравитации force of vibration – сила вибрации force of wind – сила ветра foresee — предвидеть foundation - фундамент framework - каркас framing - каскад, рама, сруб; обрамление проёма (дверного); опалубка freeze -замораживать fulfil — выполнять furnace – котел центрального отопления fuse box – закрытый плавкий предохранитель fussy — вычурный, аляповатый Gable -щипец, фронтон gap — промежуток garage - гараж girder – балка, брус, распорка; главная балка glass - стекло g rading – нивелирование, выравнивание, обработка грейдером; земляные работы, планирование (грунта) grain — (зд.) волокно gravel - гравий gravity - гравитация grid -решетка, сетка grillage - решетка Hail on -прибивать handle -транспортировать, подавать, управлять header – ригель; водосточная труба hindrance — помеха, препятствие hole -яма, углубление hook up to sewer -установить канализационную трубу hookup – присоединение к общей цепи hoop — обруч housing units – дом с участком и постройками HVAC – установка кондиционной системы Inch - дюйм inclined — наклонный inconsistency — несовместимость, несообразность inertia - инерция inferior — худший (по качеству) influence — влиять inscription -надпись installation of a septic system – установка канализации installation -установка insulate -изолировать insulation – проведение изоляционного материала; изоляция interface -поверхность раздела, взаимосвязь interlock – взаимно соединяться, смыкаться; блокировка, запирание intimation — указание, сообщение, намек intricate -сложный inverted — перевернутый involve — включать, вызывать involve -включать iron and steel manufacturing – производство стали и железа Joist – балка, брус, доска; несущая балка (перекрытия, настила, пола, крыши) Level - выравнивать, производить планировку (грунта) light – светильник load - bearing – несущий нагрузку log — бревно lot -строительный участок Magnificence - величие marble - мрамор mason (bricklayer)- каменщик meeting- house — молитвенный дом merit — достоинство metal beam – металлическая балка minor — меньший modify — видоизменять moisture — влажность mold — (зд.) плесень mortar – известковый раствор mud - шлам Nevertheless — несмотря на, однако Obstacle - препятствие obtain -получать, приобретать opening -отверстие OSB (oriented strand board) –ДВП otherwise — в противном случае outer wall – внешняя стена owe — быть обязанным Pad -опорная плита painting - окраска patron — покровитель, клиент, заказчик pattern — модель, образец peak -вершина peculiarly -особенно penetrate — проникать perforated pipe – перфорированная труба permanence — прочность pervasive -проникающий, распространяющийся повсюду pillar — столб, колонна, опора plain — (зд.) без узора plastic stripping -пластичное нанесение полос plumber - слесарь plumbing – слесарно-водопроводные работы; водопроводно-канализационная и кровельная работа plywood – фанера porch – крыльцо; портик, веранда pour -бетонировать precious -драгоценный predilection -предпочтение pre-fabricated – заранее изготовленные pressure – treated lumber - ДСП proportion -соотносить punch –пуансон, пробойник pyramid -пирамида Real estate -недвижимость rear -расположенный сзади, задний recast -придавать новую форму, переделывать remains -руины repel — отражать (нападение) replacement — замена requirement — требование resistance — сопротивление resonance - резонанс respiration — дыхание reveal -показывать, обнаруживать ridge – конек, коньковый брус; ребро (крыши) ridged — имеющий борозды, кромки rigid foam board -жесткий пенопласт rigidity -жесткость roadway - шоссе roof - крыша roofing -кровля, покрытие крыши rooftop – находящийся на крыше rotate — вращать rotational or twisting force – вращающая сила rough — грубый rural communities – сельская местность Sacristy — ризница sandwich -помещать посередине scarce — скудный semicircular -полукруглый senses — органы чувств septic system – система переработки анаэробными бактериями septic tanks -перегниватель, септиктент sewer – канализационная труба, прокладывать канализацию sewer line – канализационная труба sewer pipe -канализационная труба sewer systems – канализационная система sheathing -листовая обшивка sheet - лист shell — (зд.) оболочка, каркас shingle – дранка, тонкие доски; галька, булыжник siding –наружная облицовка; боковая обшивка, облицовка (досками, листовым материалом) sill - plate -лежень, опорная подкладка single family dwellings – дом на одну семью sink - раковина site – строительная площадка site preparation -инженерная подготовка территории skyscraper - небоскреб slab – плита; плиточный фундамент. slope -устраивать откос soffit – софит; потолок soil - почва somewhat — отчасти, до некоторой степени span – перекрывать аркой; расстояние (между опорами арки свода); перекладывать (пролет); натягивать (проволоку) spatial -пространственный spread out the load -растягивать груз spreading — простирающийся, распространяющийся stack -стояк staple -скоба steel – сталь steel reinforcing bars – стальные укрепляющие балки; стальная арматура steel skeleton – стально
|
|||||||||||||||||||||||||||||||||||||||||||||||||||||||||||||||||||||
|
|
Последнее изменение этой страницы: 2019-12-15; просмотров: 280; Нарушение авторского права страницы; Мы поможем в написании вашей работы! infopedia.su Все материалы представленные на сайте исключительно с целью ознакомления читателями и не преследуют коммерческих целей или нарушение авторских прав. Обратная связь - 216.73.216.220 (0.212 с.) |
|||||||||||||||||||||||||||||||||||||||||||||||||||||||||||||||||||||


 It gets the house up off the ground (especially important in damp or termite-prone areas).


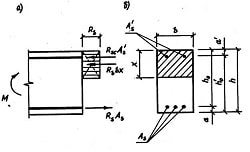
 A cross section of a header is shown at the right. The reason why the header has plywood in the middle is simply to make the header as wide as the rest of the wall. A 2x4 is really 1-1/2 inches by 3-1/2 inches, and a 2x10 is really 1-1/2 inches by 9-1/2 inches. When you sandwich two 2x10s together they are only 3 inches wide. Adding the piece of plywood in between makes the sandwich 3-1/2 inches wide.


 "W" truss
 "M" truss
 "Scissors" truss
 "Gable" truss