Заглавная страница Избранные статьи Случайная статья Познавательные статьи Новые добавления Обратная связь FAQ Написать работу КАТЕГОРИИ: ТОП 10 на сайте Приготовление дезинфицирующих растворов различной концентрацииТехника нижней прямой подачи мяча. Франко-прусская война (причины и последствия) Организация работы процедурного кабинета Смысловое и механическое запоминание, их место и роль в усвоении знаний Коммуникативные барьеры и пути их преодоления Обработка изделий медицинского назначения многократного применения Образцы текста публицистического стиля Четыре типа изменения баланса Задачи с ответами для Всероссийской олимпиады по праву 
Мы поможем в написании ваших работ! ЗНАЕТЕ ЛИ ВЫ?
Влияние общества на человека
Приготовление дезинфицирующих растворов различной концентрации Практические работы по географии для 6 класса Организация работы процедурного кабинета Изменения в неживой природе осенью Уборка процедурного кабинета Сольфеджио. Все правила по сольфеджио Балочные системы. Определение реакций опор и моментов защемления |
Arrest and Restraint TechniquesСодержание книги
Поиск на нашем сайте
The following techniques involve the use of minimum force to achieve your objectives. If you are well trained in these techniques you will find that the physiological damage caused is usually temporary with little or no long term damage. The locking techniques, if carried to their conclusion, will result in either breaks or dislocations. In arrest and restraint the joint locks are used only as a pain compliance tool. You want to achieve physical control of the resisting individual, even when the resistance is passive. All the strikes and joint locks applied during operations are not done to either satisfy your need for revenge or punish the individual. The target will be easier to handle over long distances if you can employ pain compliance techniques. The techniques are used with the express purpose of;
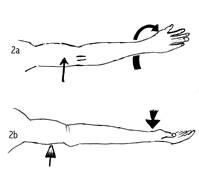
Sometimes it will be necessary to take an opponent to the ground in order to restrain them. Make sure that you take the opponent down on their face so that you or your team will not be kicked and punched by the prone opponent. The face down restraint offers you more protection but it is inherently dangerous for an opponent who may be either phychologically or physiologically challanged or under the influence of drugs. It is your objective to keep the opponent alive. You must be conversant with the relevant first aid procedures for dealing with the adverse effects of face down restraints. Jacket Grabs If the opponent is wearing a jacket, chop Point 1 and grab the collar from the back and pull it down off their shoulders. This will pin their arms at the elbows. If the opponent is wearing a jacket, chop Point 1 and then grab the bottom of the jacket from the rear and pull it, along with the collar, over the opponents head. This again will pin the opponents arms at the elbow. From the rear, grab the shoulder pads of the jacket, lift up and pull the opponent off balance to the rear. The opponent can be moved short distances in this manner. Belt Lifts From the rear, lift the opponent up by the belt line with one hand. With the other hand press forward with your thumb on the hollow at the base of the skull. As an alternative, punch your fist through the targets legs and grasp the front of their pants. Press on the back of the skull to move them forward. If the target is sitting down, apply thumb pressure in a forward direction to the top of the jaw in front of the ear lobe. When the target tries to remove your hands, apply a wrist lock. The thumb pressure is pressing the nerve against the jaw bone to cause the distraction. Straight Arm Bar For the straight arm bar to work efficiently, two points must be met. First, the anchor for the hold is approximately three fingers above the elbow joint on the tricep muscle (Fig 2a). Second, the wrist must be torqued so that the palm is facing up as in figure 2b. The illustration in figure 2c shows the palm in the incorrect position, the palm must face up in order to achieve full control.
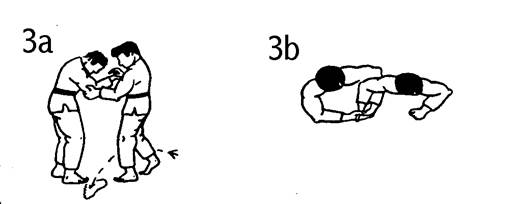
The Minor Goose Neck (Figs 3a & b) This simple wrist lock is achieved by first grabbing the opponents right arm at the wrist with your right hand. The main purpose of this initial grab is to collapse the opponents wrist forward into the goose neck position. Then move into the opponents right side, swivelling on the toes to draw you in close to the opponent, transferring your left arm below their right arm. At this stage place your left palm on the back of the captured hand. The best position is near or on the knuckles so that maximum pressure is exerted on the captured wrist. The opponents fingers must be pointing down.
The Hammer Lock This can be applied from the front if you first chop down on the center of the shoulder muscle (Point 1) to weaken the whole arm (Fig 4a) and grab the opponents right wrist with your left hand.
This is followed by punching into the base of the bicep on the inner part of the elbow (Point 7) with your right fist (Fig 4b).
Alternatively, use a reverse knife hand against Point 7. Fold up the captured arm by lifting the arm at the elbow joint and move in behind the opponent (Fig 4c).
This lock must be reinforced by pulling back on the opponents left shoulder, otherwise they can turn out of the hold. Finger and Thumb Locks (Fig 5) The fingers are vulnerable to dislocation when they are bent away from the palm.
With a good all round grip on a single finger, it is possible to control an individual by simply cocking your wrist so that the little finger edge of your hand is putting pressure on the captured finger joint. The real value in this hold is the fact that you can control the direction the opponent movement by getting the palm of the captured hand to face the direction you want the opponent to face.
Training Programme It will always prove difficult to apply minimum force on an opponent who is not cooperating. In some cases, the aggression displayed by the opposition my demand more force. The rules of engagement must be clear on this point so that the soldiers can operate and achieve the objectives required of them. The Arrest Teams behavior must reflect the degree of hostility displayed by the opposition. The team must dominate their environment in order to operate successfully. The training programme should go through four stages;
Section 2 - Stalking Teams Introduction Stalking Teams are employed in rural environments, the battlefield. They are responsible for much more than the capture of targeted individuals. They are also responsible for the disabling or killing of enemy sentries and patrol members. In many instances the minimum force tactics used by Arrest and Restraint Teams may be useful and in some situations. These minimum force tactics can be used to set up the enemy for more lethal tactics. Stalking Teams usually operate alone with limited support. The silent killing techniques employed by Stalking Teams have been omitted from this web page by the author. Composition of the Teams
Capture or kill operations are usually carried out by a 4 person team. All team members must carry either improvised or manufactured gags, blindfolds, hand and leg cuffs. These items must be ready for quick and silent use, even in total darkness. Team Leader. The Team Leader is also used as cover for the Attacker when the team are close to the enemy position. If the attack or capture goes wrong, it is the Leaders job to kill the enemy with a silenced weapon. Cover. There are usually two employed in the job of cover. Their task is to secure the area outside the scene of the attack. They must give the Attacker confidence to carry out their task without having to worry about side issues. On a capture mission, once the Attacker has the enemy under control, the Covers have a secondary task. The Covers secondary task is to move in, disarm, secure and then carry the enemy out. During this phase, the Leader must provide all round cover. If the enemy is not stunned at this stage they will usually be kicking and screaming. It is imperative that you stay away from their legs until the enemy has been totally subdued. Attacker. The role of the attacker is to either kill or overpower the enemy. Their fieldcraft training must be of the highest standard in order to achieve this. The final approach to the target will depend upon the terrain and the enemy routines. If the Attacker is spotted on the stalk in, it is the duty of the Team Leader to kill the enemy with a silenced weapon. For this to happen the Attacker must get out of the line of sight of the Team Leader. The Attacker must be trained in dealing with different types of sentry, dress and weapon carriage methods.
|
||||||
|
|
Последнее изменение этой страницы: 2017-02-10; просмотров: 166; Нарушение авторского права страницы; Мы поможем в написании вашей работы! infopedia.su Все материалы представленные на сайте исключительно с целью ознакомления читателями и не преследуют коммерческих целей или нарушение авторских прав. Обратная связь - 18.190.253.224 (0.009 с.) |