Заглавная страница Избранные статьи Случайная статья Познавательные статьи Новые добавления Обратная связь КАТЕГОРИИ: ТОП 10 на сайте Приготовление дезинфицирующих растворов различной концентрацииТехника нижней прямой подачи мяча. Франко-прусская война (причины и последствия) Организация работы процедурного кабинета Смысловое и механическое запоминание, их место и роль в усвоении знаний Коммуникативные барьеры и пути их преодоления Обработка изделий медицинского назначения многократного применения Образцы текста публицистического стиля Четыре типа изменения баланса Задачи с ответами для Всероссийской олимпиады по праву 
Мы поможем в написании ваших работ! ЗНАЕТЕ ЛИ ВЫ?
Влияние общества на человека
Приготовление дезинфицирующих растворов различной концентрации Практические работы по географии для 6 класса Организация работы процедурного кабинета Изменения в неживой природе осенью Уборка процедурного кабинета Сольфеджио. Все правила по сольфеджио Балочные системы. Определение реакций опор и моментов защемления |
Stalking Team Mission Aide Memoir⇐ ПредыдущаяСтр 11 из 11
Section 3 - Offensive Grappling Techniques Introduction This section contains material on offensive grappling techniques. These may prove useful for stalking teams because enemy prisoners will neither be quiet or passive. The techniques will create maximum damage and because of this, they must not be used in situations where minimum force is the requirement. Temples (Fatal Results) Kick with either the heel or ball of the foot. From the front, use a palm heel hook. From the side, use a palm heel thrust. A head butt can also be used, particularly after a throwing technique fails (Fig. 7).
Eyes (Permanent Damage) Use the finger tips, knife edge chop, palm heel or thumbs. The eyes of the grappler are should always be attacked at some stage of the fight. Ears (Permanent Damage) Cupped hands clapped over the ears can damage the ear drums. Attack the ears from any angle, particularly when fighting a grappler. As a restraint, grab and turn your wrist down to hold the opponent down. You can also threaten to rip off the ear by holding the ear in one hand and chopping down (Fig. 8).
Nose (Permanent Damage) Almost any part of the body can be used to attack the nose. The force of the attack can be increased if you pull forward on the opponents collar or hair (Fig. 9). Also grip the back of the head to use a head butting sequence of at least five butts.
Jaw (Permanent Damage) Palm heel the jaw area beside the ear lobe to knock out the opponent and break the jaw. Neck (Fatal Results) When attacking the opponents neck from the front, cup your right hand under their chin. Your left hand goes round the back of their head so that you can wrench their head counter clockwise (Fig. 10).
If their chin can be forced toward their left shoulder, you can cause a dislocation. This technique can be used to escape from loose waist holds, bear hugs or to force the opponent to move away from you. Neck (Fatal Results) Put your opponent on their knees and wrap your right arm round their mouth. Try to place your right hand round the back of their head. This will bring your right shoulder in close to their head. Reinforce this initial grip with your left arm close to your mouth and round the right side of the opponents head. Twist the head clockwise as fast as possible to cause maximum damage to the neck vertebra (Fig 11a).
Neck (Fatal Results) The combined arm bar and head lock (Fig11b) can cause fatal damage. If you either fall back, lift the opponent up or push your chest out, it is possible to break the opponents neck. Adam's Apple (Fatal Results) Either bite, chop, punch or toe kick to destroy the air passage to the chest. Collar Bones (Permanent Damage) These two bones run out from the throat hollow to the shoulders. They can be broken by, chops, hammerfist, head butts or batons. The approach must be slightly vertical (Fig 12), so that the force of the blow is not absorbed by the shoulder muscle. If the impact does land on the shoulder muscle, it will have a temporary stunning effect.
Fingers (Temporary Damage) Bend the fingers away from the palm. With an all round grasp of a persons finger it is possible to apply a restraint. By simply cocking your wrist and pulling on the held finger, the restraint is applied. Ribs (Fatal Results) The lower sets of ribs are more susceptible to breakage. the older the opponent, the more susceptible they are to bone breakages. Attack the ribs with head butts, toe kicks, elbows and side kicks (Fig 13).
Back (Fatal Results) With your opponent lying face down, grab their ankles and lift their feet as high as possible (Fig 14). Stamp on the small of their back to sever the spinal column (Fig 15).
Legs (Permanent Damage) If you catch the opponent with their weight on their leading leg, execute a straight leg heel jab below the knee cap (Fig 16). Also use a spooning kick to the side of the kneecap (Fig 17).
Either the heel or the shin can be used in this attack. The standing leg lock can be used to restrain the opponent (Fig 18). The bony part of your forearm is used to exert pressure on the lower part of the opponents calf. You can exert extra pressure on this nerve by leaning back and lifting up with your left forearm.
The Wedge Lock (Fig 19) can stress the knee and ankle joints. Grab the opponents left foot and push it forward. Your own leg must lie across the back of their knee joint.
Ankles and Instep (Permanent Damage) To dislocate the ankle, grab the toes with both hands, place your armpit over the heel and turn your body rapidly to the right (Fig 20a & b). Variation (Fig 21).
The Sleeper Hold (Fatal Results) To apply this strangle, squeeze both sides of the neck and push the opponents head forward. Unconsciousness should take place within 6 seconds. The two ridges of muscle that run from below the ears to the shoulders have one main function. They protect the veins and arteries going to and from the brain. After you wedge the opponents neck with your leg, the act of pushing the opponents head forward will push these ridges of muscle back. This reveals the veins and arteries and allows you to close them off (Fig 22).
Section 4 - Rear Attacks Introduction The attacks illustrated in this section can be used;
Standing Choke Hold Before starting this technique, use chops to the neck to weaken the opponent. Place your hand on the opponents right shoulder with your palm facing up (Fig 23a). Your left forearm is placed across the front of the opponents throat with your palms coming together on the opponents right shoulder. Keep your forearm as low as possible on the throat at this stage. Pull back on your left elbow and right hand while pressing your head and chest close to the opponent. To stop the opponent from either throwing you or wrestling out of the hold, break their balance back with one of your knees in the small of their back (Fig23 b).
Figure 23c illustrates a stronger variation of this choke. This choke hold can be modified slightly so that it becomes a strangle (a Sleeper Hold). Consider the last illustration in Section 3. Instead of the forearm crossing the front of the throat, the elbow joint is positioned to the front of the throat so that the opponent can breathe. The role of the forearm and bicep is to apply pressure to the sides of the neck. This is done after you jerk the hold on to displace the neck muscles and expose the veins and arteries. Knee Joint Take Down Stamp the edge of your foot into the back of the opponents knee joint (Fig24). Strike down at an angle of 45 degrees. This technique can be speeded up by;
Sweeping Ankle In this attack, block the opponents right leg any where below the kneecap with your right leg. While you are employing the foot block, grab the opponents shoulders or face and throw them back and to the right. Knee Trip Pull the opponent back off balance and step in to the side of the opponent (Fig 25a). Crouch down, keeping your body close to the opponents and keep pulling back. The opponent will fall over your hip or knee. This can be assisted by pushing on either the eyes or throat (Fig 25b).
Crotch Lift Punch your fist through the opponents crotch and grab at the testicles. Lift the opponent up and push forward with your other hand on the base of their skull (Fig26a). Finish off with a restraint if required (Fig 26b).
Shoulder Charge and Knee Lift Strike the opponent in the back with your shoulder to break their balance forward. At the same time reach down and grab the legs below knee cap level. Lift up and back (Fig 27a). Finish off with a restraint if required (Fig 27b).
Forearm Smash Grab the opponents left wrist in your left hand and pull their arm straight back from their body (Fig 28a). In order to apply tension to the elbow joint ensure that your fingers are in contact with the thumb side of their wrist. This will allow you to twist the wrist, applying torque, and thus present the opponents tricep muscle for the next stage of the attack. Land a right forearm smash to the center of the tricep muscle to temporarily disable the arm (Fig 28b). Strike further down, near the back of the elbow joint to break the arm if necessary.
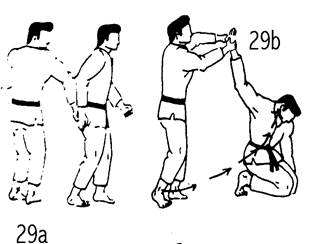
Wrist Lock The offensive wrist lock can be used to either apply a standing restraint or to throw the opponent down. Grab the opponents right palm with your right thumb on the back of their wrist. Reinforce this hold with the other hand so that you can torque the wrist clockwise and throw the opponent forward (Fig 29a & b).
The opponent can be thrown back if you initially grab their right palm with your left hand coming down to the front of their forearm. Again reinforce the grab with the right hand and torque the wrist counterclockwise to throw the opponent back. Straight Arm Bar Grab the opponents wrist and cock your leg for a roundhouse kick to the solar plexus (Fig 30a). After the kick twist the opponents wrist so that their palm is facing up. Also bear down with all your weight on their tricep muscle or just above the elbow joint (Fig 30b).
|
||||||
|
|
Последнее изменение этой страницы: 2017-02-10; просмотров: 139; Нарушение авторского права страницы; Мы поможем в написании вашей работы! infopedia.su Все материалы представленные на сайте исключительно с целью ознакомления читателями и не преследуют коммерческих целей или нарушение авторских прав. Обратная связь - 3.141.24.134 (0.012 с.) |