Заглавная страница Избранные статьи Случайная статья Познавательные статьи Новые добавления Обратная связь FAQ Написать работу КАТЕГОРИИ: ТОП 10 на сайте Приготовление дезинфицирующих растворов различной концентрацииТехника нижней прямой подачи мяча. Франко-прусская война (причины и последствия) Организация работы процедурного кабинета Смысловое и механическое запоминание, их место и роль в усвоении знаний Коммуникативные барьеры и пути их преодоления Обработка изделий медицинского назначения многократного применения Образцы текста публицистического стиля Четыре типа изменения баланса Задачи с ответами для Всероссийской олимпиады по праву 
Мы поможем в написании ваших работ! ЗНАЕТЕ ЛИ ВЫ?
Влияние общества на человека
Приготовление дезинфицирующих растворов различной концентрации Практические работы по географии для 6 класса Организация работы процедурного кабинета Изменения в неживой природе осенью Уборка процедурного кабинета Сольфеджио. Все правила по сольфеджио Балочные системы. Определение реакций опор и моментов защемления |
Primary (Maximum Damage) Pressure PointsСодержание книги
Поиск на нашем сайте
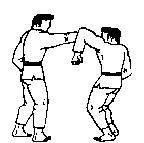
Rear 1. The top front and top back of the head can be attacked with:
2. The hollow at the base of the skull can be attacked with:
3. The spine at the base of the neck can be attacked with:
4. The area between the shoulder blades and the area below the left shoulder blade can be attacked with:
5. The ribs are also available in rear attacks:
6. The kidney area and up below the bottom ribs may be attacked with:
7. The tail bone may be attacked with:
Secondary Pressure Points When these points are attacked, the following effects can be expected:
The secondary chart excludes those areas susceptible to maximum damage. This will not guarantee that attacks to these areas will not be either crippling or fatal. Front
Fig. 2 1. The ridges of bone around the eyes can be attacked with: · Head butt · Palm heel · Feet · Teeth 2. The cheeks can be attacked with: · Teeth · Nails · Slaps with the cupped hand 3. The nose can be attacked with: · Palm heel · Head butt · Knife hand · Knee · Elbow · Teeth 4. The upper lip area and below the nose can be attacked with: · Palm heel · Knife hand 5. The mouth can be attacked with the feet. Do not attack the mouth with your bare hands. This principle will protect you from damaging your hands and serious infections 6. The point of the jaw can be attacked with palm heel jabs. The sides of the jaw can be attacked by inserting your fingers or thumbs up below the jaw. 7. The muscle ridges to each side of the neck can be attacked with either palm heels or the knife hand. 8. Attack the shoulder muscle with the knife hand. 9. The soft inner side of the upper arm can be attacked with: · Teeth · Pincer grips · Single knuckle punch 10. The arm pit can be attacked with thumb pressure directed up to the arm socket. 11. The ribs can be attacked with light palm heel attacks. 12. The solar plexus can be attacked with light palm heel strikes. 13. Attack the wrist area with: Knife edge Pincer grip Teeth 14. The back of the hand can be attacked with single knuckle punches or bites. 15. The full length of the thigh as well as the inner parts of the thigh can be attacked with: · Roundhouse shin kick · Roundhouse knee kick · Teeth 16. The shins can be attacked with: · Scraping the side of the shoe downwards · Direct toe kick · Heel kick 17. Distractions can be achieved by stamping in the direction of the toes. Secondary Pressure Points Rear 1. The ears can be attacked from the rear by: · Palm heel · Thumb pressure upwards at the hollow of the jaw line that lies behind the ear lobes. · The upper jaw area, directly behind the ear lobe, is very susceptible to thumb pressure 2. The muscles at the side of the spine at the base of the skull can be attacked with the knife hand. 3. The areas below the shoulder blades can be attacked with: · Palm heel · Elbow 4. The centre rear of the upper arm can be attacked with: · Palm heel · Pincer grip · Knife edge 5. The elbow joint can be attacked with steady pressure to force the whole arm out straight. This is possible after stopping a punch. A grip is retained on the attacker's wrist and the pressure is applied with your chest. 6. The back of the thigh from the buttocks to the knee joint can be attacked with toe kicks or pincer grips. 7. The back of the knee joint can be stamped to affect a take down. This can also be achieved with thumb pressure. 8. The calf muscle can be attacked with: · Thumb pressure · Toe kick · Side kick 9. The Achilles' tendon can be attacked with toe kicks or forearm pressure to affect a leg lock.
10. The ankle bones can be attacked with toe kicks. The Stances General There are no superior stances. The value of any stance depends on your fighting knowledge of its weaknesses and strengths. This also has to be coupled with your reactions to the opponent. One of the best all round stances for quick response remains the wrestling stance. In this stance both your feet are about shoulder width apart. The knees are slightly bent and your body weight should be equally balanced on both feet. The Basic Stance The aim of explaining and illustrating this basic stance is not to promote it as a superior stance. This stance has been used to explain the theoretical use of stances. With the working knowledge gained from using the basic stance, you can go on to adapt it to suit your personal situation. The basic stance illustrated in Figure 3 can be used either defensively or offensively. In the defensive mode, 75% of your body weight is on the rear foot. In the offensive mode, your body weight is equally distributed on both feet. In both cases, the most vulnerable areas of your body are turned away from the attackers direct line of attack.
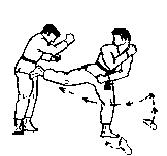
Fig.3 Leg Position. To use the basic stance, point the toes of the leading leg at the opponent. Ideally, the toes and the heel of the leading leg should be in line with the heel of the rear foot. The knee caps are easily damaged in combat. To protect the leading knee cap, transfer your body weight to the rear leg. The leading leg can also be used to protect the rear leg. Upper Body Position. In the left leading stance, the left leg is in front. The left hand is raised to a point six inches in front of the chin. This hand is used to protect the face. The left elbow is positioned in front of the body in order to protect the rib cage. As a counter against low punches and kicks, your right forearm lies across the lower torso with the hand covering the left groin. Tuck your chin into your left shoulder and look at the opponents chest. This will give you a good view of their arms and legs. When you look at the opponents face, it is impossible to notice the subtle hip and leg actions that telegraph their intentions. Keep your mouth closed. This will protect your teeth and tongue to a much better degree. After two months sparring practice, you will learn to relax thix exaggerated stance. At this stage you will know what openings you have left in your defence. You must also spend as much time using the right leading stance. The right side of right handed people is much stronger than the left side. Attacks and defences from the right leading stance will also confuse the opponent. This procedure can also be used by left handed individuals. The Boxing Stance The boxing stance is not ideal for close combat. This is because it leaves the lower torso exposed to attack. The boxing stance in Figure 4 is not ideal for close combat. This is because it leaves the stomach area uncovered. If an opponent presents this stance, do not use hand techniques. Instead, concentrate on kicks (Fig 5), grappling and ground fighting.
Fig.4 & 5 The Karate Stance The wide stance shown in Figure 6 is not very practical outside the karate hall.
Fig.6 Blocking and Parrying Blocks and parries are useless exercises, on their own. They must form part of a fluid reflex action that involves a counter attack. A block or a parry should interrupt the path of a strike and deflect it, rather than stop it. The deflection of a strike will reduce its impact and also allow you to retaliate. The end product of your block and parry training must be a fast and fluid style as opposed to a jerky and mechanistic sequence (block, pause, punch, pause). All blocking actions are very vulnerable to counter-attack. The opponent may trap your blocking arm and use a follow-up strike. Your basic training in blocking and parrying should go through four stages.
· Stage 1 For a six minute period allow your partner to throw 300 punches at either your face or body guard. These punches must be controlled so that there is no hard contact. The first 50 punches are done in slow time or until the partner can control the technique. With the development of control, the punches can be speeded up. Your partner must concentrate on developing speed, focus and recovery. Your role in this exercise is to watch your partner's arms, feet, shoulders and the attacking limb. Build up a thorough knowledge of the mechanics of that particular technique. Learn about it's path into your defensive zone. In the final 50 repetitions try to add more power to the punches. Power punches are not just generated through arm action alone. Learn to triple the speed, and the power, of the technique by using the full shoulder and hip extension as well as a shooting forward action. These three actions will be explained in more detail later on in this chapter. · Stage 2 Practice the blocking action in slow motion. Also learn to duck, dodge and parry the punch. · Stage 3 Speed up the technique. Learn to use more hip and shoulder extension in both your partner's attack and your defence. At this stage, retaliation is not considered. There are other skills to be developed before you try counter attacks. Practice all the other skills that keep you from being an easy target. These include; Ducking, Weaving, Stepping out of line, Turning, Shooting forward and back, Bobbing and Crouching. · Stage 4 At this stage you can apply your counter attack. The first three stages will have given you a thorough working knowledge of a specific technique. You have not wasted your time watching the opponent's actions in feinting, stepping and attacking. By studying the path of the strike into your defensive zone, you have a broader concept of the potential follow ups you can use. When you can predict the opponent's actions, you can also attack first and upset their timing. The Basic Block When you are in the fighting stance, your arms are always directly between your centre line and the opponents. From this fighting stance deflect the striking arm or leg by striking it with the outside of your forearm (Figures 7a & b) . Fig.7a & 7b When blocking a kick, keep your fist closed to protect your fingers. Try and parry or scoop the kick rather than stop it. Smothering Block Cushion the effects of kicks and punches to the upper body by holding both arms in front of your body. The forearms are at least six inches away from your body (Figures 8a & b).
Fig.8a & 8b Elbow Block Snap your elbow up and deflect the punch with your forearm (Figure 9). If you use this block from the fighting stance, the motion is reduced to a reflex jerk of the elbow. In this block, both your hands are free to grab the attacking arm.
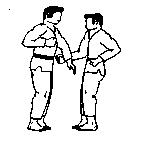
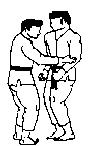
Fig, 9 Palm Heel Block The palm heels can be used to parry and block hand attacks. In Figure 10 the opponent's biceps muscles were palm heeled and the elbows were then grabbed. This can be followed up with head butts or palm heels to the face.
Fig. 10 Out Parry Keep the palm of your left hand facing the ground. With the palm still facing the ground, raise this hand until it reaches chin level (Figure 11a). At this point, snap the palm out to face the opponent. The opponents punch is parried with the outside of your forearm (Figure 11b).
Fig. 11a & 11b At all times, keep the elbow of the parrying arm down to cover your ribs. The parry should not extend further than your left shoulder width. In the execution of this parry you can also step in and counter attack. In Parry Keep the upper part of your left arm close to your body. Move your left palm out to the side in a circular motion. At the same time, step back with the right foot and turn your shoulders clockwise (Figures 12a & b).
Fig. 12a, 12b & 12c In a successful parry, the little finger edge of your forearm should parry the opponents attacking forearm (Figure 12b). Add power to this parry by moving your left elbow to the front of your body. Also snap your left palm round to face you just before contact. Figure 12c illustrates the opposite side view of the final stages of the parry. Basic Footwork Foot Blocks The threat of direct kicks to the groin will be reduced if you maintain the basic side on stance to the opponent. Also block low kicks by simply lifting your leading leg at least six inches off the ground (Figures 13a & b). This procedure will allow the edge of your foot to make painful contact the opponent shins. Most kicks have an optimum point (or focal point) for full impact.
Fig. 13a & 13b By staying close to someone who uses kicks you may neutralise their kicking ability. There is an inherent danger in getting too close to a kicker. Some of the most lethal kicks are the low sweeping hook kicks to the knee caps. This form of kicking will not be visible when you are too close to the opponent. Going Behind an Opponent
Fig. 14 · Method 1 If the opponent has one of their arms extended, pull on that arm so that the opponent is moving forward off balance Fig 14.Step forward on your right foot in order to swivel in behind the opponent (Figure 14). Ensure that you do not allow your legs to cross. · Method 2 Pull on the opponent's head or arm so that they are moving forward off balance (Figure 15a). Swivel on your left toes and then place your right foot in line with both the opponent's feet. Lift your left foot and swivel in behind the opponent on your right toes (Figure 15b).
Fig. 15a & 15b Stepping Drills Retreating Retreating should be carried out in such a way that one foot is on the ground at all times. It is equally important that your legs are never allowed to cross. Adherence to these two basic principles should ensure that you maintain a stable posture while under stress or strong attack. With practice, these two rules will become second nature.
Short Retreat Start from the basic stance with the left foot leading as in Figure 16a. The left foot slides back into contact with the right foot (Figure 16b). The right foot is then moved back so that you have returned to the basic fighting stance (Figure 16c).
Fig. 16a, 16b & 16c Moving From a Left Stance to a Right Stance Move the leading left foot so that it is behind the right foot. This is achieved by swiveling on the toes of both feet (Figure 17b). The basic stance is maintained but the body has turned with the right side leading (Figure 17 c). The same principle can be used to advance from the left leading stance to the right leading stance. Swivel on the toes of the left foot and place the right leg in the lead.
Fig. 17a, 17b & 17c Turning From Rear Attacks Draw the rear foot away from the attack area (Figure 18a)until it touches your leading foot (Figure 18b). Advance your leading leg (Figure 18c). Swivel on the toes of both your feet in order to turn and face the opponent (Figure 18d).
Fig. 18a, 18b, 18c & 18d Short Advance To advance, slide your right foot up to your left heel (Figure 19a). The leading left foot can be then advanced or used for kicking with (Figure 19b) .
Fig. 19a & 19b Side Stepping Long Side Step To side step to the right start by sliding your left foot back into contact with your right foot (Figure 20a). Take a wide step to the left of the opponents line of attack with your right foot (Figure 20b).
Fig. 20a, 20b & 20c Swivel on the toes of the right foot (Figure 20c) and pull the left foot round so that you are in a right leading stance at right angles to your former position. This move can be used to retreat from the opponent. Short Side Step To close in much faster to the opponent, simply leave out the initial step in Figure 20a by immediately stepping out with your right foot. Maintain the left leading stance by then sliding your left foot up to the right foot. Body Movement Tactics The following seven tactics may be incorporated into your training programme. These exercises have three main functions. First, they will add power to your attacks. Second, they will create the opportunities for you to counterattack. Third, by your upper body mobile you will prove difficult to hit. Even when you fail to block an attack, the act of moving away from that attack will reduce the impact. These tactics are much more important than any of the blocks and parries. That is because the tactics which follow are much more instinctive and are easier to develop than the blocks and parries. It is much easier to duck or dodge a punch than it is to block a punch. A blocking technique will force you to fully commit yourself to a single punch when you are more likely to be faced with either multiple, simultaneous or combination attacks. If you are inexperienced, the thinking process involved in blocking a punch is cumbersome. First you have to detect the punch coming. Next, you have to decide how to block it. Following that, you have to decide how to counter attack or even block the second punch. Get realistic about unrehearsed attacks, try to hit first. If you can't do that, either run for your life, move your body out of the line of fire or try these; · Ducking. Bend forward slightly at the waist. This will allow punches directed at your face to go over your shoulder. Keep your eyes on the opponent at all times. Recover your stance by springing up again, but not to your former position, go to the side slightly. · Crouching. Bend your knees slightly in order to allow punches directed at your head to go over your shoulder. Keep your eyes on the opponents chest area so that you can continue to observe their follow up. Crouching can also be used to get you close to the opponents lower targets for knife, stick and palm heel tactics. · Weaving. Move your upper body sideways to the left and the right. Do this by bending sideways at the waist and pushing off from the legs. For example, to weave left, combine the actions of straightening the right leg, bending the left and bending at the waist. · Shooting. Move your upper body either directly forward or back by flexing at the waist. Shooting forward will take you in close to the opponent as well as adding power to your strike. To shoot forward, the leading knee cap moves over the leading foot. At the same time, you straighten your rear leg and bend forward at the waist. Shooting back will allow you to escape the full force of the opponents attack. Do this by pushing off from the front leg and bending the back leg slightly. At the same time lean back slightly from the waist. Shooting forward can be modified and more committed by sliding the leading foot forward in the initial steps. Shooting back can be modified by sliding the rear leg back as well. For both these modifications, you must be certain that the terrain is safe and you will not stumble.
· Turning and Acceleration. The speed and impact effect of punches and kicks are not generated by the hands or feet in isolation. The act of turning the hips and shoulders into the target will accelerate all your techniques. To speed up your right punches from the left leading stance consider the following actions. Collapse the right knee in slightly. This will jerk the right side of your body forward. As your knee bends, turn your right shoulder and hip into the target. During this period, your fist will be accelerated towards the target. Further acceleration can be achieved when you extend your shoulder with the punch. This extension is achieved by relaxing the muscles around the shoulder joint and allowing the shoulder mass to move forward towards your chin. More acceleration can be added by shooting forward during this action. All these individual actions are not designed to increase the distance your fist has to travel. These actions are designed to accelerate your fist over the short distance it has to travel. · Bobbing. Bobbing is a combination of weaving in one direction, ducking or crouching and then weaving in the other direction. This is a common tactic used in boxing. In this case the boxer weaves low to the right in order to avoid the opponents left jab. When the jab is over the left shoulder the defender ducks low and weaves to their left. This action will take them away from a possible right punch. Bobbing is used by counter punchers. While weaving right to avoid a left punch, they will use a left hook. When they weave to the left, they will use a right hook. · Hopping. Provided the ground is safe, hopping can be used to counter rush attacks. As the opponent rushes forward you must get out of their line of attack. This is done by simply hopping on both feet to either the left or right of the opponents line of attack. This will disrupt the attackers plans for a vital fraction of a second. That is long enough for you to mount a counter attack. Use hook kicks and punches after hopping. Feinting A feint is a physical action used on the opponent to induce a reaction. Your aim is to capitalise on their predicted reaction to that action. The opponents reaction can be anything from a simple knee jerk reaction to their counter attack. Your initial feint must be strong and deliberate enough to draw the opponents attention. As soon as you have the opponents attention drawn to one area, you attack at another point. Initial direct attacks are very rarely successful in their execution. Because of this fact, feints are essential for opening up the opponents defensive posture. · Example 1 Open up the opponents defence with a palm heel jabs to the face. Follow up with a palm heel attack to the bladder or ribs. · Example 2 Raise your right rear leg for the initial stages of a snap kick. Plant that right foot in the lead and palm heel the face. · Example 3 Raise your right arm high in the air. Left jab at the face. Use a low roundhouse kick with your shins to the side of the opponents knee cap. This will break the opponents leg. Drawing Drawing is the act of deliberately leaving an opening, a small weakness, in your defence. The opening can be either subtle or obvious, but it must be enough to induce the opponent to attack that area. For example, lowering your hands will induce attacks to the face. As soon as the opponent commits themselves, you are in a position to ambush the predicted line of attack. The arts of drawing and feinting can only be learned through the trial and error of sparring. Drawing and feinting will induce the opponent to conform to your movements. You will take the initiative away from the opponent and actually control their movements. Basic Sparring Drill The two sparring drills from this section are designed to build up your sensitivity and reflexes to the opponents movements.
|
||||||||
|
|
Последнее изменение этой страницы: 2017-02-10; просмотров: 109; Нарушение авторского права страницы; Мы поможем в написании вашей работы! infopedia.su Все материалы представленные на сайте исключительно с целью ознакомления читателями и не преследуют коммерческих целей или нарушение авторских прав. Обратная связь - 18.221.248.140 (0.012 с.) |


 .
.