Заглавная страница Избранные статьи Случайная статья Познавательные статьи Новые добавления Обратная связь FAQ Написать работу КАТЕГОРИИ: ТОП 10 на сайте Приготовление дезинфицирующих растворов различной концентрацииТехника нижней прямой подачи мяча. Франко-прусская война (причины и последствия) Организация работы процедурного кабинета Смысловое и механическое запоминание, их место и роль в усвоении знаний Коммуникативные барьеры и пути их преодоления Обработка изделий медицинского назначения многократного применения Образцы текста публицистического стиля Четыре типа изменения баланса Задачи с ответами для Всероссийской олимпиады по праву 
Мы поможем в написании ваших работ! ЗНАЕТЕ ЛИ ВЫ?
Влияние общества на человека
Приготовление дезинфицирующих растворов различной концентрации Практические работы по географии для 6 класса Организация работы процедурного кабинета Изменения в неживой природе осенью Уборка процедурного кабинета Сольфеджио. Все правила по сольфеджио Балочные системы. Определение реакций опор и моментов защемления |
How do you selecting and editing pathsСодержание книги
Поиск на нашем сайте
Point and Segment Shortcuts
Lecture №29. Page Layout, Printing, Exporting and Advanced Features 29.1 Using Styles and Templates 29.2 Custom Creation Tools
Purpose: Using Styles and Templates and own creation tools Keywords: ellipse tool,rectangle tool, mart fill tool, polygon tool
As the name implies is a set of CorelDraw tools displayed in the form of icons. Knowing how to use these tools covers the basics of CorelDraw.
PICK TOOL: This is the most important I would say of all the tools in corel tool box. It forms the basic of all CorelDraw functions. The pick tool is use to select object, text or any content on the workspace in order to highlight it before any other application or transformation can be apply to that content. It is also used to move object around, to duplicate object through drag and rightclick drop. It is the default tool selected when you first launch CorelDraw. SHAPE TOOL: This tool is use to create irregular shapes through dragging of nodes. Through it nods can be added or deleted from any shape. It can also be launched by pressing F10 in your keyboard. CROP TOOL: This tool is used to crop objects by simply clicking on the object and dragging to draw a rectangle shape within the object and finally clicking on the draw rectangle to minus the area outside the rectangle. ZOOM TOOL: This is used to zoom in and out of the your workspace. Simply pressing Z on your keyboard will also launch this tool. You can also zoom in to your workspace by pressing F2 and dragging through the area you want to zoom into. And then equally press F3 to zoom out. FREE HAND TOOL: This is used to zoom in and out of the your workspace. Simply pressing Z on your keyboard will also launch this tool. You can also zoom in to your workspace by pressing F2 and dragging through the area you want to zoom into. And then equally press F3 to zoom out. Otherwise liken to pencil tool is used to draw straight and irregular lines. To draw a straight line you simply need to click on the beginning point then make sure you release your hand from your mouse button, then pressing down your control button on your keyboard drag your mouse to the end point you want your line to stop and click again before you release the control button. But to draw irregular lines you simply have to click on your mouse and still holding it down move your mouse around the workspace to draw what you want. In case of error or mistake along your drawing you can go back to the point of the line where you want to start your from again by pressing your shift button on your computer keyboard but make sure you are still holding down your mouse button. SMART FILL TOOL: This is used to apply c olour to objects. It apply colour to objects fill and outline and can also be use to determine the thickness of the outline. RECTANGLE TOOL: This is used to draw rectangle shapes simply by clicking while still holding down the mouse drag on your workspace and release. By pressing the control button down on your key board while dragging will give a perfect shape (A square shape) ELLIPSE TOOL: This is used to draw ellipse shapes like circle or oval shapes. This can be achieved by simply clicking on your workspace while still holding down your mouse button drag to draw your shape and release button when done. But to draw a perfect circle you will have to hold down the control button while dragging. POLYGON TOOL: This is used to draw shapes with more than four sides. The default sides is five but you can add to the side by increasing the number of sides in the option box in the property bar of your CorelDraw just above the rulers. And also, by using shape tool to drag the nodes between the shape edges you can easily create a star shape. By pressing down your control button when you drag to form your star will give you a perfect star shape. See diagram below...
SHAPE TOOLS This tool is use to draw other types of shapes like the love shape, the cross shape, right angle shape etc. You have to select the shape you want to draw from a drop down list in the property bar. See diagram below...
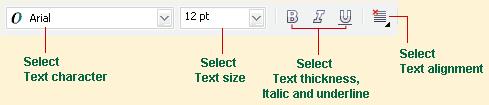
TEXT TOOL: This is used for typing text on your workspace by simply clicking on any spot in your workspace where you want to start typing from. This will launch a blinking cursor, then you can start typing. This type of typing is called a graphic text. To launch the other type of text known as the paragraph text which create a box kind of a margin where you will have to do all your typing without going out of the specified box area. You simply have to click on the spot where you want to start your typing and drag while still holding down the mouse button to cover the area where you want your texts to be and release button. This will create a sort of dotted box in the space you have specified, All your typing will be within this box. You can change the look of the text by changing it´s character in the character selector drop down menu in the property bar. See diagram below.
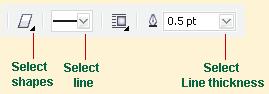
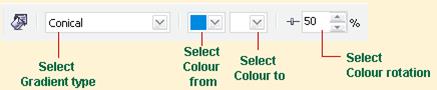
TABLE TOOL: This is used to draw a table. You can specify the rows and columns the changing their value in the property bar. INTERACTIVE BLEND TOOL: This is used to blend two objects to each other by simply dragging from one to the other. OUTLINE TOOL: This tool is used to specify the thickness of an outline and to determine it colours. By clicking on the tool you can choose from the drop down options like,”no outline, outline colour, thickness in numbers” etc. FILL TOOL: This tool is used to apply fill to an object or shape in different format like “uniform fill, pattern fill, texture fill” etc. You can get more function out of this tool from the property bar when you have already launched it. INTERACTIVE FILL TOOL: This tool is use to create gradient fill on shapes by simply clicking and dragging along the shape to create a linear gradient which is the default. You can change the gradient type and colour in the property bar. See diagram below...
Ұсынылатын әдебиеттер тізімі: 1. Peter A. Koenig, Design Graphics, Drawing Techniques for Design Professionals, Third Edition, Doorling Kindersley, India Pvt. Lt., 2012. 2. http://www.corel.com/corel/pages/index.jsp?pgid=800382&item=resource&listid=13600110 3. http://www.zicara.com/techbytes/web-design/file-formats-vector-imagescont-2 Бақылау сұрақтары 1. This tool lets you draw ribbon objects and explosion shapes. What is it tool? 2. Outline Tool CorelDraw?
|
|||||
|
|
Последнее изменение этой страницы: 2016-12-11; просмотров: 405; Нарушение авторского права страницы; Мы поможем в написании вашей работы! infopedia.su Все материалы представленные на сайте исключительно с целью ознакомления читателями и не преследуют коммерческих целей или нарушение авторских прав. Обратная связь - 3.133.89.207 (0.008 с.) |