Заглавная страница Избранные статьи Случайная статья Познавательные статьи Новые добавления Обратная связь FAQ Написать работу КАТЕГОРИИ: ТОП 10 на сайте Приготовление дезинфицирующих растворов различной концентрацииТехника нижней прямой подачи мяча. Франко-прусская война (причины и последствия) Организация работы процедурного кабинета Смысловое и механическое запоминание, их место и роль в усвоении знаний Коммуникативные барьеры и пути их преодоления Обработка изделий медицинского назначения многократного применения Образцы текста публицистического стиля Четыре типа изменения баланса Задачи с ответами для Всероссийской олимпиады по праву 
Мы поможем в написании ваших работ! ЗНАЕТЕ ЛИ ВЫ?
Влияние общества на человека
Приготовление дезинфицирующих растворов различной концентрации Практические работы по географии для 6 класса Организация работы процедурного кабинета Изменения в неживой природе осенью Уборка процедурного кабинета Сольфеджио. Все правила по сольфеджио Балочные системы. Определение реакций опор и моментов защемления |
Additional material settingsСодержание книги
Поиск на нашем сайте
Opaque The Opaque Blend Mode is easily the most straightforward, and probably the one you will use most often. Generally used for regular surfaces, you should know this by now. Masked Masked Blend Mode is used for objects in which you will need to selectively control visibility in a binary (on/off) fashion. And since I still see it happen, note that almost no plant in real life is transparent, so don't use expensive transparency for most if not all of your vegetation.
Translucent The Translucent Blend Mode is used for objects that require some form of transparency. Additive The Additive Blend Mode simply takes the pixels of the Material and adds them to the pixels of the background. This is very similar to the Linear Dodge (Add) Blend Mode in Photoshop. This means that there is no darkening; since all pixel values are added together, blacks will just render as transparent. This Blend Mode is useful for various special effects such as fire, steam, or holograms.
Modulate The Modulate Blend Mode simply multiplies the value of the Material against the pixels of the background. The behavior is very similar to the Multiply Blend Mode in Photoshop. Can be quite useful for vfx.
Additional thoughts
1.3.1 “Noise node” My general suggestion is to avoid it where possible, it's extremely heavy on instructions even in its most basic form. I’d suggest to always bake down the final result to a texture where possible. Using this node as-is should be a final resort, or if the performance budget allows for it.
Math over textures A lot of stuff in materials where one expects to use a texture (a gradient, spherical gradient, sphere, various other shapes) can be generated through simple math related nodes in the material editor. Component masking a “Texture Coordinate” node on either the Red or Green channel already gives you a crisp gradient for example. When considering math over textures, take into account that texture with mipmaps is prefiltered, while your math is not, which makes it subject to aliasing.
Switches. It is a rather bad practice to make one massive master-shader with a huge amount of static switches/static bools as it can cause extreme bloat and kill performance when misused and/or mismanaged. This is even more true when it comes to mobile development and I have personally seen simple games kill performance on consoles because of overzealous usage of static switches. To quote official documentation: " This parameter is named static because it cannot change at runtime, it can only be set in the Material Instance Editor. Static Switches are applied at compile time, not at runtime. This means that whatever branch of the material was dropped will never be executed, so static switches are effectively free at runtime. On the other hand, a new version of the material must be compiled out for every used combination of static parameters in a material, which can lead to a shader explosion if abused. Try to minimize the number of static parameters in the material and the number of permutations of those static parameters that are actually used." This is also why each time you tick a static bool/switch it compiles, as under the hood it needs to create a new copy of the master material with the correct setup of switches.
"Complex materials can create a lot of shader permutations which can add up significantly to your memory footprint and load time. (Can be hundreds of MBs.) Make sure you keep permutations to a minimum, in Instanced Materials don’t override static switch parameters if you don’t need to, this can duplicate shaders unnecessarily." and "Use Instanced Materials where possible if the material is only adjusting a few parameters to avoid duplicates." To avoid many switch-induced duplicates/permutations one should use the “ Material Analyzer ” available in the latest UE4 versions. More on this later.
Compression settings
Default compression should generally beused for albedo textures.
Normal map Compression Should always be used for normal maps. In almost no cases is it worth it to pack another texture in the blue channel and using some material nodes to append the Red/Green channel of a normal texture. The Normal compression --under the hood-- Puts the Red channel of a normal map in the combined RGB channels, and the Green channel in the Alpha channel (which is basically a combined RGB channel to begin with), and generates the blue channel through magic code. So unless a very specific situation, compress normal maps as normal maps please. Normal map compression also means that each level of mipmap chain, that is generated for your texture by the engine, will be re-normalized. This limits the possibility of storing anything other than an actual normal map using this compression setting.
Masks/Grayscale Compression Useless, only disables “SRGB” in that case if you have a RGB packed texture just keep it at the “Default” setting and disable SRGB yourself. Saves you some error/warning head-aches when applying other textures in a material instance as the “Texture Samples” do not really like using different compression settings than their originally applied texture. Use Alpha compression if your texture is a grayscale texture.
Alpha Compression In my humble opinion, a highly undervalued compression setting. It desaturates an RGB texture and puts it into the Alpha channel, removing the RGB channel. If your texture is already a grayscale texture it simply puts it into the alpha channel. Since the Alpha channel is basically an RGB channel in itself, it has the same amount of bits of RGB combined which results in much crisper albeit grayscale textures, so crisp in fact you often can get away with using smaller resolutions (saving resource size). Additionally, it does not have any of the compression artifacts one can expect from the RGB channel packing compression algorithm.
Other compression settings. All I can say is, use them accordingly. I myself do not use these as much (besides the vertex displacement one for vertex animation) so I cannot give extensive information about these settings.
Additional Texture settings
Compress without Alpha If you accidentally imported your texture with an alpha channel, either go back and fix your mistake, or turn this on so the alpha gets removed, saving some resource size.
Compression Quality I tend to not touch this as it's a “on a per situation” usage situation.
Texture Group Very important to set this up properly! DO NOT FORGET! Imagine you are playing a new highly anticipated game but you know your pc is not up to snuff to run this new game at the highest/ultra settings so you cherry pick through some graphical options.
Let's set world resolution (content related to the group “world”) to high. Now, let's set “character detail” to Ultra because you want to see the hero in all its glory! And finally, “Effects” will be set to medium, because who cares about sparkles right?! If the artist did the job, lowering the “Effects” settings to medium would result in all textures potentially reducing in quality. (Lower texture resolution trough changing mipmap levels, and depending on how its set up, changing LOD levels to reduce polycounts) If the artist forgot about this though, lowering the “Effects” settings to medium did nothing, as all the content it should affect still uses the “World” texture group. Imagine how it feels if you play a game, you lower a certain graphic setting and the game still runs like poop… Right! That's why it's important to set this up right!
SRGB Easy, if it's not albedo, generally turn this off.
Emitters
Bounds Especially when using GPU particles, be sure to set up a proper “bounds” so the particles do not pop out of view when the player is not looking at the source location of the emitter, nor have the emitter active when the player is not looking at the source location due to massive bounds. Less things rendered = always better.
Lod While setting up particle LOD’s is a pain in the butt when it comes to cascade, setting them up can significantly reduce the load as you can cull secondary or tertiary effects depending on distance. As you can also adjust spawn count (and basically any module) depending on its LOD, one could spawn less particles when an emitter is further away, yet make them slightly bigger so they are still noticed. Setting this up is painful, but can really help improve overall performance. If you are using lights, be sure to disable them in the LOD’s!
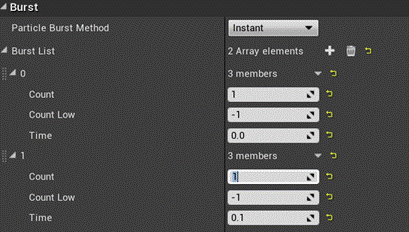
Draw Calls If you have two emitters that do the exact same thing, but are timed differently, why not combine them? Let's make a quick example: 2 emitters, Identical sprites, one bursts one emitter at birth, the other after 0.1 second. In that case you can just add a second burst in the spawn module.
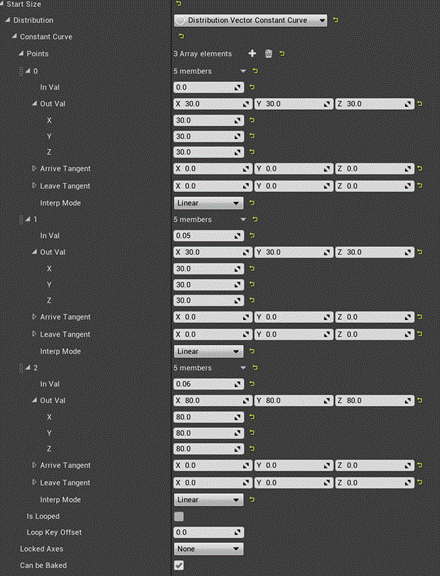
But what if this second sprite needs to be slightly bigger than the first one?
Now any particle spawned at birth will have size 30/30/30, and any particle spawned after 0.06 will have 80/80/80 for its size. This can be done for basically all “initial” modules, and when done with care allows for quite some flexibility and saving draw calls and amount of emitters in the long run. While it takes some work, when applied to a finalized effect, it can save some additional performance, so keep that in mind! Lights Lights are expensive, I'd suggest to use a separate emitter for them. You can set a particle light its color directly in the light-module, and set the “emitter render mode” to “Lights only” so it does not need to use any materials at all.
3.8 Disabled emitters.
Additionals
This tool is great when you have many master materials, each with static switches, as it will tell you which instances of these masters could be merged to reduce identical permutations and lowering resource sizes. If done well, this can save you hundreds of mb’s in various ways.
Redirectors Clean. Up. Your. Redictors. Regularly. Or. Else! Texture resolution I don't think I should say this, but I feel I should say this because I still see it happen. Unless you know what the *bleep* you are doing... only use power of two textures where possible. 16*16, 32*32, 64*64, 128*128, up to 8192*8192 (and higher) 128*512 is also fine of course, but keep in mind that some mobile devices/platforms/older hardware might benefit from 1:1 scaling of textures.
Sources: UE4 material blend mode: https://docs.unrealengine.com/en-US/Engine/Rendering/Materials/MaterialProperties/BlendModes/index.html
UE4 Customized UVs: https://docs.unrealengine.com/en-US/Engine/Rendering/Materials/CustomizedUVs/index.html
UE4 “Noise”:
UE4 Static Switch Usage: https://docs.unrealengine.com/en-US/Engine/Rendering/Materials/ExpressionReference/Parameters/index.html UE4 Quality switch: UE4 FeatureLevelSwitch:
UE4 Cascade LOD: https://docs.unrealengine.com/en-US/Engine/Rendering/ParticleSystems/LODs/index.html
UE4 Cascade Quality settings: https://docs.unrealengine.com/en-US/Engine/Rendering/ParticleSystems/Reference/BaseClasses/ParticleEmitterClass/index.html Cascade’s disabled emitters overhead:
UE4 Texture sample shared/clamped + AMD
More info about compression:
Opaque The Opaque Blend Mode is easily the most straightforward, and probably the one you will use most often. Generally used for regular surfaces, you should know this by now. Masked Masked Blend Mode is used for objects in which you will need to selectively control visibility in a binary (on/off) fashion. And since I still see it happen, note that almost no plant in real life is transparent, so don't use expensive transparency for most if not all of your vegetation.
Translucent The Translucent Blend Mode is used for objects that require some form of transparency. Additive The Additive Blend Mode simply takes the pixels of the Material and adds them to the pixels of the background. This is very similar to the Linear Dodge (Add) Blend Mode in Photoshop. This means that there is no darkening; since all pixel values are added together, blacks will just render as transparent. This Blend Mode is useful for various special effects such as fire, steam, or holograms.
Modulate The Modulate Blend Mode simply multiplies the value of the Material against the pixels of the background. The behavior is very similar to the Multiply Blend Mode in Photoshop. Can be quite useful for vfx.
Additional material settings 1.2.1 Shading model: “Unlit” If it does not need any shadow information or is overall emissive. One of the cheapest shading models available.
1.2.2 “Tangent space Normals” If the model does not have a normal map, or does not need a normal map, consider disabling this to decrease the instructions a little bit.
1.2.3 “Fully Rough” If your usecase does not require usage of a roughness value or texture, enabling “Fully Rough” can save you some instructions and up to 1 sampler.
1.2.4 “Apply Fogging” Unless your game uses volumetric fog, or objects far in the distance need fogging from height/distance fog, you can generally disable this for transparent, additive, and modulate blending modes, saving you quite a lot of shader instructions.
1.2.5 “Automatically set usage” While really handy in the early stage of development, the more “used with X’s” are active, the more instructions and other under-the-hood things come into play.
1.2.6 “Use Lightmap Directionality” (Mobile only) Lightmaps will be flat, but cheaper, resulting in less instructions.
1.2.7 “Custom uv’s” A “Custom UV” matches with the UV channel of a mesh on a vertex level. So “Custom UV 2” will relate to UV channel 2 of a mesh (considering UE4 starts with UV channel 0)
On GPU's, the vertex shader is run for every vertex, and the pixel shader is run for every pixel. Almost all the material nodes in Unreal Engine 4 are run for every pixel. While a UV Coordinate node can be either part of the vertex or pixel shader, the CustomizedUVs feature is only run in the vertex shader, and offers a performance increase over running the same calculations in the pixel shader. This offers an excellent way to speed up even just tiling a texture. While the system is not limited in the math you run on the UVs, the result will depend on the tessellation of your mesh.
Note: Customized UVs are currently only implemented for certain component types: Static Meshes, Skeletal Meshes, BSP, landscape, and mesh particles. Notably Sprite particles do not support Customized UVs yet. 1.2.8 “Quality Switch” & “Feature Level Switch”
The Feature Level Switch node allows you to make simplified materials for lower powered devices. Example Usage: You might have a material with 10 textures overlapping and complex math, but just a single static texture for mobile (feature level ES2). The difference between the two is that generally the QualitySwitch can be somewhat controlled by the user through the “Graphic settings” (Setting special effects, or post processing from Ultra to Low for example), while the FeatureLevelSwitch automatically does its thing depending on the shading models that can be used by the platform it runs on.
If you use the same network on different inputs, it won't cause unnecessary duplication of shaders. (Thanks to Deathrey for this info)
Additional thoughts
1.3.1 “Noise node” My general suggestion is to avoid it where possible, it's extremely heavy on instructions even in its most basic form. I’d suggest to always bake down the final result to a texture where possible. Using this node as-is should be a final resort, or if the performance budget allows for it.
Math over textures A lot of stuff in materials where one expects to use a texture (a gradient, spherical gradient, sphere, various other shapes) can be generated through simple math related nodes in the material editor. Component masking a “Texture Coordinate” node on either the Red or Green channel already gives you a crisp gradient for example. When considering math over textures, take into account that texture with mipmaps is prefiltered, while your math is not, which makes it subject to aliasing.
Switches. It is a rather bad practice to make one massive master-shader with a huge amount of static switches/static bools as it can cause extreme bloat and kill performance when misused and/or mismanaged. This is even more true when it comes to mobile development and I have personally seen simple games kill performance on consoles because of overzealous usage of static switches. To quote official documentation: " This parameter is named static because it cannot change at runtime, it can only be set in the Material Instance Editor. Static Switches are applied at compile time, not at runtime. This means that whatever branch of the material was dropped will never be executed, so static switches are effectively free at runtime. On the other hand, a new version of the material must be compiled out for every used combination of static parameters in a material, which can lead to a shader explosion if abused. Try to minimize the number of static parameters in the material and the number of permutations of those static parameters that are actually used." This is also why each time you tick a static bool/switch it compiles, as under the hood it needs to create a new copy of the master material with the correct setup of switches. "Complex materials can create a lot of shader permutations which can add up significantly to your memory footprint and load time. (Can be hundreds of MBs.) Make sure you keep permutations to a minimum, in Instanced Materials don’t override static switch parameters if you don’t need to, this can duplicate shaders unnecessarily." and "Use Instanced Materials where possible if the material is only adjusting a few parameters to avoid duplicates." To avoid many switch-induced duplicates/permutations one should use the “ Material Analyzer ” available in the latest UE4 versions. More on this later.
|
||||||||
|
|
Последнее изменение этой страницы: 2020-12-19; просмотров: 271; Нарушение авторского права страницы; Мы поможем в написании вашей работы! infopedia.su Все материалы представленные на сайте исключительно с целью ознакомления читателями и не преследуют коммерческих целей или нарушение авторских прав. Обратная связь - 3.145.79.214 (0.009 с.) |