Заглавная страница Избранные статьи Случайная статья Познавательные статьи Новые добавления Обратная связь КАТЕГОРИИ: ТОП 10 на сайте Приготовление дезинфицирующих растворов различной концентрацииТехника нижней прямой подачи мяча. Франко-прусская война (причины и последствия) Организация работы процедурного кабинета Смысловое и механическое запоминание, их место и роль в усвоении знаний Коммуникативные барьеры и пути их преодоления Обработка изделий медицинского назначения многократного применения Образцы текста публицистического стиля Четыре типа изменения баланса Задачи с ответами для Всероссийской олимпиады по праву 
Мы поможем в написании ваших работ! ЗНАЕТЕ ЛИ ВЫ?
Влияние общества на человека
Приготовление дезинфицирующих растворов различной концентрации Практические работы по географии для 6 класса Организация работы процедурного кабинета Изменения в неживой природе осенью Уборка процедурного кабинета Сольфеджио. Все правила по сольфеджио Балочные системы. Определение реакций опор и моментов защемления |
Editor and Windows Form Designer Windows
The large main window is used by the Code Editor, the Windows Forms Designer, or the Windows Presentation Foundation Designer. You can switch to Code view or Design view by clicking Code or Designer on the View menu or by using the keyboard shortcuts F7 or SHIFT + F7. While in Design view, you can drag controls onto the window from the Toolbox, which you can make visible by clicking the Toolbox tab on the left margin. The Properties window in the lower-right is populated only in Design view. It enables you to set properties and hook up events for user interface controls such as buttons, text boxes, and so on. When you set this window to Auto Hide, it will collapse into the right margin whenever you switch to Code View.
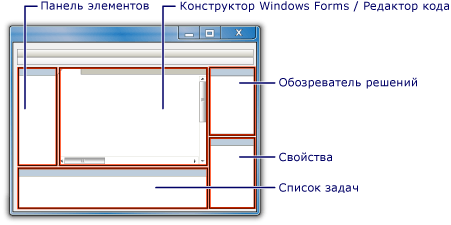
Доступ к средствам в интегрированной среде разработки Взаимодействие со средствами осуществляется через окна, меню, страницы свойств и мастеров в интегрированной среде разработки. Основа интегрированной среды разработки показана ниже:
Для быстрого доступа к любым окнам или файлам открытого средства используется сочетание клавиш CTRL + TAB. Окна редактора и конструктора форм Windows В главном большом окне открывается редактор кода, конструктор Windows Forms или конструктор Windows Presentation Foundation. Для переключения между представлением кода и конструктора можно в меню Вид выбрать команду Код или Конструктор, или воспользоваться клавишей F7 или сочетанием SHIFT + F7. В представлении конструктора элементы управления из Панели элементов можно перетаскивать в окно (для открытия панели элементов следует слева щелкнуть пункт Панель элементов). Окно Свойства справа внизу появляется только в представлении конструктора. В его помощью можно задать свойства и привязать события для элементов управления пользовательского интерфейса, таких как кнопки, текстовые поля и другие. Если для этого окна установить параметр Автоматически скрывать, оно будет сворачиваться в правое поле при каждом переходе к Представлению кода.
Solution Explorer and Project Designer The window in the upper-right is Solution Explorer, which shows all the files in your project in a hierarchical tree view. When you use the Project menu to add new files to your project, you will see them reflected in Solution Explorer. In addition to files, Solution Explorer also displays your project settings, and references to external libraries required by your application. The Project Designer property pages are accessed by right-clicking the Properties node in Solution Explorer, and then clicking Open. Use these pages to modify build options, security requirements, deployment details, and many other project properties. Compiler, Debugger, and Error List Windows The C# compiler has no window because it is not an interactive tool, but you can set compiler options in the Project Designer. When you click Build on the Build menu, the C# compiler is invoked by the IDE. If the build is successful, the status pane displays a Build Succeeded message. If there were build errors, the Error List window appears below the editor/designer window with a list of errors. Double-click an error to go to the problem line in the source code. Press F1 to see Help documentation for the highlighted error.
The debugger has various windows that display values of variables and type information as your application is running. You can use the Code Editor window while debugging to specify a line at which to pause execution in the debugger, and to step through code one line at a time. Customizing the IDE All of the windows in Visual C# can be made dockable or floating, hidden or visible, or can be moved to new locations. To change the behavior of a window, click the down arrow or push-pin icons on the title bar and select from among the available options. To move a docked window to a new docked location, drag the title bar until the window dropper icons appear. While holding down the left mouse button, move the mouse pointer over the icon at the new location. Position the pointer over the left, right, top or bottom icons to dock the window on the specified side. Position the pointer over the middle icon to make the window a tabbed window. As you position the pointer, a blue semi-transparent rectangle appears, which indicates where the window will be docked in the new location.
You can customize many other aspects of the IDE by clicking Options on the Tools menu.
|
|||||
|
|
Последнее изменение этой страницы: 2017-01-19; просмотров: 129; Нарушение авторского права страницы; Мы поможем в написании вашей работы! infopedia.su Все материалы представленные на сайте исключительно с целью ознакомления читателями и не преследуют коммерческих целей или нарушение авторских прав. Обратная связь - 3.139.238.76 (0.004 с.) |