Заглавная страница Избранные статьи Случайная статья Познавательные статьи Новые добавления Обратная связь КАТЕГОРИИ: ТОП 10 на сайте Приготовление дезинфицирующих растворов различной концентрацииТехника нижней прямой подачи мяча. Франко-прусская война (причины и последствия) Организация работы процедурного кабинета Смысловое и механическое запоминание, их место и роль в усвоении знаний Коммуникативные барьеры и пути их преодоления Обработка изделий медицинского назначения многократного применения Образцы текста публицистического стиля Четыре типа изменения баланса Задачи с ответами для Всероссийской олимпиады по праву 
Мы поможем в написании ваших работ! ЗНАЕТЕ ЛИ ВЫ?
Влияние общества на человека
Приготовление дезинфицирующих растворов различной концентрации Практические работы по географии для 6 класса Организация работы процедурного кабинета Изменения в неживой природе осенью Уборка процедурного кабинета Сольфеджио. Все правила по сольфеджио Балочные системы. Определение реакций опор и моментов защемления |
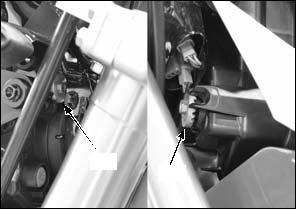
Brake pedal height adjustment
Loosen the lock nut [1] and turn the push rod [2] until the correct pedal height is obtained.
For standard push rod length (page 18-9).
After adjustment, tighten the push rod lock nut to the specified torque.
TORQUE:17.2 N·m (1.8 kgf·m, 13 lbf·ft)
[1]
BRAKE LIGHT SWITCH
[2]
[1]
[2]
3-17 MAINTENANCE
HEADLIGHT AIM
[1] [2]
CLUTCH SYSTEM
The adjuster may be damaged if it is positioned too far out, leaving minimal thread engagement.
Minor adjustment is made with the minor adjuster [1] at the clutch lever.
Loosen the lock nut [2] and turn the adjuster. Tighten the lock nut while holding the adjuster. Recheck the clutch lever freeplay.
If the adjuster is threaded out near its limit and the correct freeplay cannot be obtained, turn the adjuster all the way in and back out one turn, then perform the adjustment at major adjuster as follows.
[1]
[2]
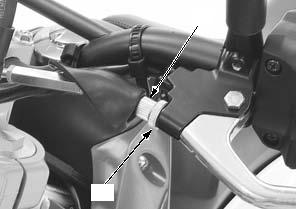
Major adjustment is made with the major adjuster [1] on the clutch cable.
Loosen the lock nut [2] and turn the adjuster to adjust the freeplay.
Tighten the lock nut while holding the adjuster.
If proper freeplay cannot be obtained, or the clutch slips during test ride, disassemble and inspect the clutch (page 12-9).
[1]
[2]
3-18 MAINTENANCE
SIDESTAND
INSPECTION
Check the sidestand [2] for movement and lubricate the sidestand pivot if necessary.
Check the sidestand ignition cut-off system:
– Sit astride the motorcycle and retract the sidestand. – Start the engine. – Shift the transmission in gear and lower the sidestand. – The engine should stop as the sidestand is lowered.
SUSPENSION
Loose, worn or damaged suspension parts impair motorcycle stability and control. REAR SUSPENSION INSPECTION
Check the action of the rear shock absorber by compressing the rear end several times.
Check the entire shock absorber assembly for leaks, damage or loose fasteners.
Replace damaged components which cannot be repaired.
Tighten all nuts and bolts.
For shock absorber service (page 17-6).
Support the motorcycle using a safety stand or hoist, raise the rear wheel off the ground.
Check for worn swingarm bearings by grabbing the swingarm ends and attempting to move it side to side.
Replace the bearings if any looseness to noted. For swingarm service (page 17-10).
NUTS, BOLTS, FASTENERS
Check that all chassis nuts, screws and bolts are tightened to their correct torque values (page 1-9). Check that all cotter pins, safety clips, hose clamps and cable stays are in place and properly secured.
3-19 MAINTENANCE
WHEELS/TIRES
Support the motorcycle using a safety stand or hoist, raise the front wheel off the ground.
Hold the front fork leg and move the front wheel sideways with force to see if the wheel bearings are worn.
For front wheel service (page 16-4).
Support the motorcycle using a safety stand or hoist, raise the rear wheel off the ground.
Hold the swingarm and move the rear wheel sideways with force to see if the wheel bearings are worn.
For rear wheel service (page 17-4).
Check the tire pressure with a tire pressure gauge when the tires are cold.
– Front tire (page 1-8) – Rear tire (page 1-8)
Check the tires for cuts, embedded nails, or other damage.
Check the front and rear wheels for trueness.
Measure the tread depth at the center of the tires. Replace the tires when the tread depth reaches the service limits.
– Front tire (page 1-8) – Rear tire (page 1-8)
Inspect the wheel rims and spokes for damage.
Tighten any loose spokes to the specified torque using the special tool.
|
|||||||||||||||||||||||||||||||||||||||||||||||||||||||||||||||||||||||||||||||||||||||||||||||||||||||||||||||||||||
|
|
Последнее изменение этой страницы: 2016-04-08; просмотров: 272; Нарушение авторского права страницы; Мы поможем в написании вашей работы! infopedia.su Все материалы представленные на сайте исключительно с целью ознакомления читателями и не преследуют коммерческих целей или нарушение авторских прав. Обратная связь - 3.19.27.178 (0.022 с.) |


 Check the sidestand spring [1] for damage or loss of tension.