Заглавная страница Избранные статьи Случайная статья Познавательные статьи Новые добавления Обратная связь КАТЕГОРИИ: ТОП 10 на сайте Приготовление дезинфицирующих растворов различной концентрацииТехника нижней прямой подачи мяча. Франко-прусская война (причины и последствия) Организация работы процедурного кабинета Смысловое и механическое запоминание, их место и роль в усвоении знаний Коммуникативные барьеры и пути их преодоления Обработка изделий медицинского назначения многократного применения Образцы текста публицистического стиля Четыре типа изменения баланса Задачи с ответами для Всероссийской олимпиады по праву 
Мы поможем в написании ваших работ! ЗНАЕТЕ ЛИ ВЫ?
Влияние общества на человека
Приготовление дезинфицирующих растворов различной концентрации Практические работы по географии для 6 класса Организация работы процедурного кабинета Изменения в неживой природе осенью Уборка процедурного кабинета Сольфеджио. Все правила по сольфеджио Балочные системы. Определение реакций опор и моментов защемления |
Урок 2: Переменные. Примитивные типы данных.Стр 1 из 15Следующая ⇒
Автор курса: alishev Составил конспект: dragosh Москва Август 2018 public class HelloWorld {
Вывод в консоль:
Hello World!
Урок 2: Переменные. Примитивные типы данных. public class Variables {public static void main(String[] args) { byte myByte; myByte = 16; System. out. println ("myByte - " + myByte); short myShort = 211; int myInt = 557; long myLong = 234546677L; float myFloat = 234.0F; double myDoble = 234.0; boolean myBoolen = true; char myChar = 'c'; }
Вывод в консоль:
myByte - 16 myShort - 211 myInt - 557 myLong - 234546677 myFloat - 234.0 myDoble - 234.0 myBoolen - true myChar - c Урок 3: Строки(String) в Java. Ссылочные типы данных. public class Strings {public static void main(String[] args) { String string = "Hello"; String space = " "; String name = "Bob"; System. out. println (string + space + name); System. out. println ("Hello" + " " + "John"); int x = 10;
Вывод в консоль:
Hello Bob Hello John My number is 10
Урок 4: Цикл while. public class WhileLoops {public static void main(String[] args) { boolean t = true; System. out. println (t); boolean t2 = 2 > 1; boolean t3 = 5 >= 5; boolean t4 = 5 == 5; int value = 0; while (value < 5){
Вывод в консоль:
true true true true false Hello - 0 Hello - 1 Hello - 2 Hello - 3 Hello – 4
Урок 5: Цикл for. public class ForLoop {public static void main(String[] args) { for (int i = 0; i < 10; i++) { System. out. println ("Hello - " + i); } System. out. println (); for (int i = 0; i < 10; i = i + 5) { System. out. println (); for (int i = 10; i > 0; i--) {
Вывод в консоль:
Hello - 0 Hello - 1 Hello - 2 Hello - 3 Hello - 4 Hello - 5 Hello - 6 Hello - 7 Hello - 8 Hello - 9
Bye - 0 Bye - 5
Hi - 10 Hi - 9 Hi - 8 Hi - 7 Hi - 6 Hi - 5 Hi - 4 Hi - 3 Hi - 2 Hi - 1
Урок 6: Условный оператор if. public class If {public static void main(String[] args) { System. out. println (" if №1"); if (5 == 5){ System. out. println ("5 == 5 - Yes, is true!"); } else { System. out. println ("5 == 5 - No, if false!"); } System. out. println (" if №2");
} else if (5 == 3){ System. out. println (" if №3");
Вывод в консоль:
if №1 5 == 5 - Yes, is true! if №2 5 == 3 - No, is false! if №3 5 == 5 - Yes, is true!
Урок 9: Операторы break и continue. Реализация Break. public class Break_Continue {public static void main(String[] args) { int i = 1; while (true){ if (i == 5){ break; } System. out. println (" Петля №" + i); i++; } System. out. println (" Мы вышли из цикла for!"); } }
Вывод в консоль:
Петля №1 Петля №2 Петля №3 Петля №4 Мы вышли из цикла for!
Реализация Continue. public class Break_Continue { public static void main(String[] args) { for (int i = 0; i < 10; i++) { if (i % 2 == 0){ continue; // continue не пропускает ниже выполнение кода если выполнено условие // в if (i % 2 == 0). } else { System. out. println ("Петля №" + i); // Выводим в консоль только Петли с нечетными номерами. } } System. out. println ("Мы вышли из цикла for!"); } }
Вывод в консоль:
Петля №1 Петля №3 Петля №5 Петля №7 Петля №9 Мы вышли из цикла for!
Урок 10: Оператор switch. import java.util.Scanner;import java.util.Scanner; public class Switch { Вывод в консоль: How old are You?0 // Ввел с клавиатуры. You were born.Вывод в консоль:
How old are You? 7 // Ввел с клавиатуры. You are a schoolboy.
Вывод в консоль:
How old are You? 18 // Ввел с клавиатуры. You are a student.
Вывод в консоль:
How old are You? 1 // Ввел с клавиатуры. Your case is not here!!!
import java.util.Scanner; public class Switch { Вывод в консоль: How old are You?zero // Ввел с клавиатуры. You were born.Вывод в консоль:
How old are You? seven // Ввел с клавиатуры. You are a schoolboy.
Вывод в консоль:
How old are You? eighteen // Ввел с клавиатуры. You are a student.
Вывод в консоль:
How old are You? 18 // Ввел с клавиатуры. Your case is not here!!!
import java.util.Scanner; public class Switch {
Вывод в консоль:
How old are You? zero // Ввел с клавиатуры. You were born. You are a schoolboy. You are a student.
Вывод в консоль:
How old are You? zer // Ввел с клавиатуры слово с ошибкой. Your case is not here!!!
Урок 11: Массивы в Java. public class Arrays {public static void main(String[] args) { int num = 3; // Примитивный тип данных. char character = 'a'; // Примитивный тип данных. String string1 = new String ("Hello"); // Объект Класса String. String string2 = "Hello"; // Объект Класса String. int number = 10; System. out. println (" Инициализация массива numbers \" вручную \". Способ 2."); System. out. println (" Инициализация массива numbers \" вручную \". Способ 3."); System. out. println (" Инициализация массива numbers с помощью цикла for");
Вывод в консоль:
0 Инициализация массива numbers "вручную". Способ 1. 10 20 30 40 50 Инициализация массива numbers "вручную". Способ 2. 100
200 300 400 500 Инициализация массива numbers "вручную". Способ 3. 1000 2000 3000 4000 5000 Инициализация массива numbers с помощью цикла for 0 10 20 30 40
Урок 14: Классы и объекты. public class ClassesAndObjects {public static void main(String[] args) { Person person1 = new Person (); person1. name = "Roman"; person1. age = 50; System. out. println ("My name is " + person1. name + ", and I am " + person1. age + " years old."); Person person2 = new Person (); } class Person{
Вывод в консоль:
My name is Roman, and I am 50 years old. My name is Vovan, and I am 20 years old.
Урок 15: Методы в Java. public class ClassesAndObjects {public static void main(String[] args) { Person person1 = new Person (); person1. name = "Roman"; person1. age = 50; person1.speak (); Person person2 = new Person (); class Person{ // У Класса есть Методы (Действия)
Вывод в консоль:
My name is Roman, and I am 50 years old. My name is Vovan, and I am 20 years old.
public class ClassesAndObjects { public static void main(String[] args) { Person person1 = new Person (); person1. name = "Roman"; person1. age = 50; person1.sayHello (); person1.speak ();
class Person{ // У Класса есть Методы (Действия) void sayHello(){
Вывод в консоль:
Hello! My name is Roman, and I am 50 years old. My name is Vovan, and I am 20 years old.
Урок 17: Параметры метода. public class ClassesAndObjects {public static void main(String[] args) { Person person1 = new Person (); person1.setNameAndAge ("Roman", 50); person1.speak (); Person person2 = new Person (); class Person { void setNameAndAge(String userName, int userAge) { void speak() {
Вывод в консоль:
My name is Roman, and I am 50 years old. My name is Vovan, and I am 20 years old.
Урок 20: Конструкторы. public class Lesson19 {public static void main(String[] args) { Human human1 = new Human (); } } class Human{ // Конструктор по умолчанию. /* У конструктора нет типа данных. Имя конструктора всегда совпадает с именем класса и оно всегда пишется с большой буквы. */ public Human(){ System. out. println ("Hello from the first Constructor!"); } }
Вывод в консоль:
Hello from the first Constructor!
Перегрузка конструкторов public class Lesson19 { public static void main(String[] args) { Human human1 = new Human (); // Hello from the first Constructor! Human human2 = new Human ("Bob"); // Hello from the second Constructor! Human human3 = new Human ("Bob", 45); // Hello from the third Constructor! } } class Human{ private String name; private int age; /* public Human(String name){
Вывод в консоль:
Hello from the first Constructor! Hello from the second Constructor! Hello from the third Constructor!
Урок 23: StringBuilder public class Lesson23 {public static void main(String[] args) { // создаем Объект Класса String двумя способами String s = new String (" Hello "); String x = " Hello "; /* Метод toUpperCase Класса String не изменяет стоку х, а на базе строки х создает НОВУЮ строку х с изменениями. После изменения переменная х перестает ссылаться на СТАРЫЙ Объект String Hello. И теперь х ссылается на вновь созданный Объект String HELLO. */ x.toUpperCase (); // Строка х не изменилась. System. out. println (" \" Старая Строка \" (Строка х не изменилась): " + x); //Чтобы строка х изменилась, ее нужно переопределить. x = x.toUpperCase (); // Строка х изменилась. System. out. println (" \" Новая Строка \" (Строка х изменилась): " + x); } }
Вывод в консоль:
"Старая Строка" (Строка х не изменилась): Hello "Новая Строка" (Строка х изменилась): HELLO
// Конкатенация строк. public class Lesson23 {
Вывод в консоль:
HelloMyFrieng hellomyfriend HELLOMYFRIEND
Урок 25: Наследование. public class Lesson25 {public static void main(String[] args) { Animal animal = new Animal (); System. out. print ("animal: "); animal.eat (); System. out. print ("animal: "); animal.sleep (); System. out. println (); /*
public class Animal { public void eat(){ System. out. println ("I am eating"); } public void sleep(){
// Dog наследует 2 метода от Animal public class Dog extends Animal {
Вывод в консоль:
animal: I am eating animal: I am sleeping
dog: I am eating dog: I am sleeping
Дополняем класс Dog методом bark (лаять). Этот метод не сможет использовать объект класса Animal,только объекты класса Dog и классы наследники класса Dog. public class Lesson25 { public static void main(String[] args) { Animal animal = new Animal (); System. out. print ("animal: "); animal.eat (); System. out. print ("animal: "); animal.sleep (); System. out. println (); /*
public class Animal { public void eat(){ System. out. println ("I am eating"); } public void sleep(){
/* Dog extends Animal Dog наследует методы от Animal Дополняем класс Dog методом bark (лаять). Этот метод не сможет использовать объект класса Animal, только объекты класса Dog и классы наследники класса Dog. */ public class Dog extends Animal {
Вывод в консоль:
animal: I am eating animal: I am sleeping
dog: I am eating dog: I am sleeping dog: I am barking
В классе Dog переопределяем метод eat класса Animal. public class Lesson25 { public static void main(String[] args) { Animal animal = new Animal (); System. out. print ("animal: "); animal.eat (); System. out. print ("animal: "); animal.sleep (); System. out. println (); /*
public class Animal { public void eat(){ System. out. println ("Animal is eating"); } public void sleep(){
/* Dog extends Animal Dog наследует методы от Animal Дополняем класс Dog методом bark (лаять). Этот метод не сможет использовать объект класса Animal,только объекты класса Dog и классы наследники класса Dog. В классе Dog переопределяем метод eat класса Animal */ public class Dog extends Animal {
Вывод в консоль:
animal: Animal is eating animal: Animal is sleeping
dog: Dog is eating dog: Animal is sleeping dog: I am barking
Добавляем в класс Animal новое поле name. public class Lesson25 { public static void main(String[] args) { Animal animal = new Animal (); System. out. print ("animal: "); animal.eat (); System. out. print ("animal: "); animal.sleep (); System. out. println (); /* System. out. print ("dog: ");
// Создаем поле String name; в классе Animal public class Animal { String name = "Some animal"; public void eat(){ public void sleep(){
// Создаем поле метод showName(); в классе Dog public class Dog extends Animal { /* public void showName(){
Вывод в консоль:
animal: Animal is eating animal: Animal is sleeping
dog: Dog is eating dog: Animal is sleeping dog: I am barking dog: Some animal
Урок 26: Интерфейсы. Чтобы использовать в одном проекте классы с одинаковыми именами, нужно разнести их по разным папкам (Pascage) в папке src. Создаем новый пакет (папку) Interfaces. Для создания в IJ Constructor, Setter или Getter, зажимаем клавиши Ctrl + N. package Interfaces; public class Test { animal1.sleep ();
package Interfaces; public class Animal { public Animal(int id){ public void sleep(){
package Interfaces; public class Person { public Person(String name){ public void sayHello(){
Вывод в консоль:
I am sleeping Hello
Создаем Interfaces для классов Animal и Person. Interfaces -> Animal -> New -> Java ClassName: InfoKind: Interface 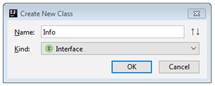 package Interfaces; package Interfaces;
public class Test { animal1.sleep (); animal1.showInfo (); public interface Info { package Interfaces; public class Animal implements Info{ public Animal(int id){ public void sleep(){ public void showInfo(){
package Interfaces; public class Person implements Info{ public Person(String name){ public void sayHello(){ @Override
Вывод в консоль:
I am sleeping Hello showInfo(); - Id is 1 showInfo(); - Name is Bob
package Interfaces; public class Test { info1.showInfo ();
package Interfaces; public interface Info {
package Interfaces; public class Animal implements Info{ public Animal(int id){ public void sleep(){ public void showInfo(){
package Interfaces; public class Person implements Info{ public Person(String name){ public void sayHello(){ @Override
Вывод в консоль:
showInfo(); - Id is 1 showInfo(); - Name is Bob
package Interfaces; public class Test { /* outputInfo (info1); }
package Interfaces; public interface Info {
package Interfaces; public class Animal implements Info{ public Animal(int id){ public void sleep(){ public void showInfo(){
package Interfaces; public class Person implements Info{ public Person(String name){ public void sayHello(){ @Override
Вывод в консоль:
showInfo(); - Id is 1 showInfo(); - Name is Bob
package Interfaces; public class Test { }
package Interfaces; public interface Info {
package Interfaces; public class Animal implements Info{ public Animal(int id){ public void sleep(){ public void showInfo(){
package Interfaces; public class Person implements Info{ public Person(String name){ public void sayHello(){ @Override
Вывод в консоль:
showInfo(); - Id is 1 showInfo(); - Name is Bob Урок 27: Пакеты. Создаем: - класс Test;- пакет Forest; - класс Squirell; - класс Tree;
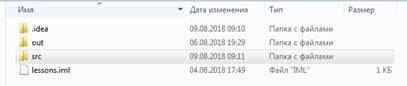
Организация нашего проекта в папке src на компьютере.
В папке Forest.
Создаем Объект класса Tree в классе Test. public class Test { public static void main(String[] args) { Tree tree1 = new Tree (); } }
!!!Компилятор выдает ошибку о том, что он не видит класс Tree!!! Импортируем в класс Test класс Tree пакета Forest. import Forest.Tree; public class Test {
Ошибка компиляции исчезла.
import Forest.Tree; import Forest.Squirell;public class Test {
Класс Scanner находится тоже в другом пакете, который тоже нужно импортировать. import java.util.Scanner; public class Test {
Создаем Объект класса SomeClass в классе Test. Импортируем в класс Test класс SomeClass пакета SomeThing пакета Forest. import Forest.SomeThing.SomeClass; public class Test {
Сокращенный импорт классов. Из...
В...
Урок 29: Полиморфизм. В языках программирования и теории типов полиморфизмом называется способность функции обрабатывать данные разных типов.
public class Test { public static void main(String[] args) { Animal animal = new Animal (); Dog dog = new Dog (); animal.eat ();
public class Animal { public void eat(){ System. out. println ("Animal is eating..."); } }
public class Dog extends Animal{ }
Вывод в консоль:
Animal is eating... Animal is eating...
public class Test { public static void main(String[] args) { Animal animal = new Dog (); animal.eat (); /* !!! не можем обратиться в через animal к методу bark как - animal.bark(); не все животные лают!!! */ Dog dog = new Dog (); dog.eat (); dog.bark (); }
public class Animal { public void eat(){ System. out. println ("Animal is eating..."); } }
public class Dog extends Animal{ public void bark(){ System. out. println ("Dog is barking..."); } }
Вывод в консоль:
Animal is eating... Animal is eating... Dog is barking...
Позднее связывание. Переопределяем public void eat(){} в классе Dog
Обект такого типа и реализации Animal animal = new Dog ();выведет на экран переопределенный в потомке метод родителя eat таким образом: "Dog is eating...".Это и есть "Позднее связывание". public class Test { public static void main(String[] args) { Animal animal = new Dog (); animal.eat (); } }
public class Animal { public void eat(){ System. out. println ("Animal is eating..."); } }
public class Dog extends Animal{ /* Переопределяем public void eat(){} в классе Dog */ @Override public void eat() { System. out. println ("Dog is eating..."); } public void bark(){
Вывод в консоль:
Dog is eating...
Возможность передавать в метод разные типы, если у них один и тот же родитель.
public class Test { public static void main(String[] args) { Animal animal = new Animal (); Dog dog = new Dog (); Cat cat = new Cat (); System. out. print (" Объект animal: "); }
|
|||||||||
|
|
Последнее изменение этой страницы: 2020-12-17; просмотров: 121; Нарушение авторского права страницы; Мы поможем в написании вашей работы! infopedia.su Все материалы представленные на сайте исключительно с целью ознакомления читателями и не преследуют коммерческих целей или нарушение авторских прав. Обратная связь - 3.144.202.167 (0.665 с.) |