Заглавная страница Избранные статьи Случайная статья Познавательные статьи Новые добавления Обратная связь КАТЕГОРИИ: ТОП 10 на сайте Приготовление дезинфицирующих растворов различной концентрацииТехника нижней прямой подачи мяча. Франко-прусская война (причины и последствия) Организация работы процедурного кабинета Смысловое и механическое запоминание, их место и роль в усвоении знаний Коммуникативные барьеры и пути их преодоления Обработка изделий медицинского назначения многократного применения Образцы текста публицистического стиля Четыре типа изменения баланса Задачи с ответами для Всероссийской олимпиады по праву 
Мы поможем в написании ваших работ! ЗНАЕТЕ ЛИ ВЫ?
Влияние общества на человека
Приготовление дезинфицирующих растворов различной концентрации Практические работы по географии для 6 класса Организация работы процедурного кабинета Изменения в неживой природе осенью Уборка процедурного кабинета Сольфеджио. Все правила по сольфеджио Балочные системы. Определение реакций опор и моментов защемления |
General Comments on The Fist
The skin and bones of the fist are liable to suffer much more trauma than then objects they connect with in a fight. The skin covering the knuckles is very thin and liable to break open when it strikes a solid surface. When you punch an opponent in the mouth, the skin will cut open by the opponent's teeth. This will lead to other health problems, including infection with AIDS, hepatitis, jaundice, and other debilitating problems. Compared with other weapons of the hand the fist is not a reliable, long term, general-purpose weapon. Despite this reality, the fist remains the principal weapon in close combat for the novice fighter. This is because it is a natural, nurtured and cultural expression of aggression. Natural It is a natural expression of aggression because most people will clench their fists when they are under stress. In many cases, individuals will telegraph their intentions by approaching you with their fists clenched. In conflict resolution, where the minimum amount of force is required, the approach of the individual who intends resolving the situation is open handed. This is instantly recognised as non-offensive. The individual who intends using a sucker punch will also use this open handed approach. Nurtured A false sense of security in the use of the fist can be nurtured through success in childhood fistfights. The bones of a child's fist are more pliant than adults. There is much more give when a child's fist strikes another's skull. Adult bones are much more solid. When bones connect in a fight they do not bend or spread, they will splinter and break. Success in playground fights will not prepare you for adult combat. Cultural From a cultural perspective, the sport of boxing is very popular and the media, to represent aggression, uses the fist. These factors can lead to individuals emulating their screen or ring idols by using their fists. It must never be forgotten that boxing is only a sport. It is now a sanitized version of a very practical form of close combat. Boxing originally included; cross-buttocks, choking, eye gouging, foot stamping, tripping, head butting, spitting, headlocks, kicking and arm locks. Because of these cultural and natural tendencies, it is inevitable that individuals will have to either defend themselves from or resort to fist fighting in close combat. For that reason, this chapter will illustrate several fist techniques. When the fist is used in combat, it must be protected with a knuckle-duster or sturdy gloves. Punching For the purposes of both defence and attack, spend at least one month in daily practice of the basic punch. This practice will not be wasted; you will develop your attacking muscles so that you can deliver more powerful attacks. Coordinating the following seven principles will develop your power punches:
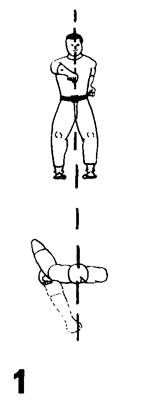
The Basic Punch The basic punch starts with the fist palm up against the hip (Fig1). Your feet should be in line and shoulder width apart. Imagine that at arms length there is a centre line from head to toe and you direct your punches into it. On the full thrust of your arm, the palm of your hand is facing down. To lock your fist for the impact, push the thumb side of your fist forward. The back of your fist should be straight with the forearm and locked so that the wrist can cope with the impact.
The perfect fist is made by having point A (Fig.2a) protruding slightly further than point B. The figure in 2a shows how the average person will make a fist and therefore the fist needs a pair of sturdy gloves to protect the knuckles, particularly at point B. It is important that you develop your fist until you are only using the two knuckles as shown in Fig. 2b.
Consider this point, how long can you wait in order to develop a complete fighting style incorporating the fist? Leave out the fist fighting and your training programme will accelerate. The better alternative to the fist is the palm heel. This technique will be illustrated later in this chapter. The Left Jab Jabs are used to loosen up the opponents defence, block their vision and distract them. When the fist is punched out, your body weight should be off the leading leg and your shoulders add impact by turning into the target. When your fist is almost touching the target, tense it in a grabbing action. As the fist connects, your whole body weight should be on the fist with virtually no weight on the leading leg. For your recovery, relax the arm, pull back fast and distribute your weight equally to both feet (Figs. 3a & b).
Combinations with the left jab:
Defences to the left jab:
The One Two Combination The one two combination is usually made with a left jab and a straight right. The left jab is used to block the opponents vision and distract them. This will leave a clear path for the straight right. Figures 4a, b, c, d, e and f show this sequence. Check the illustrations for:
Defences against the one two combination:
The Left Hook The left hook is a short arm circular punch. On the way to the target, the elbow is raised, but not as high as the fist. The left shoulder and hip must turn into the punch in order to add speed. At all stages of the punch your palm should be facing you. If you do not have a pair of protective gloves, use the palm heel instead (Figs. 5a & b).
This punch, like all others, is executed without full muscular tension until the target is reached. For the final stages of the punch, your body weight is transferred to the leading left leg. To aid balance and recovery, your body weight is transferred to the right foot. If you miss the target, this weight shift will help you to maintain your balance. Limit the forward movement of your fist to an area approximately six inches in front of your shoulder. This will also stop you from over extending yourself if the punch misses. The main targets for the hooking punches are:
Combinations using the left hook:
Defences against the left hook:
The Upper Cut The upper cut is normally used as either a finishing punch or a counter punch. Start by cocking the punching fist close to your hip and bend bend your knees in a crouching position. Complete the punch by straightening your legs and turning your hips and shoulder into the target. Your palm faces you all the way to the target. Stop the punch and recover when your fist reaches a point six inches in front of your nose (Figs. 6a & b).
Combinations with the upper cut:
Defences against the uppercut:
The Pivot Punches After missing with a left hook to the opponents head, follow up with a back knuckle (Figs. 7a & b).
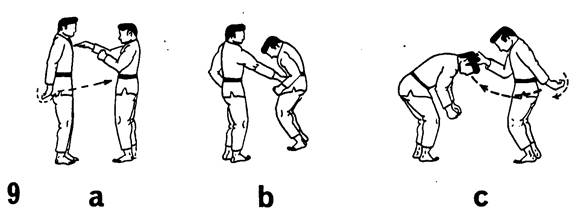
Double arm block, followed by a double back knuckle (Figs. 8a & b). Back knuckle to the bladder (Figs. 9a & b).
Back knuckle to the nose (Fig. 9c). Back knuckle to the temple (Figs. 9d & e). Back knuckle to the bladder and jaw (Figs. 9f & g).
To use the tension back knuckle punch, hold your right fist against your right kidney, pressing it in lightly (Fig10a). To release the fist, turn your right hip and shoulder into the target and transfer your weight to your left toes. (Figs. 10b - d). This is a whip action punch, so work on raising your elbow and allow the fist to flick out.
Hammer Fist Hammer fist to the spine (Fig. 11a).
Hammer fist to the bladder (11b).
Reverse hammer fist to the kidneys (Figs. 12a & b). Combination Attacks Back knuckle jab and a right cross (Fig. 13).
Snap toe kick with the leading leg, followed up with a jab and a right cross (Figs. 14a & b). The purpose of the toe kick is to cover the opponents footwork and distract them.
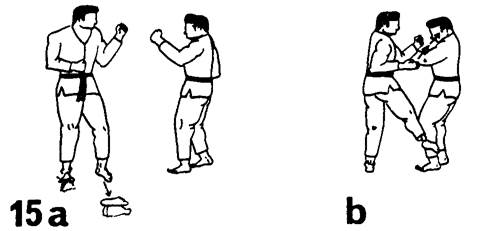
Step right with the leading left leg and then use a lower sweep to cover their footwork. Carry out a hand attack to the face while using your left hand to cover the opponents arms (Figs. 15a & b). If you use your shins in the roundhouse kick and direct them to the side of the knee cap, this will break the leg.
Hammer fist to the spine followed by a toe kick (Fig. 16).
Rear attack followed up with a hammer fist to the face (Figs. 17 & 18).
Thumb Attacks The point of your thumb can be used to stab or bring direct pressure to many weak points of the body. Particular areas of interest are the main nerves that run through the body and cross in front of the main bones. Here they are very vulnerable to direct pressure with varying results. Some of these points will be described here without using their anatomical names.
The Pincer Grip The pincer grip in figures 19 and 20 is made by pressing down with the thumb on the knuckle of the index finger. This technique can be used to either create a distraction or death.
Targets:
Thick clothing will nullify the shock value of this technique. In some situations the teeth can be used to equal effect on these targets. Fore Knuckle Fist Used below the nose, jabbed at the throat, eyes and upper cut into the kidneys or solar plexus. (Fig. 20) The circled area is used for the pincer grips. Reverse Knife Hand Put the tip of your thumb on the palm of your hand (Fig. 21). Use this thumb edge of your hand to attack the testicles, throat, below the nose and the eyes.
Palm Heel Because there is less muscular tension involved, the palm heel attacks are much more powerful than the fist attacks. This will become obvious when you practice combination attacks. The palm heel techniques may reduce your reach by two inches but there are many advantages.
"Y" of the Hand The "Y" of the hand can be targeted to:
The Extended Knuckle Fist The fore finger knuckle can be used in a left jab to the throat or eyes. (Fig. 24). The thumb knuckle can be used if the opponent is side on to you.
The Finger Jabs In the three finger jab, (Fig. 25) the fingers are doubled up slightly so that the ends are even. Jab at the eyes, throat, solar plexus or testicles. Keep the fingers bent forward slightly. If something solid is hit, your fingers are less liable to damage. The fingers are held this way for one and two finger jabs.
The Knife Edge Chop The area of the hand that strikes the target first is the inside edge of the palm near the little finger (Fig. 26a & b). Just before impact the fingers should be held tightly together and bent back from the palm.
Elbow to Spine This attack starts with the palm side of your hand touching your ear. The elbow is raised as high as possible (Fig. 27). To strike the blow, bend the knees slightly and snap down the elbow, palm sideways all the time. Also breathe out as the elbow comes down.
|
|||||||
|
|
Последнее изменение этой страницы: 2017-02-10; просмотров: 127; Нарушение авторского права страницы; Мы поможем в написании вашей работы! infopedia.su Все материалы представленные на сайте исключительно с целью ознакомления читателями и не преследуют коммерческих целей или нарушение авторских прав. Обратная связь - 13.59.80.187 (0.034 с.) |