Заглавная страница Избранные статьи Случайная статья Познавательные статьи Новые добавления Обратная связь КАТЕГОРИИ: ТОП 10 на сайте Приготовление дезинфицирующих растворов различной концентрацииТехника нижней прямой подачи мяча. Франко-прусская война (причины и последствия) Организация работы процедурного кабинета Смысловое и механическое запоминание, их место и роль в усвоении знаний Коммуникативные барьеры и пути их преодоления Обработка изделий медицинского назначения многократного применения Образцы текста публицистического стиля Четыре типа изменения баланса Задачи с ответами для Всероссийской олимпиады по праву 
Мы поможем в написании ваших работ! ЗНАЕТЕ ЛИ ВЫ?
Влияние общества на человека
Приготовление дезинфицирующих растворов различной концентрации Практические работы по географии для 6 класса Организация работы процедурного кабинета Изменения в неживой природе осенью Уборка процедурного кабинета Сольфеджио. Все правила по сольфеджио Балочные системы. Определение реакций опор и моментов защемления |
Strength (Numerical and Physical)
a) YOU: Your strength depends on how fit you are to handle the situation and how reliable your comrades are. b) THE ENEMY: Is the enemy younger, fitter, faster, fatter, more confident, more experienced, or drug crazed? Are they accompanied by comrades or are they close at hand? 2. Weapons (Legal, Illegal, Improvised and Procured) a) YOU: Have you time to go for a weapon? Is it safe to go for a weapon? Are there objects lying around that can be used as weapons? b) THE ENEMY: What weapons do the enemy have? If you can improvise, will they also improvise? Have you adequate defences against their weapons? Aim (Purpose and Attitude) a) YOU: Your aim, at all times, will be survival at any cost. How you achieve this depends on your appreciation of all the other factors. b) THE ENEMY: Your opponents aim can include detaining, crippling, raping or killing you. It is up to you to find out fast, by arguing, observing, moving, listening, talking, cooperating, thinking and distracting. Terrain (Surface Conditions and Troop Disposition) a) YOU: Are you in an area that is familiar to you? Can you use the ground to your advantage? What type of tactics can you use on that terrain to escape or stay alive? Where is the nearest refuge? Can you step, roll or fall without danger? Where is your nearest back up? b) THE ENEMY: Is this their territory? From which direction will their support come? Consideration of these four factors will help you to survive. Quarter In a boxing match, when your opponent falls, you immediately go to a neutral corner. Nerve Points The illustrations in chapter 2 show 32 frontal and 17 rear targets on the human body. Not very many people will have the clarity of mind, in the heat of the fight, to remember these precise points. Hand Techniques The bones of the hand are very delicate and easily damaged. Most people have a natural tendency to clench their fists in violent situations. Because of this fact, some closed fist techniques have been described in this textbook. The fist must only be used when it is protected by heavy duty gloves or knuckle dusters. This will be discussed in much more detail in Chapter 3. Defensive Stances Think about this point. If you have the time to adopt a defensive stance, it means that an attack on your person has been either unsuccessful or you have time to perceive an attack on your person and time to adopt a stance.
Foot Techniques In sport combat, many foot attacks are directed at difficult to reach areas. For safety reasons, kicks are never allowed to the most vulnerable areas. These areas include the ankles and sides of the knee cap. Body Movement Text book illustrations always fail to convey the degree of body movement involved in any technique. The figures used in illustrations can only represent a single phase of a physical action. Do not slavishly follow the illustrations. It is important that you modify the techniques illustrated in order to suit your height, dress and situation. Holding the Opponent Grabbing or holding the opponent will place you at a disadvantage. With your hands employed, your defences are restricted. This is particularly true when you may have to fight with more than one person. Always weaken or distract the opponent before trying to apply a hold. When you go for a hold, try to apply it to the hair, ears, testicles, throat or fingers. Also use pincer grips, arm and leg locks, chokes and strangles. Holding a Weapon Holding a weapon can place you at a disadvantage, if you are focused on looking for an opening to use that particular weapon. Unconventional Techniques Survival in combat can be attributed to many factors other than numerical and technological superiority. History has shown us that many a battle has been won by a weaker opponent who can disrupt the enemy with an sudden or unconventional attack. Emergency Techniques In some standing or grounded situations you may become either blinded, stunned, shocked or surprised.
Training Sessions
For combat efficiency, the training requirement is twice weekly for one year. There are two main reasons for embarking on a training programme. First, the ability to fight in either armed or unarmed combat is not a skill that can be learned from either books or videos. Second, some individuals do not posses the ability to fight and find it impossible to be totally aggressive. For these reasons, a training programme must be employed in order to assess the fighting ability of individual soldiers. There is no point in learning technique from books or videos unless you can apply it to a living, retaliating opponent. Knowledge is the reserve of the instructor who may or may not be able to fight. Fighting experience is the reserve of those who can survive. The length of the training programme also depends on the operational role of the troops involved. This may vary from a short but intensive programme to instill self confidence, to a longer programme for training future instructors. Each training session should last for two hours. An all round training approach can be tailored to cater for the units operational requirements. A basic training session would contain the following elements. These elements will be discussed in more detail at the end of this chapter: 10 min - Safety checks 20 min - Basic sparring drill 20 min - Bag work revision 20 min - Ground work revision 20 min - New material 10 min - Free sparring 10 min - Match fighting 10 min - Bag work revision 10 min - Ground work revision 20 min - Yoga and Visualization Revision Sessions To promote speed, self confidence, and fighting skill, the revision sessions must contain as many variables as possible, for example; 1. The attack can be structured as a rush attack, rear attack, side attack, group attack, ground attack or combination attack. 2. The defence can incorporate withdrawal, ground fighting, friendly support or weapons. 3. The opponent can be either tall, short, fat, thin, drunk, crazed or armed. 4. The conditions must also be varied. Train within a crowd of people, in a cramped room, in darkness, your hands may be tied or you may be blindfolded or stunned. The stunned condition may be simulated as follows: 1. Place the end of a brush shaft on the ground. 2. Place both your hands over the other end and then rest one of your ears on top of your hands. 3. Run round the broom shaft without lifting the shaft off the ground or lifting your ear from your hands. 4. After 30 seconds of this exercise, try to either adopt a fighting stance or use a punch bag. Close Combat Training There should be at least four phases to close combat training. Furthermore, these phases must be broken down into stages. This will help to ensure that your training programme has a progressive structure. Phase 1 - Basic Techniques. Stage 1 - The Basics. Practise single offensive techniques from all sections of the text book. Make maximum use of the training aids, including punch bags, static and active partners. Practise until you have a thorough knowledge of the basic techniques at the different fighting ranges. Stage 2 - Defence. Practise different defences against the same offensive technique. Learn how to counter attack as well as defend. Keep the physical contact under control so that undefended strikes do not have a serious impact. Move around the training floor using stepping drills and distractions. Stage 3 - Combination Attacks. Combine two techniques from one discipline only. One partner remains passive and simply observes the line of the attack. Use this procedure until you are proficient in using combinations. Stage 4 - Defence. Practise several defences against the same combination attack. Use light contact only at this stage. Again, you must make maximum use of the floor space. Phase 2 - Free Sparring Before this phase, sensitivity training and sparring drills may be introduced. The aim of free sparring is to develop your spontaneity in attack and defence. In this phase, there is no collusion between the combatants. The techniques used in free sparring are personally selected and tested out by each individual. You are now learning to use offensive and defensive techniques on an opponent who has the same intentions. Lethal tactics are not permitted at this stage and all strikes are directed to full body armour. Always work in teams of four. The teams are made up from two combatants with one observer each. Two sparring sessions, with a total of two minutes, will be quite sufficient in the early stages of your training.
Constantly change your training partners. Fresh partners will demand a fresh approach on your part. Phase 3 - Match Fighting. A match fight is a knock down contest to establish the superiority of a particular fighter. There is no time limit to a fight. A fighter will lose the fight when:
The judgement of the observers is necessary because protective clothing will nullify some of the lethal attacks. Phase 4 - Close Combat Drills Close combat drills will allow you to advance your practical knowledge of close combat without the requirement of lethal contact. The subject areas to cover include:
Training Practice Keep changing the training partners over. This will stop students from becoming too familiar with each other and thus developing a complacent attitude. Durind a training session, have a Team Leader detailed to control the class. The Team Leaders role is to formulate a specific training and stick to that programme. The team Leader must be capable of stopping dangerous practices and also motivating the students to maintain a high work rate. Obstructive Practice During practice sessions, it is possible to develop an obstructive mind set. This is where you start to anticipate the training partners movements and you apply counter moves. This will slow down your partners development. Allow your partner to practice a move until they are proficient at that technique. Remember that all techniques are usually set up with distracting punches or kicks. Your ability to anticipate your training partners moves will be properly tested during match fighting. Perfect or Practical Spend at least two minutes on each technique. Work fast to develop power, speed, recovery, accuracy and tactical movement. Get away from the mind set of doing 200 kicks or 200 punches.. Practice each technique for at least two minutes, even if you only manage 50 repititions. You must try to incorporate the technique into a fighting framework. The aim is to make the technique part of a defence and attack strategy rather than a sterile exercise in technique. Bag Training The punch bag is a passive training aid. Spend too much time on it and you will neglect your defence and ability to react positively to an attacker. Kick Training Keep your kick training as realistic as possible. Move back and forward, left and right, counter and use combinations. Close combat is both dynamic and demanding, you must keep moving an remain difficult to predict. Kicks are powerful techniques, they will have an effect, not only on the opponent, but also on the applier. Anticipate these effects through a rigorous training procredure that involves an active training partner. Yoga Exercises The following Yoga exercises will help you to relax mentally and physically:
Total relaxation is neither desirable nor a prerequisite to fighting success. There is an ideal level of relaxation to be aimed at. The ideal level that allows you to cope with battle field stress and continue to think tactically. To Blitzkrieg or to Hammer In a fighting situation, you have two avenues of attack. First, you can Blitzkrieg the opponent by hitting from every angle.
Second, you can Hammer away at the same spot until the enemy is defeated. For the untrained, the Blitzkrieg is more difficult to activate and is also less instinctive. This is because it demands an active, analytical form of thinking. Combat is always performed at a very base level of intellectual consciousness. Thinking, seeing and hearing are usually focused directly on the immediate threat. For this reason, the Hammer approach is a better tactic for the inexperienced fighter. The Hammer is more instinctive, single minded and can be used to break down the opponents covering up tactics. The physical strength required to defeat an opponent is a limited commodity that evaporates after 5 - 10 seconds of hard combat. The flow of adrenalin, that occurs at the start of a stressful encounter, will sap your strength if it is not controlled. Using the Hammer tactic will sap your strength if the opponents defence is good. Why persist in using valuable energy on an opponent who can cover up and bide their time until your energy level drops? Against an aggressive opponent, hammering away with a single technique will give the opponent time to switch tactics and counterattack. For example, why try to head butt an opponent who is pushing away at your chest. You may try the head butt several times before realizing there is no connection taking place. Meanwhile your strength is sapped, the initiative has gone and the mind set of a single tactic will leave you in an impasse, open to counterattack. Blitzkrieg or Hammer? It all depends on the opponents approach and responses to your attack. Visualization The mental practice of visualization can be used to enhance your fighting skills. General Principles In combat, it is difficult to think in terms of specific responses to specific attacks. Your mind must remain uncluttered from this baggage.
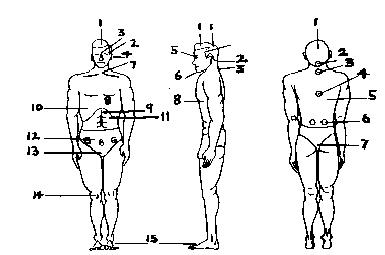
CHAPTER 2 Chapter 2 - Intro This second section will describe in more detail the fundamental techniques outlined earlier. The subject matter will include: · Pressure points and appropriate mode of attack · Stances · Body movement · Footwork · Kick defences · Punch defences · Basic sparring drills · Coping with the different fighting ranges and styles The Pressure Points Pressure points are areas of the human body that are vulnerable to damage when attacked with the appropriate weapon. The effects of strikes to pressure points will also depend upon a combination of the following five factors: · The weight behind the delivery. · The speed of the delivery. · The accuracy of the strike. · The type of weapon used. · The opponent's physical and mental state. Operational dress and equipment will directly influence technique as well as the effect of any strikes. Specific pressure points are difficult to reach, especially when the opponent is moving and attacking you at the same time. The exact pressure points can only be attacked when the opponent's defence has been broken down with strong attacks to general areas. Real combat will never be a display of perfect form. It will always be a display of quick opportunities. There will always be a high rate of low power strikes, forced throws and imperfect techniques. Because of this factor, consider the principle of overkill by using combinations in your attack and defence. Primary Pressure Points Front
Fig.1 1. The top front of the head can be attacked with:
2. The temples lie between the tops of the ears and the eyes. Attack the temples with:
3. Attack the area between the eyes with:
4. Attack the ears by grabbing or clapping:
5. The eyes can be attacked with any weapon. Minimum force is required to create maximum damage. The only danger to the attacker is the rigid bone that surrounds the eye socket. Remove the eye by pushing the fingers or thumb in at the top middle of the socket. 6. The jaw line can be attacked with:
7. The throat area targets cover the wind pipe, Adam's apple and the hollow of the throat:
8. The heart can be attacked with:
9. The solar plexus area is usually well protected. Any attacks to this area are usually part of a combination that opens up the opponent's defences. Attack this area with:
10. The ribs are usually protected by the elbows. They can be attacked with:
11. The spleen can be attacked with:
12. The bladder and groin area can be attacked with:
13. The genital area is usually well protected. Direct attacks to this area can be used to draw the opponent's defence down and leave other targets exposed. Attack this area with:
14. The knee caps are best attacked when the opponent has most of their weight on them. Attack with:
15. The insteps have a very delicate bone structure. Attack this area with heel stamps.
|
|||||||||
|
|
Последнее изменение этой страницы: 2017-02-10; просмотров: 88; Нарушение авторского права страницы; Мы поможем в написании вашей работы! infopedia.su Все материалы представленные на сайте исключительно с целью ознакомления читателями и не преследуют коммерческих целей или нарушение авторских прав. Обратная связь - 3.147.2.160 (0.096 с.) |