Заглавная страница Избранные статьи Случайная статья Познавательные статьи Новые добавления Обратная связь КАТЕГОРИИ: ТОП 10 на сайте Приготовление дезинфицирующих растворов различной концентрацииТехника нижней прямой подачи мяча. Франко-прусская война (причины и последствия) Организация работы процедурного кабинета Смысловое и механическое запоминание, их место и роль в усвоении знаний Коммуникативные барьеры и пути их преодоления Обработка изделий медицинского назначения многократного применения Образцы текста публицистического стиля Четыре типа изменения баланса Задачи с ответами для Всероссийской олимпиады по праву 
Мы поможем в написании ваших работ! ЗНАЕТЕ ЛИ ВЫ?
Влияние общества на человека
Приготовление дезинфицирующих растворов различной концентрации Практические работы по географии для 6 класса Организация работы процедурного кабинета Изменения в неживой природе осенью Уборка процедурного кабинета Сольфеджио. Все правила по сольфеджио Балочные системы. Определение реакций опор и моментов защемления |
Throttle needle (see ACRO menu 3. 3. 15) ⇐ ПредыдущаяСтр 6 из 6
PROG MIX (see ACRO MENU 3.3.1) CONDITION Revo., curves for idle-ups are often v-shaped to provide proper rudder input with negative pitch and increased throttle during inverted flight. (Rudder is needed to counter the reaction whenever there is increased torque. In inverted flight, throttle stick below half has increased throttle and negative pitch, therefore increasing torque and rotating the helicopter unless the revo. mix is also increasing appropriately.) Additional flight conditions are available specifically for helicopters. These additional flight conditions contain different throttle curves, collective pitch curves, revo. mixing, and trims (except IDLE-3) to make the helicopter perform certain maneuvers more easily. Lastly, the gyro and dual rate functions may be set to provide separate rates per condition selected, including one for each idle-up. Additional idle-ups may be used to maximize the helicopter's flight characteristics in certain types of flight (i.e. fast forward motion, backward) or maneuvers (loops, rolls, stall turns), or even the same maneuver but changing from heading-hold/AVCS gyro mode to normal gyro mode. The AT9 provides 3 idle-ups to allow the modeler 3 additional setups along with the normal flight condition. (Note that IDL3 does not include governor settings.)
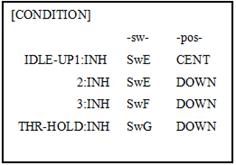
ADJUSTABILITY: • SWITCH G (AT9) or E (AT9) is programmed for normal (NORM), idle-up 1 (IDLE-UP1), and idle-up 2 (IDLE-UP2) curves, adjustable in CONDITION SELECT (IDLE-UP1/2, IDLE-UP3 items). (IDLE-UP1/2 3-position type switch only, IDL3 2-position type switch only) • Activated with the throttle curve for that condition in THR-CURVE. • Curves are adjusted to maintain constant RPM even when the collective pitch is negative (inverted). Note that REVO mixing has one curve for idle-ups 1 and 2 and a second curve just for idle-up3. •Gyro settings may be set separately for each idle-up. • Governor settings may be set up to follow Normal/Idle1/Idle2, but do not offer a setting to adjust for each of the 5 conditions like gyro. • Activating OFFSET makes the TRIM LEVERS adjust the trim separately in each of the idle-up conditions.
Part 6. AIRCRAFT FUNCTIONS AIRCRAFT menu is the most differ between AT9 and AT10. The menu makes it easier to fly multi copters. The basic function menu is same like ACRO, GLID and HELI, please find the detail in the former chapters. Now letЎЇs start the basic setting, take a quad copter for example:
AIRCRAFT BASIC MENU The basic function menu is same like ACRO, GLID and HELI, please find the detail in the former chapters. Below is the special option:
MODEL TYPE Different from ACRO, GLID AND HELI, MODEL TYPE for AIRCRAFT has an additional function TRIM, which is controlled by the VR switch. Set the TRIM OFF to avoid a mis-operation damage to the model.
AUX Channel setting AUX channel for aircraft is channel 6 to 10, same like ACRO, GLID and HELI, to set auxiliary channel. CH5 is special for ATTITUDE, enter CH5 and press PUSH for ATTITUDE. Select 3-section and 2-section switch to get 6 different attitudes. By DIAL set 6 different rates according to the attitudes.
ADVANCE MENU FOR AIRCRAFT ATTITUDE There are 6 different attitude modes for aircraft: NORMAL, ATTI, GPS, HOVER, F/S and AUX. Every mode will have a different rate to get a unique signal. NORMAL mode preset 0%, ATTI 50%, GPS 100%, HOVER 25%, F/S 75% and AUX 50%. 0% means a output signal 1ms, and 100% means 2ms. You can totally get 6 different modes by adjusting the related rates.
|
||||||||||||||||||||||||||||||||||||||||||||||||||||||||||||||||||||
|
|
Последнее изменение этой страницы: 2016-08-01; просмотров: 146; Нарушение авторского права страницы; Мы поможем в написании вашей работы! infopedia.su Все материалы представленные на сайте исключительно с целью ознакомления читателями и не преследуют коммерческих целей или нарушение авторских прав. Обратная связь - 18.117.188.64 (0.012 с.) |
 for 1 sec. to BASIC menu (If ADVANCE,
  again)
  to MODEL TYPE
 to TYPE
 for 1 sec. Ў®Are you sure?ЎЇ Displays,
  to confirm.
 .
.  to BASIC.
 Repeat as needed.
  to BASIC.
 VR(A),
  VR(A) to repeat above steps.
 to CH
to CH  SwA screen reads ELEV(UP)
 Elevator Stick
  to set rate.
  Elevator Stick
  to set rate.
  Elevator Stick
  to set rate.
  SwA to downЈrepeat to set low rate.
 SwG to center position. Repeat steps above to set 3rd rate.
 to CH6

 to MODEL TYPE