Заглавная страница Избранные статьи Случайная статья Познавательные статьи Новые добавления Обратная связь КАТЕГОРИИ: ТОП 10 на сайте Приготовление дезинфицирующих растворов различной концентрацииТехника нижней прямой подачи мяча. Франко-прусская война (причины и последствия) Организация работы процедурного кабинета Смысловое и механическое запоминание, их место и роль в усвоении знаний Коммуникативные барьеры и пути их преодоления Обработка изделий медицинского назначения многократного применения Образцы текста публицистического стиля Четыре типа изменения баланса Задачи с ответами для Всероссийской олимпиады по праву 
Мы поможем в написании ваших работ! ЗНАЕТЕ ЛИ ВЫ?
Влияние общества на человека
Приготовление дезинфицирующих растворов различной концентрации Практические работы по географии для 6 класса Организация работы процедурного кабинета Изменения в неживой природе осенью Уборка процедурного кабинета Сольфеджио. Все правила по сольфеджио Балочные системы. Определение реакций опор и моментов защемления |
Exercise 1. Look at the garments shown in figure I. Give the Ukrainian equivalent for each of the English wordsСтр 1 из 5Следующая ⇒
Англійська мова збірник текстів та завдань до практичних занять для студентів ІІІ-IV курсу спеціальності „Технологія та конструювання швейних виробів”
КИЇВ КНУТД 2006
Англійська мова: збірник текстів та завдань до практичних занять для студентів III-IV курсу спеціальності “Технологія та конструювання швейних виробів”
Упорядник: старший викладач Самуйлова А.М. викладач Телев’як І.І.
К.: КНУТД, 2006. – 53 с. Англійська мова.
Unit 1 Exercise 1. Look at the garments shown in figure I. Give the Ukrainian equivalent for each of the English words Fig.I
1. a shirt, 2. a short-sleeved shirt, 3. a blouse, 4. a jacket, 5. a vest, 6. a sweater 7. a cardigan sweater, 8. a suit, 9. a nightgown, 10. a T-shirt, 11. a cap (a baseball cap) 12. a coat, 13. tights, 14. an evening dress, 15. gloves, 16. shorts, 17. a tie, 18. trousers, 19. a ski hat, 20. a scarf, 21. a hat. Text A. Clothes express me Key Words and Phrases: to be aware – усвідомлювати, знати; high-heeled shoes – взуття на високих підборах; loose – просторні; gown – сукня, мантія; to convey – передавати; loose-fitting – вільного покрою; to gain the approval – отримати схвалення Design, color and style of dress can all express very personal qualities. They can show information about a person’s mood, personaliy, and self-esteem. Clothes also make up the biggest part of a person’s physical appearance. People are often described in terms of their clothing. “Jim is the best-dressed person I know”. “Susan always dresses well”. Comments like there are heard every day. You can be sure that Jim and Susan are well aware of their clothes. They know that clothes can add to their appearance. Clothes can also change your physical appearance. High-heeled shoes can add to your height. Loose clothes can add “power” to your appearance. For example, think of an historical queen’s impressive gowns. The size and design of the gowns conveyed an image of power and wealth. The clothes you wear can affect you in many ways. Wearing brightly coloured clothes to a party can put you in a festive mood. Wearing comfortable old clothes can help you feel relaxed. Clothes are important in satisfying many personal needs. The clothes you buy and wear also reflect your self-image. Do you dress conservatively? Do you like bright colours? Do you prefer loose-fitting clothes? The clothes you choose reflect the kind of person you are. The clothes you choose should be based on your lifestyle and should also make the kind of impressions that you want to make. In every culture, people have learned that they feel comfortable in clothes that are appropriate or suited to their lifestyles. Appropriate clothes are those that are right for the time and place you choose to wear them. Clothes must also be suitable for the climate in which you live and weather. If you are going on a winter hike or skiing, then you need to wear a hat, a scarf, gloves or mittens. Wear several warm tops, even if you look bulky. This is not the time to show off a new blouse. The best way to know when and where to wear certain garments is to be aware of what you do
Exercise 2. Answer the questions. 1. Do your clothes reflect your personality? 2. What do they say about your tastes and style? 3. Are your clothes the same as yor friends? Why? 4. Which of your clothes say, “This is me”? 5. What clothes are the most comfortable for you?
6. Do colours of clothes affect our emotional state? 7. What clothes are appropriate for (a birthday party, an official meeting, sport exercises)? 8. How do you understand the phrase “to be in “wrong” clothes”? 9. Have you ever gone somewhere dressed in the “ wrong” clothes? How did you feel?
Exercise 3. Find in the text all the synonyms of the words “clothes” and “to wear”. Exercise 4.Translate into English 1. Oдяг повинен вiдповiдати вашому життєвому стилю. 2. Люди часто обирають костюм, який можна вдягнути в рiзних ситуацiях. 3. Святковий одяг вдягають у вiдповiдних випадках. 4. Дiловий костюм створює образ дiлового чоловiка. 5. Повсякденний одяг завжди простий, зручний та практичний. 6. Ваш одяг повинен вiдповiдати не лише ситуацiї, а ще й клiмату та погодi. Exercise 5. Translate the sentences and define the part of speech of underlined words. 1. She always dresses well. 2. Her dresses are very expensive. 3. I bought this suit at a supermarket. 4. She looks very nice in that dress, it suits her very well. 5. I didn’t like the cut of the dresses. 6. A bad tailor can never cut a suit well. 7. Can you put a button on my coat? 8. I can’t button my coat; it is too tight. 9. They crown the King of England in Westminster Abby. 10. He wears a crown on his head.
Exercise 6. Topics for discussion. 1. Why clothes that are difficult to make are sometimes cheaper to buy, such as shirts and jackets? 2. What are advantages and disadvantages of buying ready-to-wear clothes? 3. List the pros and cons of sewing the items yourself. Exercise 7. Read and translate the dialogue. Formulate the main idea of it. Text C Key Words and Phrases: outfit-комплект одягу, essentials- предмети першоi необхiдностi, heavy-weight coat-зимове пальто, light-weight coat- демисезонне пальто, sleeves- рукава,well-cut- хорошого покрою, to date- виходити з моди, perennial “must”-постiйна необхiднiсть. Very often a person has a wardrobe full of clothes and “nothing to wear”. It means you should change something in your wardrobe and think of the right outfits for every occasion. Never buy any new clothes before going through your existing wardrobe to see whether you need them or not. First of all, your wardrobe ought to contain certain essentials or basic items. They include coats: heavy-weight, light-weight, rain-coat; dresses: casual dresses, evening dresses; suit: pants suit, skirt suit; shirts or blouses: long- sleeved, short-sleeved; a pullover and a cardigan. Your wardrobe should also include some skirts in different colours and some kinds of pants: classic and jeans. When you buy your clothes, go in for simple, well-cut suits and dresses that will look “right” for almost any occasion. Concentrate on styles that are not expensive but elegant. A winter coat is a basic need and it may be an expensive item, because it should be wearable for several seasons. Choose a cosy-looking coat in any material that suits you. A well-cut suit is another essential. If its lines are plain, it won’t go out of fashion for several years. You can prolong its life by having an extra skirt because jackets always outlast skirts. An extra dress is perennial “must” with women. The short evening dress is much better than the long one. The lines that don’t date are the simple ones.
With colour you can experiment as you like nowadays. Remember that the warm colours- red, yellow, orange- make a figure appear larger. Cool blue and green make it look smaller. The light colours increase size. Dark shades decrease size. It is up to you to decide how you want to look and what to wear. Remember that the clothes in which you feel happy are always the most successful clothes.
Unit 2
Taking Measurements The four measurements – best, waist, hip, and back waist length – may be sufficient for you in determining your pattern size. If you are aware of any problems you have experienced with garments that fit improperly, you may need to take additional measurements to assist you in making this decision. Fitting Fitting is an important art of dressmaking. Skill in fitting comes with practice in observing every detail of the garment. This is only achieved by building up experience in a variety of situations concerned with the fitting of garments in different fabrics and for different figure types. The garment must be worn right side out when it is being tried on, and an underslip must be worn for dress and skirt fittings as this enables the garment to hang smoothly over the figure. It is also important to wear the correct shoes as varying heel heights can affect the figure posture and alter the appearance of the overall silhouette. Text B. Fabrics Key Words and Phrases Fabric - тканина, cotton - бавовна, linen - льон, silk - шовк, wool - шерсть, pattern - візерунок, firm - міцний, fine - тонкий, soft - м’який, springy - еластичний, fibrе - волокно, rayon - віскоза, штучний шовк, pulp - маса, wrinkle - зминатися, blended - змішані, repel - відштовхувати, dye - фарбувати. Natural fabrics. These fabrics are chiefly Cotton, Linen, Silk, Wool. Cotton and Linen come from plants. Silk is the fine thread made by a silk-worm. Wool is the soft-coat of a sheep. Cotton is the cheapest of these fabrics, and it is used by people in almost every country in the world. You can find what a fabric is made of by looking closely at the threads. You will see that cotton threads are even and rather round. The surface of the cotton fabric has very fine hairs all over it. These can only be seen if it is held up to the light. Cotton fabric is often white, but to make it pretty it is often coloured, either all over or in a pattern. It is usually better to wear coloured materials, for colour helps to make people feel happy. Linen looks like cotton, but it is stronger, firmer and often heavier. The threads are very smooth and round. No fine hairs can be seen on the surface. Linen is cooler to wear and more expensive than cotton. It can be used for clothing such as dresses or men’s coats, but it is more often used for such articles as tablecloths. Silk is a beautiful fabric. It is soft and shiny. The threads of silk are so fine that it is hard to see each one separately. Silk is expensive and, although it is so fine, it stands up to hard wear when made into cloths of a fair weight. It is cool to wear and looks very beautiful. Wool is the best material to wear, for it is the warmest. Wool is very soft and springy. The surface of the fabric is covered with very fine hairs. It is these tiny hairs which help to make it so soft and warm. Wool is also much thicker and heavier than cotton, so that it keeps out the cold. But it is not so easy to wash as cotton. When it is washed badly, the springiness is lost and the wool is then hard and uncomfortable to wear. In very cold countries, life Greenland, even wool is not thick enough, so the people have to wear fur. Fur is the outside coat of such animals as fox, seal and bear, wolf. It is soft and very thick, so that it keeps out the biting wind and keeps in the warmth of the body.
Man-made fabrics. For thousands of years people used natural fibres. Then people learned to make fibres themselves. Cellulose fibres. Scientists wanted to find a fibre that would look and act like silk. Their study resulted in the production of a fibre called rayon. Most rayon and acetate fabrics are made from wood pulp. Rayon dyes well and, if treated chemically, it does not wrinkle much. Non-cellulose fibres are made entirely by chemical processes.nylon was the first non-cellulose fibre. It is made from chemicals and petroleum products. Today, nylon has almost as many uses as cotton has. It is wrinkle-resistened does not shrink and repels water. Nylon is used for rainwear, camping clothes and equipment, parachutes. But it is not comfortable to wear in hot weather. Blended fibres. Chemical processes are also used to combine two or more fibres into one fabric. Since cotton has a tendency to wrinkle, combining it with a nonwrinkling fibre reduces this tendency. Cotton for example, is often combined with polyester. It makes a fabric that looks like cotton and is cool to wear like cotton. But, like polyester, this fabric does not wrinkle easily. Fibers combined in this way are called blends. Blended fibres and fabrics can take advantage of each fibres' good qualities.
Exercise 4. Answer the questions: 1. What natural fibres do you know? 2. Identify the sourse of each fibre. 3. What are the main man-made fibres? 4. How do man-made fibres differ from natural fibres? 5. Define and discribe blends. 6. What would be the advantages of wearing a shirt or blouse made of blend?
Exercise 5. Make a dialogue (choosing fabric)
Unit 3 Text A. Sewing Machine
Key Words and Phrases: needle - голка, thread - нитка, spool - котушка, bobbin - шпуля, котушка, stitch - шов, стiбок, stitching - зшивання, threading - втягування нитки, winding - намотування, winder - моталка, lock–stitch - човниковий шов, стiбок, lever - важiль, eye-вушко голки, presser foot-притисна лапка. The sewing machine is the center for many creative hours of sewing activity. Sewing your own clothes saves money. It can also give you the freedom to design and create something original. Get to know your sewing machine. This will prevent the annoying problems that develop when you are unfamiliar with your equipment. No one should refer to a machine part as ‘this knob’ or ‘that lever.’
Types of Sewing Machines. There are many types of home sewing machines. Different models allow you to sew in one, two,or three directions – forward, backward, and side-to-side. The stitches formed may be straight, zigzag, or automatic. An automatic stitch combines forward, backward, and side-to-side stitches into a specific design. The design is repeated and forms a pattern. Automatic or reverse-cycle stitches are useful for hemming and decorating. Inserting the Upper Thread. The upper thread passes through and around many machine parts before it reaches the needle. With any model of sewing machine, threading always follows the same steps. Learn the order and names of the parts, and you can thread any machine. Before you thread the machine, check to see in which direction your hand wheel turns. By turning the hand wheel, you can raise the take-up lever to its highest point. Next, raise the presser foot with the presser foot lifter. Place your spool of thread on the spool pin and begin to thread the machine. Correct threading takes lots of practice. You should also learn how to insert the lower thread.
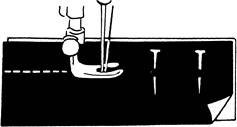
Forming Stitch. When the bobbin thread intertwines with the upper thread, a lock-stitch is formed. A good lockstitch is one that does not pucker or ravel when a loose thread is pulled. The illustration on the next page shows how the machine forms a stitch. You can change the length of your stitches by regulating the stitch length control. Find this dial. If you need to, refer to the manual for your machine. On a scrap of fabric, make various samples of long and short stitches. The stitch length you will use most often is 10 to 12 stitches per inch (2.5 to 2.0 millimeter stitch). The quality of your stitch depends on the correct adjustment of the upper and lower tensions. If either tension is set improperly, the stitches will be either too tight or too loose.
Measuring Tools. Measuring tools are critical to a properly fitting garment. Three measuring tools are essential: the tape measure, the yardstick or meterstick, and the hem gauge. Measuring Tools and Aids. 1. Tape measure – a flexible measuring tool for taking body measurements. It measures both round or flat surfaces. 2. Yardstick or meterstick – a rigid tool used to take and mark long straight measurements. It is made of wood, plastic, or metal. 3. Hem gauge – a tool used to accurately mark curved and straight hems. It is metal or plastic. A metal hem gauge can be left in the hem while pressing. 4. Transparent ruler – a ruler that the sewer can see through. The tool is useful for marking pleats. 5. Skirt marker – a device to accurately measure skirt hems. There are different types: pin marker, chalk marker, or combination pin-and-chalk marker. 6. French curve – a tool helpful for redrawing curved pattern lines, such as armholes and necklines. 7. Hip curve – a tool used for redrawing gently curved lines. Pinning Tools. You will need an adequate number of good pins. These litle items are essential. Do not use rusty or dull pins. Straight pins are used for securing the pattern to the fabric while cutting. They also hold two or more layers of fabric together while stitching. Use sharp-point pins for woven fabrics. Ball-point pins are good for knits, since the rounded tip does not snag the fabric. Straight pins can be purchased with three different types of heads: flats, colored ball, and “T”. The colored ball pins, made of glass or plastic, are easy to pick up. T-pins are good for heavy pile fabrics and loosely woven fabrics. Stainless steel pins are a good choice since they do not rust.
You should use a pin cushion instead of a box. With a pin cushion, pins are easier to handle. Cutting Tools. Cutting tools are precision instruments and should be handled carefully. Many people do not know the difference between scissors and shears. They are not the same tool. Scissors are usually smaller and are used for clipping and trimming. Shears have long blades and are used for cutting out fabric pieces. There are many specialized types of scissors and shears. Keep your scissors and shears so they can do their job properly.
Cutting Tools and Aids 1. Sewing scissors – pointed for trimming and clipping work. The two handles are the same size, and the blades are 5 to 6 inches long. 2. Shears – used for cutting fabrics. The two handles are shaped differently, to fit the hand comfortably. The blades are 6 to 12 inches long. 3. Pinking or scalloping shears – used to cut a decorative edge that reduces raveling of the fabric. 4. Embroidery scissors – used for light detail work, like cutting threads, ripping stitches, and cutting buttonholes. 5. Buttonhole scissors – uesd for cutting open buttonholes. 6. Electric scissors – powered by a battery or other source of electricity. These make cutting faster. 7. Seam ripper – aids in removing stitches from fabric; lifts thread away from fabric before cutting. 8. Thread clippers – used for clipping threads quickly. 9. Rotary cutter and cutting mat – used to cut long, straight fabric strips quickly. Be sure to cut on the protective mat. Marking Tools. It will be necessary to transfer markings accurately from the paper pattern to your fabric. The tool most often used is probably the tracing wheel (used with carbon paper). 1. Tracing wheels – used with tailor’s carbon to trasfer pattern markings to fabric. There are three basic types: a sawtooth tracing wheel that marks sheer fabric without carbon paper; a blunt-tooth tracing wheel that can be used on any fabric; and a smoth-edged wheel on knits. 2. Tailor’s carbon paper – used with a tracing wheel to create a temporary marking on fabric. The color of carbon paper used should show but should be close to the color of the fabric. 3. Tailor’s chalk – an oil-free chalk for transferring markings. 4. Tailor’s pencil – an oil-free chalk in pencil form.
Pressing Tools. Good pressing tools will help you produce a professional-looking finished garment. Some of the pressing tools listed are essential. The most important are the iron, ironing board, and pressing cloths. 1. Iron – an electrically heated appliance for flattening. 2. Ironing board – a padded flat surface for ironing and pressing. The paddingresiststhe heat of the iron. 3. Pressing cloth – used to cover fabric while pressing. It distributes heat, prevents scorching, and, when wet, creates steam. 4. Tailor’s ham – a device used to shape curved seams, darts, and the like whilepressing. 5. Sleeve board – a small ironing board that permits pressing of sleeves without creasing. 6. Point presser – used to press points such as those on collars. 7. Seam roll – used to press seams without creating press marks. 8. Sponge – used to wet press cloth to create steam for pressing. Unit 4 Text A: Machine Stitches
Key Words and Phrases: Tension – натяг, basting – наметування, regulation stitch–звичайний стібок, clip – обрізати, anchor – закріпити, reinforcement–закріплення, strain – деформація, напруження, зусилля, splitting – розрив, overcasting– обметування.
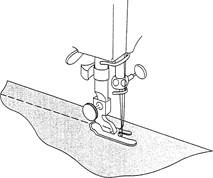
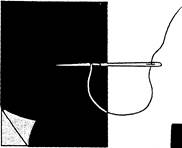
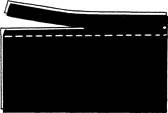
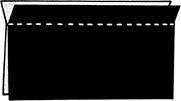
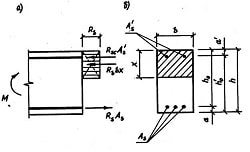
Machine stitches are divided into two types—straight and zigzag. The straight-needle machine makes only straight stitches, unless a special attachment is used; whereas the zigzag machine can create both. Regulation Stitch This is the stitch used for permanent stitching such as seams, darts and tucks. The length and tension of the stitch may vary according to the fabric used. On most medium-weight fabrics, the regulation stitch is about 12 stitches to the inch; sheers require a finer stitch (16 to the inch); heavy or coarse fabrics generally take 8 to 10 stitches to the inch (Fig.1).
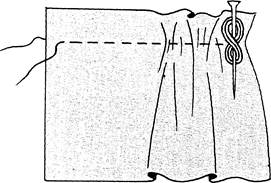
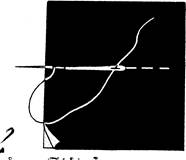
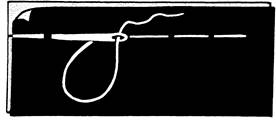
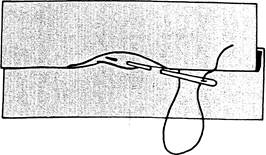
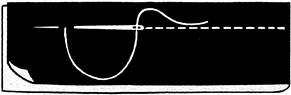
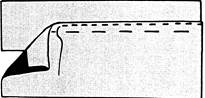
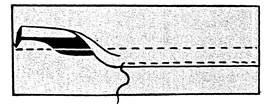
Fig.1 Fig.2 Basting Stitch Basting stitches are used for temporary joining of sections or details which may require reworking when the garment is fitted or for marking. Use the longest stitch on the machine (6 to 8 per inch) and a contrasting thread so that the markings and bastings are easily seen and easily removed. Use the same tension on the machine as you do for permanent stitching on your fabric. To remove basting, clip the needle thread every few inches and pull out the bobbin thread using small, sharp-pointed scissors (Fig.2). Stitching for Gathering Sections which require easing or gathering should be stitched with a long stitch (6 to 10 to the inch) in matching color thread. Leave long threads at the ends of the stitching. Anchor threads at one end around a pin, then pick up the bobbin thread at the other end and gently draw it up to form the amount of easing or gathering needed. The shorter stitch (10 to the inch) will form finer easing or gathering; the longer (6 to the inch) will create fuller easing or gathering. Sometimes a heavier thread is used on the bobbin (Fig.3).
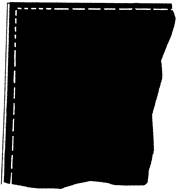
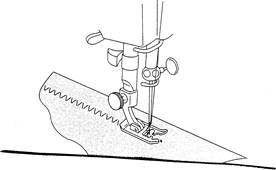
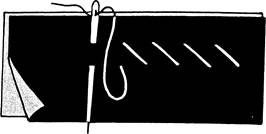
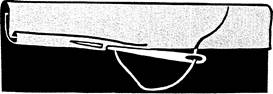
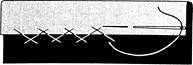
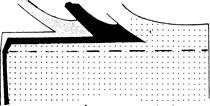
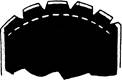
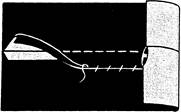
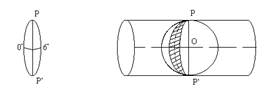
Fig.3 Fig.4 Stitching for Reinforcement Areas where there is strain or a need for reinforcement, such as points of collars, cuffs, gussets, pointed faced openings of necklines, underarm seam of kimono sleeves, will need a finer, tighter stitch, usually 16 to 20 stitches to the inch (Fig.4). Zigzag Stitch Zigzag machines are capable of making the zigzag stitch but a straight-needle machine will require a special zigzag attachment. The small zigzag stitch may be used to stitch seams in jersey and loosely woven fabric with bias seams, giving greater elasticity which helps prevent seam splitting. It can also be used as a seam finish for edges that ravel by stitching close to the raw edge or by overcasting the edge (Fig.5).
Fig.5 Exercise 1. Answer the following questions: 1. How is the stitch used? 2. What is the regulation stitch on most medium-weight fabrics? 3. When are basting stitches used? 4. How can you form the amount of easing or gathering? 5. What kinds of stitches are used for points of collars, cuffs, gussets, and so on? 6. What does a straight-needle machine require for making the zigzag stitch? 7. How can you use the zigzag stitch?
Exercise 2. Find the English equivalents of such words from the text: Виточка, складка, прозорі (легкі), грубі, гострі кінці, лицьова сторона, косий, трикотажна тканина (джерсі), розходитись (обтріпуватись, обсипатись).
Text B: Hand Stitches Key Words and Phrases: Running stitch – зметувальний стібок, quilting – виготовлення стьобаних виробів, basting stitch – наметувальний стібок, interfacing – прокладка, allowance – припуск, overlap –заходити один за другий, hemming stitch – підрублювальний стібок, slanting stitch – косий стібок, catch-stitch – стібок “ялинкою”, overcasting stitch – обметувальний стібок.
Permanent hand stitches are usually worked from right to left unless the directions state otherwise. If you are left-handed you may have to reverse the direction of the stitching. Begin and end any permanent hand stitches with tiny back-stitches on the wrong side of the garment to hold threads securely (Fig.6).
Fig.6 Fig.7 Running Stitch This is the simplest form of hand stitch. It can be used for gathering, quilting, mending, tucking and seams that do not require much strain. For easing and gathering, take stitches 1/16 to 1/4 inch length, pass the needle through the fabric several times and then pull the needle through. Continue across the work, gently easing the fullness. For a permanently stitched seam, use tiny stitches 1/16 to 1/8 inch in length. Do not draw the thread up; keep it flat and smooth in the work. On sheer fabrics use the tiny 1/16-inch stitch; on heavier woolens a 1/8-inch stitch may be the smallest you can make (Fig.7). Basting Stitch A basting stitch is used to hold two or more pieces of fabric together temporarily, to transfer construction symbols from wrong to right side of fabric and to indicate guide lines. Use a contrasting thread so the basting stitch can be easily identified when permanent stitching is made and the basting is removed. The stitch is a larger version of the running stitch, about 1/4 to 1/2 inch in length, depending on the weight of the fabric and how securely the pieces of fabric should be held together (Fig.8).
Fig.8 Fig.9 Even Basting. Used when there will be some strain on the seam. Make stitches about 14 inch long, even on both sides of fabric (Fig.9). Uneven Basting. Used in seams where there is little or no strain or as a guide line for stitching. Take long stitches on one side of fabric and short stitches on other side (Fig.10).
Fig.10 Fig.11 Diagonal Basting. Used to hold several layers of fabric securely together. Stitch through the fabric at right angles to the fabric edge. This gives a diagonal stitch on the upper side and a short horizontal stitch on the underside. It is used to hold interfacings, linings and facings in place during fittings (Fig.11). Slip-Basting. Most often used when matching seams in plaids or stripes or to baste alterations made on the right side. Fold under the seam allowance on one side of the seam and press flat. Then place this over the other section of the seam, right sides up, matching accurately at the seam line and pin. Place the needle through the seam line on the underside and back through the seam line. Take stitches about 1/4 inch in length. Place the needle through the seam line fold and out on the fold line. Continue in the same manner. No stitches will show on the right side, while on the wrong side, there is a regular basting stitch (Fig.12).
Fig.12 Fig.13 Back-Stitch Back-stitching is used to stitch a seam securely or permanently. It looks like machine-stitching on the right side, but stitches overlap on the wrong side. Take a small running stitch (1/8 inch long) through the fabric on the underside. Take a stitch back, placing the needle in the fabric at the beginning of the first stitch and bringing it out a stitch ahead. Continue in this manner working across the fabric (Fig.13). Slip-Stitch The slip-stitch is used when stitching should not show, but it isn't very strong. It differs from the slip-basting stitch in the length of the stitches. Place a stitch through the fold of the fabric about 1/8 to 1/4 inch in length. Pick up only one or two threads of the under fabric. Continue in this manner taking a stitch through the fold and then in the under fabric (Fig.14).
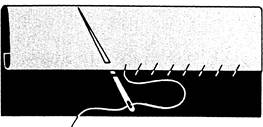
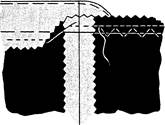
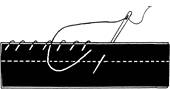
Fig.14 Fig.15 Hemming Stitch A slanting stitch which shows on the wrong side and is stronger than the slip-stitch. Used for all types of hemming. Take up one thread of the garment fabric and then bring the needle through the fold of the hem edge. Stitches should not show on the right side (Fig.15). Catch-Stitch This is a fairly loose but secure stitch used to hold raw edges of facings and interfacings. Working from left to right, take a small stitch through the upper fabric from right to left, then pick up one or two threads in the under fabric from right to left. Do not pull the stitches tight. The threads will cross each other between stitches (Fig.16). Invisible Stitch Sometimes called the French hemming stitch. This stitch is used for hems and for attaching facings and interfacings in tailoring. Fold hem or facing back on garment. Working from right to left, pick up a thread of the garment, then pick up a thread of the hem or facing diagonally above. Do not pull the stitches tight (Fig.17).
Fig.16 Fig.17 Fig.18 Overcasting This stitch may be used on raw edges, either single or double, to prevent their raveling. Take stitches over the edge with the needle held in a slanting position. Stitches should be close together and an even distance apart. Keep the depth of the stitches uniform (Fig.18). Exercise 1. Answer the following questions: 1. How should you begin and end any permanent hand stitches? 2. Where can you use a running stitch? 3. When is a basting stitch used? 4. What kind of basting stitches are there? 5. How does a back-stitch look like? 6. How does a slip-stitch differ from a slip-basting stitch? 7. What stitch is used to prevent the raveling of the edge?
Exercise 2. Find the English equivalents of such words from the text: Ремонт, повнота (ширина), рівномірний наметувальний стібок, шар, підкладка, потайний наметувальний стібок, переробка (зміна), зігнути (скласти), підрубка, невидимий стібок.
Text C: Seams Key Words and Phrases: Evenly – рівно, plain seam – зшивний шов, shifting – зміщення, notches – помітки, rate – розмір, grading – висікання припусків швів, reduce – зменшувати, clipping – надсікання, apart – на відстані.
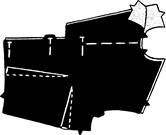
Pinning Although it is possible to stitch seams without pinning them, this requires a great deal of skill and control. Normally, seams are joined first with pins, then basted or permanently stitched. To pin plain seams correctly, place the two pieces to be joined together evenly on a flat surface. Insert pins at right angles to the seam line with the pin holding the two fabrics securely together along the seam line. This prevents the two fabrics from shifting on the seam line while you are basting or stitching. Place a pin at each end, matching edges, and then at the notches before pinning the remaining area (Fig.19).
Fig.19 Fig.20 If you are working with an eased seam, the pinning will be slightly different. Place the fabrics together with the section to be eased on top toward you. Place pins at right angles to the seam along the seam line. Put them very close together leaving slight fullness between pins in the eased section. This can be done easily and evenly if you roll the fabric over your finger as you join the two sections with the pins. When you pin a crossed seam (where two or more seams cross each other), first be sure the stitched seams match. Place a pin through the middle of the stitched seams at the seam line and place pins on either side of seams on the seam line (Fig.20). To pin a lapped seam, turn under the seam allowance on the section to be lapped and place it in position. Place pins at right angles to the fold edge close to the fold through all thicknesses. Stitching Usually a pinned seam is taken directly to the sewing machine and either machine-basted or permanently stitched. If it is a seam, which will not require additional fitting such as a center front seam, or the joining of a facing to a neckline, it is permanently stitched. Seams, which may need refitting should be machine-basted. In either case, you'll want to remove the pins as you stitch. Most machines are equipped with a traveling foot, which rocks backward and forward over the pins, so an entire seam can be stitched and the pins removed after stitching. However, this is not the best method, since many fabrics may require slight easing of the top layer because the two thicknesses do not travel through the machine at exactly the same rate. When a seam is pinned such fabric is likely to bunch at the pins, unless it is carefully eased. It is better to stitch slowly, removing each pin with your right hand just before it reaches the edge of the machine foot. Keep a pin cushion handy on your wrist or at the right side of the sewing machine, and place the pin in it as soon as you remove it from the fabric (Fig.21).
Fig.21 Fig.22 Trimming In working with a pattern, you'll find that you will have to trim many seams. This simply means that you cut away both allowances to an even width. Seams are trimmed to reduce bulk, particularly at faced edges (Fig.22). Grading Grading a seam allowance means that the layers of fabric are cut to different widths, with the wider seam allowance next to the outside fabric. When there is an interfacing joined in a seam, trim this close to the line of stitching. Grading eliminates a ridge being formed by the bulk of several layers of fabric in a seam allowance (Fig.23).
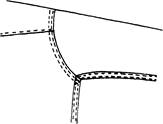
Fig.23 Fig.24 Fig.25 Clipping Most curved seams, such as necklines, princess seam lines, collars, kimono sleeves at the underarm, require clipping in order to make the seam lie flat. On an inward curve, grade seam allowances and clip to the stitching line about 1/4 inch apart. On outward curves, grade seams and make notches to line of stitching about 1/4 inch apart (Fig.24, Fig.25).
Exercise 1. Answer the following questions: 1. Why should you use pinning? 2. How are plain seams pinned correctly? 3. What prevents the two fabrics from shifting on the seam line while you are basting or stitching? 4. What seams should be machine-basted? 5. How does a traveling foot of the sewing machine work? 6. What does grading a seam allowance mean? 7. Why do most curved seams require clipping? Exercise 2. Find the English equivalents of such words from the text: Закріплення, вставляти, надійно, коливатися, збиратися складками, підрізання, об’єм (маса), знищити (усунути), товстий край. Text D: Types of Seams Key Words and Phrases: French seam – подвійний (французький) шов, flat-fell seam – запошивний шов в замок, eased to – прилаштований до, binding – обшитий, shrink out – декатирувати, зсідання під утюгом, top-stitched seam – розстрочувальний шов, lapped seam – накладний шов із закритим зрізом, sturdy – міцний, сильний, hemmed-fell seam – підрублювально-запошивний шов, welt seam – настрочний шов із закритим зрізом, mock-French seam – імітація (псевдо) подвійного шва, piped seam –обкантувальний шов.
In garment construction there are several types of seams. The type to use in a garment is determined by the fabric and the design of the garment. For example, if you are working with a sheer fabric, you'll use a French seam, which won't show through the sheer fabric. When making a man's sport shirt, the flat-fell seam is used since it is stronger and will hold up under the stress given this sort of garment. You should know the various types of seams and how to construct them, as well as where they are commonly used in a garment. Plain seam. The seam most frequently used to join two sections of fabric. Pin two pieces of fabric, right sides together, and stitch. Sometimes backstitches are used for this joining. Press seam open and finish seam edges (Fig.26).
Fig.26 Fig.27 Fig.28
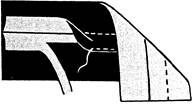
Plain eased seam. When two pieces to be seamed together are slightly unequal in length, the longer piece must be eased to the shorter. Although this easing provides shaping for a curved area of the body, the seam should appear smooth. It is often found at the bust, elbow and shoulder seam of a garment. To construct the seam, place a row of long stitches (6 to 10 to the inch) on the seam line of the longer piece of fabric between the markings for easing. Pull up the bobbin thread of this row of stitches until the seam edge of the longer piece is the same length as the shorter one. Distribute the ease evenly and steam-press to shrink out any fullness at the seam line. Pin the two pieces together and stitch the seam, keeping the eased seam on top as you stitch. Plain seam joining bias piece and straight piece. If one section of fabric to be joined at a seam is bias and the other on the straight grain, place the bias section on top; ease if necessary and stitch with the bias section up toward you. To control stretching of bias seams, place woven seam binding along the seam line and stitch the tape to the seam as you are stitching the seam. Plain seam joining napped fabric and smooth fabric. When one section to be joined in a seam is napped and one is smooth fabric, place the smooth section on top. Stitch with smooth fabric up toward you. Plain seam, top-stitched. A top-stitched seam not only adds a decorative effect to a garment, it also provides a strong seam construction. It is similar in appearance to the lapped seam. Stitch a plain seam and press the seam open first, then press both seam allowances toward the section to be top-stitched. Place a row of stitching close to the seam line, stitching on the right side of the garment through both seam allowances (Fig.27). Lapped seam. This seam is most often used for yokes and applied pieces such as gussets. One section is lapped over the other and top-stitched. Fold under the seam allowance on the section to be lapped and press flat. Place the sections together, right sides up, matching the fold to the seam line accurately and baste in position. Stitch close to the folded edge through all thicknesses (Fig.28). Flat-fell seam. This strong, sturdy seam construction is used for sportswear, men's sport shirts, children's clothes and pajamas. Garments, which will receive a great deal of stress or must withstand repeated washing will be sturdier if constructed with flat-fell seams. However, avoid using the construction on bulky fabrics; the seam is thick and difficult to construct in a heavy, bulky fabric. Place the pieces to be joined wrong sides together, and stitch a plain seam. Press the seam to one side and trim the lower seam allowance to 1/8 inch. Turn under the raw edge of the other seam allowance and place over the trimmed edge. Stitch close to the folded edge through all thicknesses (Fig.29).
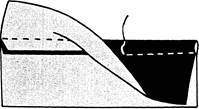
Fig.29 Fig.30 Hemmed-fell seam. This seam is similar to the flat-fell seam and begins with a plain seam on the wrong side. The under layer is trimmed to 1/8 inch and the upper edge is turned under, pinned and slip-stitched by hand, catching only a single thread of fabric. This eliminates machine-stitching on the right side and gives an inconspicuous finished seam on the wrong side (Fig.30). Welt seam. This seam is similar in appearance to the flat-fell seam on the right side. It is also good for heavy fabrics since it gives a smooth, flat finish without the bulk of a flat-fell seam. First stitch a plain seam, press it open, then press the seam allowances toward one side. Trim the underneath seam allowance to 1/4 inch and press the other seam allowance over trimmed edge. Stitch close to the raw edge (Fig.31).
Fig.31 Fig.32 French seam. This is a particularly good seam for sheer fabrics and is used for infants' clothes because it leaves no unfinished seam edges. Place the fabrics, wrong sides together, and stitch a plain seam 3/8 inch from the edge. Trim the seam allowances to 1/8 inch or less. Turn the garment with right sides together and press flat at the seam line. Pin and stitch on the regular 5/8 -inch seam line marking. In infants' clothing, this seam construction is often done by hand (Fig.32). Mock French seam. This seam is similar in appearance to the French seam and is often used in similar fabrics. It is easier to construct, especially in curved seams, such as those of set-in sleeves. First stitch a plain seam, with right sides of the fabric together. Turn in the raw edges of the seam allowance 1/4 inch toward the center seam line. With the folded edges meeting, stitch them together close to the folded edge (Fig.33).
Fig.33 Fig.34 Piped seam. This is a decorative seam often used in neckline seams with a facing and at the waistline. Use a folded bias strip of fabric, ribbon, bias tape or braid. Place it on the right side of one section of the fabric with the fold extending the desired amount beyond the seam line toward the main part of the garment. Baste. Place the other section in position, right sides together, and stitch seam. Press seam allowances to one side (Fig.34).
Exercise 1. Answer the following questions: 1. What is the type of seam determined by? 2. What is the most frequently used seam? 3. How should you join a bias and straight grain piece? 4. What seam is most often used for yokes and gussets? 5. Why is a flat-fell seam used for sportswear and children’s clothes? 6. What seam is particularly good for sheer fabrics? 7. Where is a piped seam often used?
Exercise 2. Find the English equivalents of such words from the text: Зшивний шов, проста структура, ворсиста тканина, гладка тканина, кокетка, витримувати, непомітний, вшивати, бажаний, виріз, обшивання (пройми). Unit 5 Text A: Sleeves Key Words and Phrases: Maintained – підігнаний, set-in – вшивний, bodice – ліф, корсаж, puffed – рукав з буфами, armhole – пройма, dolman – широкий в проймі і вузький в кисті, cut in one – суцільнокрійний, gusset – вставка, клин, sleeve cap – окат рукава, dart – виточка, wash-and-wear – ті, що не потребують прасування після прання, tapering – зменшуючи, скорочуючи, armscye – пройма, uppermost – верхня частина, hem – підрублювати (підшивати).
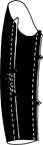
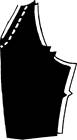
A smoothly fitted sleeve is one of the marks of an expert seamstress. A sleeve with unsightly gathers and puckers or one which twists because proper grain lines were not maintained is the sign of the inexperienced and careless. There are two basic types of sleeves—the set-in or mounted sleeve and the sleeve cut in one with the bodice or unmounted sleeve. The one-piece sleeve (Fig.35), the two-piece sleeve (Fig.36) and the puffed sleeve (Fig.37) are set into a normal armhole. The shirt sleeve (Fig.38), the dolman sleeve (Fig.39) and the raglan sleeve (Fig.40) are variations of the set-in sleeve but fit into a deeper or an irregularly shaped armhole. The kimono sleeve (Fig.41) is cut in one with the bodice. It can be made without a gusset or with a one- or a two-piece gusset.
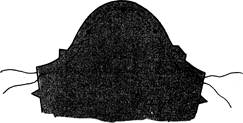
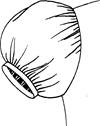
Fig.35 Fig.36 Fig.37 All set-in sleeves are cut with a sleeve cap that is larger than the armhole section into which it must fit. This extra fullness or "ease" is necessary for the sleeve to fit over the arm and hang correctly. The home-sewer must learn to distribute this fullness evenly across the sleeve cap so that it is eased and not gathered. Two-piece Set-In Sleeve This sleeve is found mostly in suits and coats. Both sections of the sleeve are shaped to produce a fitted sleeve. The parts should be joined with a plain seam and pressed. After the sleeve is made it is sewed into the armhole in the same way as the one-piece sleeve, and the lower edge finished in an appropriate manner. Puffed Sleeve Stitch the underarm seam and finish hem edge of the sleeve. Place two rows of machine-basting between markings on sleeve cap. Place one row on the seam line and the other 1/8inch into the seam allowance. Pin sleeve into the armscye, right sides together, matching seams, notches and markings. Draw up the bobbin threads evenly until the sleeve fits the armscye smoothly, and distribute the gathers evenly. Holding the sleeve toward you, baste the sleeve in place. Then stitch. Press the seam at the top of the puffed sleeve away from the gathers and toward the neckline. Press only to the seam line to keep from flattening the gathers.
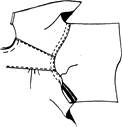
Fig.38 Fig.39 Fig.40 Fig.41 Shirt Sleeve The construction of this type of sleeve is quite different from that of the regular set-in sleeve. The cap of a shirt sleeve is more shallow and has much less fullness. A flat-fell seam is used instead of a plain one. First join the shoulder seams or yoke of the shirt and finish the seams, but do not sew side seams. Pin the sleeve into the armscye, wrong sides together, matching notches and markings and keeping seam lines even at underarm. Ease in the fullness across the cap of the sleeve. There will not be enough fullness to require a gathering thread. Press the seam open and then toward the sleeve. Trim sleeve seam allowance to 1/8 inch. Turn under the raw edge of the shirt seam allowance 1/4 inch and stitch it over the trimmed seam allowance. Pin underarm seam of shirt and sleeve, wrong sides together. Make flat-fell seam. Finish lower edge of sleeve with a cuff or hem. Dolman Sleeve This sleeve is attached to the bodice before the underarm is stitched because of the deep armhole. There will be very little ease in the cap of the sleeve. Pin the sleeve into the armhole, right sides together, matching notches, markings and keeping seam lines even at underarm. Ease in fullness of sleeve cap so that it fits smoothly. Baste and stitch the sleeve in place. Press the seam open, clipping curve at intervals so that the seam will lie flat. Pin underarm seam of bodice and sleeve, right sides together. Stitch the seam and press it open. Finish lower edge of sleeve. Raglan Sleeve Stitch the shoulder dart of the sleeve and press the dart open. Pin sleeve to bodice front and back, right sides together, matching notches and edges. The sleeve section will require easing when it is joined to the bodice but not enough to require a gathering thread. Stitch the seam and clip curve at intervals. Press seam open. Pin the underarm seam of bodice and sleeve, and stitch in a continuous seam. Press seam open. Finish lower edge of sleeve. Kimono Sleeve without a Gusset This is the easiest sleeve, so if you are a beginner, look for styles with this sort of sleeve if it is flattering to your figure. Join the bodice front and back at the shoulder with a plain seam. Press this curved seam open over a tailor’s ham to retain the curve. Join bodice front to back at the underarm seam, right sides together, matching notches. Stitch seam and clip curve at intervals. Press seam open. This seam will need reinforcement under the arm, since it will be subject to a great deal of stress in normal body movement. Reinforce it by basting a piece of woven seam binding about 11/2 inches long to the inside of the bodice along the curve of the underarm seam. Turn bodice right side out. Stitch 1/8 inch from the seam, through bodice, seam allowance and seam binding, along both sides and ends. Or if you do not wish the stitching to show on the right side, baste the seam binding to the seam line on the inside and stitch it only to the seam allowance on both sides of the seam.
Exercise 1. Answer the following questions: 1. What are basic types of sleeves? 2. What are the signs of the inexperienced and careless of a seamstress? 3. When should the sleeve length be determined? 4. When should you finish the lower edge of sleeve? 5. What kind of sleeves is the easiest?
Exercise 2. Find the English equivalents of such words from the text: Знаючий(досвідчений), некрасивий (неприглядний), складки, зморшки, цільний, той, що складається з двох частин, лікоть, бічний шов (під пахвою), пояс(корсаж), мілкий (не глибокий), придавати форму.
Text B: Cuffs
Key Words and Phrases: Turnback cuffs – відкладні манжети, cut in – вставляти, interfaced – вставлений з прокладкою, facing – обшивка, bias facing – коса бейка, shaped facing – підкрійна обшивка, placket – розріз (для застібки). Sleeves are often given interest by the use of cuffs. There are many different types, each one creating a definite fashion effect. They may be straight or shaped, closed or open, applied or cut in one with the sleeve. Turnback cuffs may be applied as separate pieces or are sometimes cut in one with the sleeve and faced. Applied cuffs are either straight or shaped and can be closed or open at the ends. The straight cuff has a fold at the upper edge and fits close to the sleeve. The shaped cuff has a seam at the upper edge and can be curved so that it will flare away from the sleeve. The cuff cut in one with the sleeve can be made with or without an opening. When an opening is used, it may be in the seam. Cuffs are often interfaced to give them body and firmness. For a straight cuff, cut the interfacing half the width of the cuff or to the fold line; for a shaped cuff, use cuff pattern; for a cuff cut in one with the sleeve, the sleeve facing piece. Cuffs are applied with a bias facing, a shaped facing or a self-finish. Shaped Cuff Closed at Ends Join the ends of the interfacing with a lapped seam. Stitch end seams of each cuff section and press open. Baste the interfacing to the inside of the under-cuff section. Stitch the under-cuff section to the top cuff section at the unnotched edge, right sides together and seams matched. Trim interfacing close to stitching and grade seam allowances. Turn cuff to right side and baste seamed edge rolling seam slightly to the inside. Baste cuff one inch from open edge. Shaped Cuff with Open Ends Baste the interfacing to the under section of the cuff. Place right sides of cuff sections together and stitch at unnotched edges. Grade the seams and turn cuff to right side. Baste close to edge, rolling seam slightly to the inside. Slip-stitch the open ends of the cuff together for ѕ inch up from the open edge. Baste cuff 1 inch from the open edge. Shirt Cuff Baste interfacing to cuff facing. Trim away interfacing scam allowance at upper edge. Stitch cuff to cuff facing, right sides together, leaving upper edge open. Trim interfacing close to stitching and grade seam allowances. Turn to right side and press. Baste and stitch cuff facing to inside of lower edge of sleeve, adjusting gathers evenly. Press, seam toward cuff facing. Turn under free edge of cuff and top-stitch over scam on right side. Continue top-stitching around entire cuff. Close cuff with button and buttonhole. French Cuff The French cuff is made the same as the shirt cuff. Before applying the cuff to the sleeve edge turn under-lap of placket to the inside and baste at lower edge. Apply the French cuff to the lower edge of sleeve same as the shirt cuff. Make buttonholes in both edges of cuff. Fold the finished cuff in half and fasten with cuff links or linked buttons.
Exercise 1. Answer the following questions: 1. What types of cuffs are there? 2. How may turnback cuffs be applied? 3. What are the differences between straight and shaped cuffs? 4. How are cuffs applied? 5. How is the French cuff made?
Exercise 2. Find the English equivalents of such words from the text: Згин, оброблений, бути зігнутим, розширятись, міцність, підрізати (підрівнювати), ретельно, петля, скріпляти, запонки для манжетів. Text C: Collars Key Words and Phrases: Detachable – той, що знімається, flat collar – прилеглий, плосколежачий, coarse – грубий (матеріал), decided roll – сильне заокруглення, Peter Pan collar – маленький, круглий, плосколежачий комір, convertible – відкритий, scalloped – зубчатий, band collar – комір стійка, turtle-neck collar – комір виду “хомут”.
The collar is about the most important part of any garment, and must fit well. Although there is a variety of collar designs and shapes they all fit into one of three groups—round, pointed, or collar and undercollar cut in one. All collars except the detachable ones are normally interfaced to give them needed body and shaping. The type of interfacing to select will depend upon the design of the collar and the fabric used.
|
|||||||||
|
|
Последнее изменение этой страницы: 2016-04-18; просмотров: 221; Нарушение авторского права страницы; Мы поможем в написании вашей работы! infopedia.su Все материалы представленные на сайте исключительно с целью ознакомления читателями и не преследуют коммерческих целей или нарушение авторских прав. Обратная связь - 3.129.148.210 (0.416 с.) |