Заглавная страница Избранные статьи Случайная статья Познавательные статьи Новые добавления Обратная связь КАТЕГОРИИ: ТОП 10 на сайте Приготовление дезинфицирующих растворов различной концентрацииТехника нижней прямой подачи мяча. Франко-прусская война (причины и последствия) Организация работы процедурного кабинета Смысловое и механическое запоминание, их место и роль в усвоении знаний Коммуникативные барьеры и пути их преодоления Обработка изделий медицинского назначения многократного применения Образцы текста публицистического стиля Четыре типа изменения баланса Задачи с ответами для Всероссийской олимпиады по праву 
Мы поможем в написании ваших работ! ЗНАЕТЕ ЛИ ВЫ?
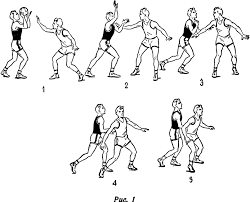
Влияние общества на человека
Приготовление дезинфицирующих растворов различной концентрации Практические работы по географии для 6 класса Организация работы процедурного кабинета Изменения в неживой природе осенью Уборка процедурного кабинета Сольфеджио. Все правила по сольфеджио Балочные системы. Определение реакций опор и моментов защемления |
Double-Faced Pattern: Design Tools
Double-Faced Pattern: Card Setup
Setting Thread Colours The colours of all cards can be set by clicking on the To set the colour of a specific thread, click on the hole in the card display. Left-clicking will set the colour to the selected primary colour, and right-clicking will set the colour to the selected secondary colour.
Setting the Card Threading
The threading for each card can be set by clicking on the letter S or Z below each card in the list. Alternatively, one of the threading buttons can be used:
Double-Faced Pattern: Design Area
Left-clicking or right-clicking on a block will swap between the foreground and the background colour. Left-clicking and moving the mouse while holding down the button will set all blocks to the foreground colour. Right-clicking and moving the mouse while holding down the button will set all blocks to the background colour.
An approximation of the actual woven appearance can be seen by changing to the Real Image tab.
The 3/1 Broken Twill Designer
The 3/1 Broken Twill designer is amost identical to the standard double-face designer, with the following differences:
Design Area and Tools
Instead of a simple grid, the blocks are arranged in the staggered pattern necessary for 3/1 broken twill design. This has an impact on several of the tools:
Additional Tools
Card Threading
Although the threading can be changed, it is advisable to stick with the standard method, ie threading all cards in the S direction. At present GTT only supports the one-pack method (as described in The Techniques of Tabletweaving), and colours are automatically assigned in the following sequence:
P = Pattern warp B = Background warp
Long Floats
The standard turning sequence for a card is FFBB (with different starting points). To achieve smooth colour boundaries it is necessary to change the turning direction in the middle of a sequence, resulting in a long float. In GTT this can be achieved almost painlessly by marking a block as having a long float. The pattern will be marked like this:
Colour Interchanges
Clicking on the Print Pattern button can generate two different types of turning sequence, depending on the option selected in the File | Settings | 3/1 Broken Twill menu:
The Font Designer
Font Designer: Design Tools
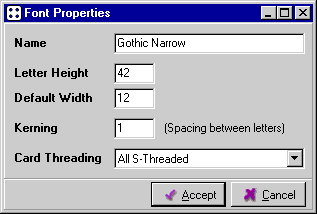
Font Properties
This form is used to set the overall properties of the character set.
|
|||||||||||||||||||||||||||||||||||||||||||||||||||||||||||||||||||||||||||||||||||||||||||||||||||||||||||||||||||||||||||||||||
|
|
Последнее изменение этой страницы: 2016-04-08; просмотров: 185; Нарушение авторского права страницы; Мы поможем в написании вашей работы! infopedia.su Все материалы представленные на сайте исключительно с целью ознакомления читателями и не преследуют коммерческих целей или нарушение авторских прав. Обратная связь - 13.58.121.131 (0.012 с.) |


 The design area is very straightforward. By default, the pattern will be filled with the background colour of each card. A few simple operations can be performed here:


 The normal turning sequence for the three blocks would be FFBBBB, but since the second block has been marked with a long float tag, the turning sequence will be FFBFFF.