Заглавная страница Избранные статьи Случайная статья Познавательные статьи Новые добавления Обратная связь КАТЕГОРИИ: ТОП 10 на сайте Приготовление дезинфицирующих растворов различной концентрацииТехника нижней прямой подачи мяча. Франко-прусская война (причины и последствия) Организация работы процедурного кабинета Смысловое и механическое запоминание, их место и роль в усвоении знаний Коммуникативные барьеры и пути их преодоления Обработка изделий медицинского назначения многократного применения Образцы текста публицистического стиля Четыре типа изменения баланса Задачи с ответами для Всероссийской олимпиады по праву 
Мы поможем в написании ваших работ! ЗНАЕТЕ ЛИ ВЫ?
Влияние общества на человека
Приготовление дезинфицирующих растворов различной концентрации Практические работы по географии для 6 класса Организация работы процедурного кабинета Изменения в неживой природе осенью Уборка процедурного кабинета Сольфеджио. Все правила по сольфеджио Балочные системы. Определение реакций опор и моментов защемления |
S implest approaches to objects
| ||||||||||
Until that time, we built new objects for each object in the drawing. But you can download any shape and place a copy in the right place, as well as edit the created shape. Operations with objects that are discussed below begin with their designation (definition):
* The object reacts with the selected pointer tool.
• If objects are captured (like the top two ellipses), then objects built after the construction of objects are selected in the common zone, since the program considers it built above the previous one. (he lived on the top floor.)
Copying and pasting
Copy the object.
1. indicate a five-pointed star.
2. Press Ctrl+C next to it. The object is moved to the Windows clipboard. There were no changes in the picture.
3. press Ctrl+P. the Object in the clipboard is inserted on the working page above the first one. This is not visible in the picture, since the borders of the shapes intersect.
4. The Copy object (copy, suck) command is located in the edit menu. Define the object and select this command. To insert an object, select Paste from the edit menu. The insert, copy, and cut buttons are located on the left side of the control panel.
5. Transfer
6. The copy remains in the symbol position after insertion. You can use the coordinate field in the properties panel to drag it to the desired location. This method provides a high degree of placement accuracy. However, interactive object movement is usually used to promote the work. Thus, any programЕгер ол белгіленбеген болса, онда бесбұрышты белгілеңіздер. Нұсқағышты орталық манипуляторға әкеліңіздер. Нұстағыш төртбасты стрелка пішінді болады.
1. until the object reaches the desired location (in Eran, you will see its heat.) but aparine. The copy of the object is moved from place, and the first shape remains in place.
 Horizontal and vertical offset.
If you hold down the Ctrl key while moving an object, the offset is made in the exact horizontal or vertical position.
Scaling
1. The second slope of the crown should be less. To change the dimensions, you can use the properties panel again,or use Interactive resizing.
2. mark the left square. Click on one of the corner handles and drag it. The pointer is a two-bladed arrow.the object changes size, accompanied by the movement of the pointer. Reach the required parameters of the object and put it in place.
Horizontal and vertical offset.
If you hold down the Ctrl key while moving an object, the offset is made in the exact horizontal or vertical position.
Scaling
1. The second slope of the crown should be less. To change the dimensions, you can use the properties panel again,or use Interactive resizing.
2. mark the left square. Click on one of the corner handles and drag it. The pointer is a two-bladed arrow.the object changes size, accompanied by the movement of the pointer. Reach the required parameters of the object and put it in place.
 Control question:
1. what key do you hold when moving an object?
2. what are the properties of size changes?
Task:
1.
Control question:
1. what key do you hold when moving an object?
2. what are the properties of size changes?
Task:
1.  Bezier through the tool insert shapes.
2. Artistic Insert the photos below using the Media tool Bezier through the tool insert shapes.
2. Artistic Insert the photos below using the Media tool
 
| |||||||||||
Editing curves requires certain skills. Of course, at first your figures will not be beautiful, but you will get used to it in the process. Operations performed on certain nodes (nodes) can be performed with drawing tools and pointers. However, there is a special tool For editing CorelDRAW contours (Shape Tool). It is located on the second panel of tools, counting from the top. Selecting this tool changes the appearance of the object. The outline is a dotted line illuminated in yellow. Object nodes are displayed as small black squares.
Transformation of curves (change)
From the point of view of the reaction of paths (or view) the main differences of the shapes (curves, objects) voluntary forms from graphics primitives, you can change the nodes of a curve object in any way, and the nodes are graphic primitives are only editing a subset of the most limited of ways. Therefore, if you want to change the shape of a figure built with the drawing tool, you need to turn it into a curve. To do this, select the convert to shapes menu. This command can also be accessed in the properties panel after selecting an object. It is selected using the same button on the properties panel. On the button, four nodes of the circle are laid out.
Move the cursor using the control keys
You can use cursor control and keys to move a given node. The node moves the pointer key by the same amount each time it is pressed. The offset step is passed to the input field for the offset step and the property bar pointer tool (Nudge Offset). This approach allows you to accurately position the nodes of the edited shape.
Consider this object. Although the appearance of the segments has not changed since the changes were made, the presence of control points indicates that we have a curve ahead of us.each node has two control points, and the last one has one node. All existing nodes are independent - control points for such a node are independent of each other.Curves that pass through a sharp node can bend at any angle. When summing up the node control points, make sure that the curves that pass through the node have a smoothness or any angle. Then repeat the primary form.You won't need a burned node in this curve. All nodes must ensure smooth curvature bending. These are either polished or symmetrical nodes.
In this case, depending on what they can be used for, they can be used when editing symmetric objects. In our case, we use grinding units to form beautiful curves. They allow you to control the type (shape) of the curve more freely.
 1. select all nodes of the Curve.
2. Click the Smooth Button On the properties panel. The shape of the curve has changed. The corners of the tipping line turn into smooth transitions (transitions) between segments.
3. Finish editing the curves. To do this, move the sites to the control points.
Task
Draw the image below:
1. select all nodes of the Curve.
2. Click the Smooth Button On the properties panel. The shape of the curve has changed. The corners of the tipping line turn into smooth transitions (transitions) between segments.
3. Finish editing the curves. To do this, move the sites to the control points.
Task
Draw the image below:
| |||||||||||
Working with text
CorelDraw allows you to use two types of text.
1. Artistic text-shaped text
2. Paragraph text-simple text Shaped text is considered an object. Therefore, you can use General contour and casting properties and special effects in it. You can change the shape of the curly text (using the Shape tool). Plain text is placed in a special text block and parameters (fields, paragraph margins, hyphenation, etc.) used in word processors can be set in it. If necessary, you can convert curly text to plain text and Vice versa. For this:
1. Run the command ' Text > Convert to Paragraph (Artistic) text or Ctrl + F8.
2. To create plain and curly text, use the: Text tool. To create curly text: click on any area of the work area and enter the text. To create a simple text, you need to draw a frame and enter the text. The dialog box used for editing text is called the Ctrl + Shift+t key combination. to fully configure text parameters, use the F-button to open the Format text chat window. This window has a 5-page list.
3. Character - symbols
4. Paragraph - paragraphs
5. Tabs - tab
6. Columns - columns
Effects – select the marker type. The size of the same marker, the type of letter is selected here. To create a new block associated with the previous text block, click the lower-middle marker of the text block.
Then draw the text block frame. If the text is completely symmetrical to the first block, it will look like a marker arrow. In order to connect two blocks to each other, you must first click on the middle-lower markers of the first block, then click on the second block. The link will be blue.
Сorel Draw the graphic editor contains tools for text processing. Its capabilities are sufficient to solve many problems, even if its capabilities are not so suitable for a strong text editor in a professional printing system.
Corel Draw – you can also create two different text objects: simple text (Paragraph) and creative text (Artistic). Creative text is often necessary for a beautiful print design. To create an Artistic object, click the icon on the tool bar. Here, the text borders are not limited-click once anywhere on the screen and type the text. Depending on the print size, the borders are automatically expanded. To enter a large amount of text, use the Paragraph format.
When creating an object, click the desired area on the paper, that is, the location of the text. After it is not filled to the limits, it remains invisible on the screen. Thus, you need to expand the boundaries, or you can move another Paragraph object in the same section.[4]
You can select Effects on a text object and create various effects: zoom, stretch, offset, and scroll. Like any other WYSOWYG-based software, Corel Draw shows all text changes on the screen.
Corel Draw let's look at the main operations performed in the text. Use the Text menu to format text. Below are its points[5] Text Roll -Up
Basic text parameters: the font used is aligned to a number of sizes. You can go to the menu if this menu is intended for setting special parameters.
Character
When analyzing this item, a menu appears where the user can implement the size of the carp, the style of characters, the distance between characters, the distance between words, rows, and the alignment of rows. The hyphen can be one size or two-thin and thick.
Paragraph
In this menu, you can change the text paragraph parameters: line spacing between words and labels, paragraph limits, left or right margins, and tab position. You can put signs from special artistic carps.
Frame
Only for the Paragraph object. The text is published in newspaper format, i.e. in columns. Number of columns from 1 to 8. You can give the size of the width of each column. When you enter text and reach the lower limit of the object, it automatically moves to the next column.
Fit Text To Path
Corel Draw is a distinctive tool that stands out in other simple word processors. "First previous 11121314151617181920 next last" is thus adjacent to this object. Corel Draw includes the placement of text in various forms. Creating a perimeter grid for an example.
Align To Baseline – align text to the baseline
Straighten Text – balancing text along the baseline and using all characters to it.
Type Assist - special service symbols for text
Spel Checker- spell checker. Not only checks the pinned object, but also checks all documents that have text.
Thesaurus - ability to replace each dictionary with a synonym
Find – found text
Replace – Replacing text
Edit Text – it is not very clear, but in most cases it is suitable for entering text. An input window will appear where you can make changes. You can make all the changes that are used in plain text, such as stretching, compressing, scrolling, and moving. The inconvenience of working in Corel Draw with large volume objects that you need to pay attention to. Powerful word processors for Windows and a user with a printing system will immediately notice problems with the Corel Draw interface.
You often need to change the type of cursor that is used to work with text and objects, and you need to change the text style several times.Working with paragraphs is difficult. There are no necessary features for many useful changes. On the one hand, given the purposes for which this program was developed, we can say that the functions for working with text were well organized.
Changing dimensions
Height
Width
Proportional
Sizes are not limited. If you take a square in the corner, the length and height vary proportionally. These operations can be done not visually, but also to enter numbers, if you use the Transform Roll-Up menu, the Effects menu displays a menu here and there is a move button, rotate, resize, and move buttons. You can set the desired length and angles manually. To execute the command, click Apply.
Crossing (Mirror)
This function allows you to convert text to the left, right, or top-down.
Бақылау сұрақтары:
1. operations with curly text.
2. operations with plain text.
3. types of text placement along the trajectory.
4. task
5. 

| |||||||||||
Formatting plain text
Formatting plain text has a lot in common with formatting curly text.For plain text characters, you can pass the font,size, expression, and other font attributes.Naturally, the text should be indicated in advance.Use the[Text Tool] tool to mark text characters. Markup text using the mouse and keyboard. You can also mark text using the keyboard [using the cursor keys when you press the Shift key], or using the mouse [by clicking the left button, move it around the text].
The properties panel shows shapes, underscores, alignments, and so on. buttons.If you click on one of them during the marked text, MIT has the corresponding attribute.
1.Select the text [Text Nool]tool.
2.text designation on the first side
3.Select 14 items in the font size.The text was larger, now it moved to the associated frame without placing it in the frame. 4.move the long marker of the first side down until the road is in the same place.The text in this case remains in the established form.
Consider other formatting attributes.
1.on the second side of the text, indicate, for example, the phrase.
2.Click the Bold button on the properties panel.The font took on a bold expression. 3.Alignment properties in the center Alignment panel Press the button.A list of alignment options opens.By selecting the list items one by one, let's look at the different alignment options, then select centered.
The theme is aligned with the vertical axis of symmetry of the frame. Fine tuning of the text Most text shaping attributes can be selected from the properties panel. However, when it comes to splitting text into columns, you have to get help from the Format text dialog box.You can configure all formatting attributes there. It should be noted that when using the tool, you can also pass interval values that can only be configured as needed.You may need to use numeric values when working with a small amount of text until it works.
Ø Use the text tool to select the text on the second side and click the Format text button on the properties panel.This opens a dialog box with the same name with five applications.
Ø In the cheracter (Symbol) application, all the controls for the Sivol attributes are listed.Here, the headset selects the attributes of pin 6, expression, underline, and drawing. You can define designated characters as an upper or lower index. Language defines a group of text languages in the list language (Language, Script) - Latin (Latin) Asian (Asian) Middle Eastern (middle Eastern). In the lower part of the app, you can define the angle of rotation of characters, vertical and horizontal offset.
Ø Paragraph (the paragraph app allows you to align paragraphs (right or left, center or shape, and indent from the side borders of the frame and paragraphs). Here you can give the distance between paragraphs. You can also change the distance between characters and the size of the space.In this case, you can enable or disable automatic transfer placement and configure the placement algorithm.
Ø You can use the tabs application to determine the tab location and the text alignment mode that applies to them. In this application, you can also define a placeholder between tabs.
Control question:
1. operations with curly text.
2.operations with plain text.
3. types of text placement along the trajectory. 
| |||||||||||
W orking with multiple objects
CorelDraw is the most popular vector graphics program.
CorelDraw is an unknown package that is not used for editing a vector image without a graphics processing tool. Editors are better than Adobe Photoshop and Adobe Illustrator. CorelDraw is designed for calculating multiple calculations and solving graphical problems. This package also includes programs used to prepare textures for raster and wind graphics, a font editor, tracing, and large image sizes.
To change the order of objects, select the desired object and run the command Arrange > order from the menu.
* To Front-stands in front of the selected object.
* To Back-place the selected object behind you.
* Forward One-place the selected object in one forward object.
* Back One-places the selected object back by one object.
· * In Front Of-specifies which object to place in front of.
· Behind - specifies which object to place behind.
· Reverse Order – shows the relative position of the selected object.
· The design (combination of) objects. Combining-creating a new object from several objects. To create a new object from objects, you must first select the necessary objects. Then, in the properties palette, click the Ctrl+L button or keyboard shortcut, or run the Arrange > Combine command.
· * Buldioski (logical) operations used in the objects
· Weld (Association) - Association. As a result of an unrelated connection, the object outline and fill will look like the last selected object. If objects differ by using frames, then the contour and fill of the minimum object is taken as the final object.
· 1.Trim-get the difference. To create a new object as a result of getting a common part from the last selected object with other objects. If objects differ using a frame, they are subtracted from the minimum object as the final object.
· 2.Intersect – the intersection. Based on the last selected object, you can create a new object by deleting unassigned parts of objects. If the objects are characterized using the framework, the quality of the final object is the minimal unit.
· • Alignment of objects
· The Align and Distribute command is used to align objects and place them in a specific sequence. As a result of executing the command, a dialog box consisting of two pages will appear.
· Align Top the selected objects will be aligned on top
· Center-aligns objects horizontally.
· Botton-selected objects are aligned at the bottom.
· Left-selected objects are aligned to the left.
· Center-the selected objects are aligned vertically.
· Right-objects are aligned on ten sides.
· Edge to Page-page alignment
· Center of page-the selected objects are located in the center of the page.
· Align to Grid-the selected objects are attached to the nodes of the grid.
1. Distribute – this is using flags on the surface in the volume of the surface and on any object, you can place objects at an equal distance from each other. The flags of the Distribute of group are used to display the placement.
· Extent of Selection-for the selected objects.
As a result, the Extent of Page object cannot be used for any operations. To remove a block, you must run the command
Arrange > unlock Object.
Multiplying objects (getting copies)
To increase objects, use the Duplicat and Clone commands.
The Duplicate operation results in an authentic copy of the object and the copy is a separate object. To execute this command, press Ctrl + D and the"+ " key.
The object created as a result of the Edit Clone command will depend on the source object. If the original makes any changes to the object, it automatically appears in all its clones. And changes in the Clone do not affect the original object.
Control question:
1. What actions can I perform with objects in CorelDraw?
2. What tools exist that edit object forms, and explain how they work?
3. The alignments of objects of the regulation?
Task:
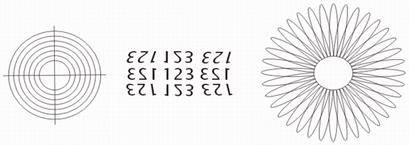
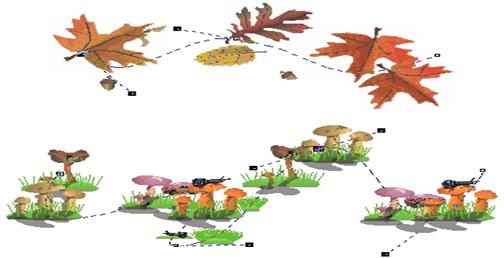
Insert images below, combining objects:
Placing and installing 6 objects in the "Clipart" folder using the " container" the objects are grouped and placed in the container of an ellipse. Контейнердің мүмкіндіктерін қолданып төмендегідей сурет алыңыз:
|
|||||||||||
|
|
Последнее изменение этой страницы: 2021-04-12; просмотров: 101; Нарушение авторского права страницы; Мы поможем в написании вашей работы! infopedia.su Все материалы представленные на сайте исключительно с целью ознакомления читателями и не преследуют коммерческих целей или нарушение авторских прав. Обратная связь - 3.139.80.15 (0.018 с.) |