Заглавная страница Избранные статьи Случайная статья Познавательные статьи Новые добавления Обратная связь КАТЕГОРИИ: ТОП 10 на сайте Приготовление дезинфицирующих растворов различной концентрацииТехника нижней прямой подачи мяча. Франко-прусская война (причины и последствия) Организация работы процедурного кабинета Смысловое и механическое запоминание, их место и роль в усвоении знаний Коммуникативные барьеры и пути их преодоления Обработка изделий медицинского назначения многократного применения Образцы текста публицистического стиля Четыре типа изменения баланса Задачи с ответами для Всероссийской олимпиады по праву 
Мы поможем в написании ваших работ! ЗНАЕТЕ ЛИ ВЫ?
Влияние общества на человека
Приготовление дезинфицирующих растворов различной концентрации Практические работы по географии для 6 класса Организация работы процедурного кабинета Изменения в неживой природе осенью Уборка процедурного кабинета Сольфеджио. Все правила по сольфеджио Балочные системы. Определение реакций опор и моментов защемления |
Tiling methods. (Wrapping/Mirroring/Clamping) ⇐ ПредыдущаяСтр 3 из 3
While it sometimes can be handy to set this in the texture itself, proper use of some simple material math can do this in the material editor, allowing for more flexibility to the artist.
Emitters
Bounds Especially when using GPU particles, be sure to set up a proper “bounds” so the particles do not pop out of view when the player is not looking at the source location of the emitter, nor have the emitter active when the player is not looking at the source location due to massive bounds. Less things rendered = always better.
Lod While setting up particle LOD’s is a pain in the butt when it comes to cascade, setting them up can significantly reduce the load as you can cull secondary or tertiary effects depending on distance. As you can also adjust spawn count (and basically any module) depending on its LOD, one could spawn less particles when an emitter is further away, yet make them slightly bigger so they are still noticed. Setting this up is painful, but can really help improve overall performance. If you are using lights, be sure to disable them in the LOD’s!
Detail Mode Bitmask (Click on emitter name module to access this) At what detail modes do you want a certain emitter to spawn its content? Let's say you have a secondary effect which looks great on Ultra quality settings, but would be overkill for medium spec users, in that case you might want to disable “Low”, and “Medium” so it does not get spawned when the Quality settings are “Medium” or lower. 3.4 Significance level (Click on emitter name module to access this) How significant is a specific emitter? Is it just tiny sparks? If you have to spawn your particle system many times, what aspects of the emitter should be disabled first to improve performance? In other words, what is the least significant to the effect? Critical: Always needs to be emitted High: emitted when significance level is low, medium, and high. The last to go. Medium: emitter when significance level is medium, and high. Low: The first not to be emitted when things on screen get hectic. Particle cutout (click on the required module) If you use a flipbook or sprite texture that does not fill most of the texture space, enabling this allows usage of a properly aligned rectangle or octagon to cut off any unneeded surface of the sprite, which can reduce overdraw of transparent particles quite a bit.
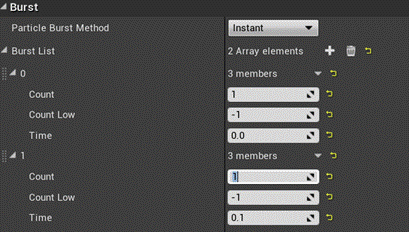
Draw Calls If you have two emitters that do the exact same thing, but are timed differently, why not combine them? Let's make a quick example: 2 emitters, Identical sprites, one bursts one emitter at birth, the other after 0.1 second. In that case you can just add a second burst in the spawn module.
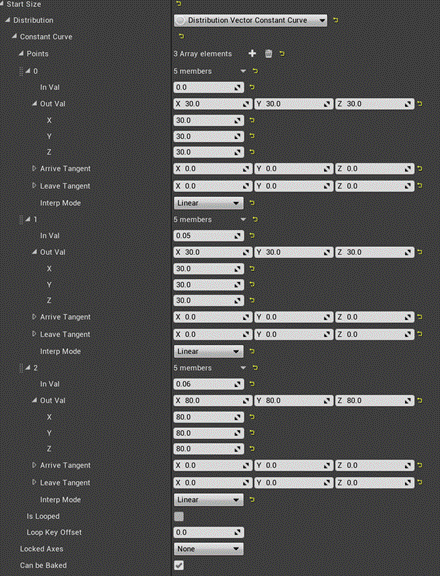
But what if this second sprite needs to be slightly bigger than the first one?
Now any particle spawned at birth will have size 30/30/30, and any particle spawned after 0.06 will have 80/80/80 for its size. This can be done for basically all “initial” modules, and when done with care allows for quite some flexibility and saving draw calls and amount of emitters in the long run. While it takes some work, when applied to a finalized effect, it can save some additional performance, so keep that in mind!
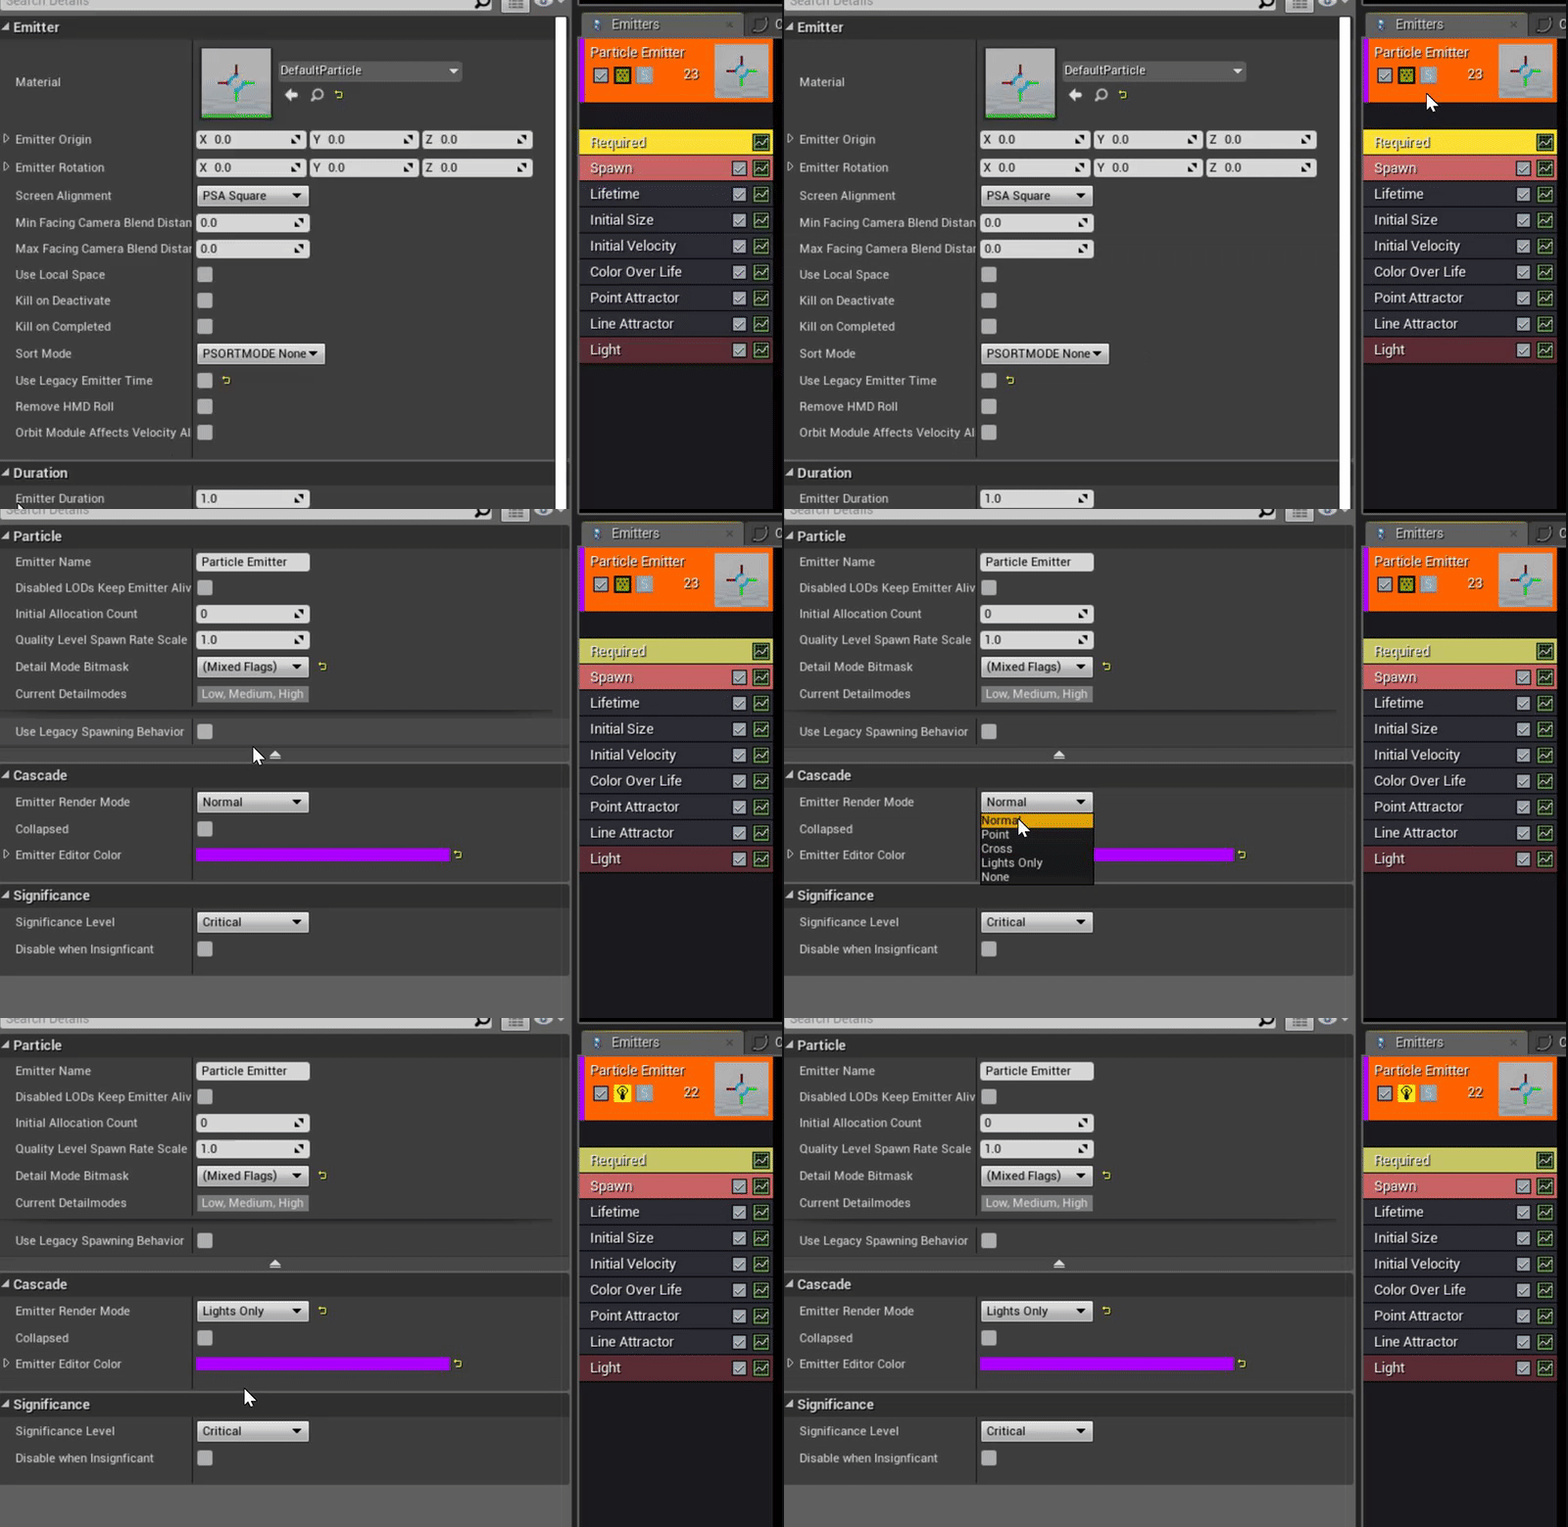
Lights Lights are expensive, I'd suggest to use a separate emitter for them. You can set a particle light its color directly in the light-module, and set the “emitter render mode” to “Lights only” so it does not need to use any materials at all.
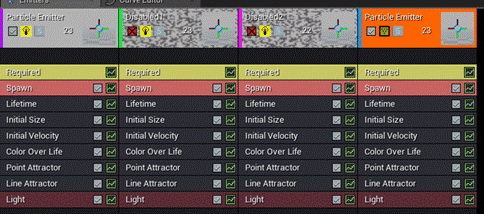
3.8 Disabled emitters.
Additionals
This tool is great when you have many master materials, each with static switches, as it will tell you which instances of these masters could be merged to reduce identical permutations and lowering resource sizes. If done well, this can save you hundreds of mb’s in various ways.
|
|||||
|
Последнее изменение этой страницы: 2020-12-19; просмотров: 59; Нарушение авторского права страницы; Мы поможем в написании вашей работы! infopedia.su Все материалы представленные на сайте исключительно с целью ознакомления читателями и не преследуют коммерческих целей или нарушение авторских прав. Обратная связь - 3.144.107.191 (0.01 с.) |

